Восстановление загрузчика grub в linux
Содержание:
- Method 4 To Rescue Grub
- grub rescue>
- No Such Partition Grub Rescue Windows 10 FAQ
- Guessing the boot partition number #
- Как удалить загрузчик Grub в UEFI
- Способ 1
- 3 — Configure and Set Active Partition
- Ярлыки
- Способ 1. Приоритет в загрузке
- Восстановление Grub2 без LiveCD
- When Error No Such Partition Grub Rescue Windows 10 Happens?
- To fix grub rescue go with following steps:
- Entering rescue mode
- Further Reading: Reasons for No Such Partition Grub Rescue Windows 10
- Такая ошибка есть на всех дистрибутивах?
- Восстановление с помощью LiveCD/USB
- 2 — Restore Boot Sector Code with Windows 10 Automatic Repair
- Search & Set
- Способ 3. Ремонт с помощью Boot Repair в Ubuntu
- Заключение
Method 4 To Rescue Grub
- Get Ubuntu live USB/DVD stick and boot into the live desktop.
- Connect to the Internet and then open your terminal.
- Install Boot Repair Tool by entering these commands –
sudo add-apt-repository -y ppa:yannubuntu/boot-repair
sudo apt-get update
sudo apt-get install -y boot-repair && boot-repair
Boot repair tool will appear. Select the recommended option and follow all steps exactly as it says. Your PC will be repaired and Nothing will be lost.
Remember, repair speed will vary according to your internet connection.
Pro Tips:-
If you are wondering where to get a Live USB stick, you can visit your friend and download Ubuntu iso and create a bootable USB stick with Rufus and bootable DVD using PowerISO.
You can visit a public place if you need WiFi. There are many places like Airports, Railway Stations, Hospitals offering open wifi. It only helps if you have a Laptop.
If your PC does not support booting from a USB stick and the DVD drive is toasted, you can use Plop boot manager to boot from a USB stick forcefully.
grub rescue>
The GRUB 2 rescue mode is a major enhancement to the GRUB bootloader. The presence of the grub rescue> prompt signifies that GRUB 2 has failed to find the grub folder, the grub.cfg file, and/or the associated modules. The rescue prompt is presented so the user can provide the path to the grub folder, load the necessary modules, and provide the proper boot commands.
A common reason for the grub rescue> prompt is an incorrect path to the grub folder. Reasons for the prompt also include a failure to update GRUB 2 after certain system or partition operations, improper designation of the grub folder location, missing linux or initrd.img symlinks in /, or a failed installation.
To successfully boot from the grub rescue> prompt:
-
The grub folder must exist and contain the necessary GRUB 2 files and modules.
-
The proper paths must be set via the set prefix command.
Many GRUB 2 commands will not work until the correct path is set. If the path to the grub folder (normally /boot/grub) is not correct, an unknown command or file not found message is likely.
- The necessary modules must be loaded.
The kernel cannot be loaded until the ‘linux’ module is loaded.
- A Linux kernel and initrd.img must be located and loaded.
Use the section to locate the correct partitions and file locations. Once the user has confirmed the paths and existence of the proper folders using the section, run the following commands:
|
1. set prefix=(hdX,Y)/boot/grub |
Use the values determined earlier. |
|
Example: If the Ubuntu system is on sda5, enter: set prefix=(hd0,5)/boot/grub |
|
|
2.* set root=(hdX,Y) |
Confirm the correct X,Y values and press ENTER. |
|
Example: If the Ubuntu system is on sda5, enter: set root=(hd0,5) |
|
|
3. insmod normal |
Load the normal module. |
|
If the module loads there will be no message. |
|
|
If the module fails to load, try the full path: insmod (hdX,Y)/boot/grub/normal.mod |
|
|
4. normal |
Transition to the normal GRUB 2 mode with increased functionality. |
|
If the module loads there will be no message. |
|
|
If the module loads, HELP, TAB completion and command recall using the UP/DN keys should be available. |
|
|
5. set |
(Optional) Review the current settings. |
|
6. insmod linux |
Load the linux module. An error message usually means the path is incorrect. |
|
7.* linux /vmlinuz root=/dev/sdXY ro |
Selects the latest kernel. |
|
Example: linux /vmlinuz root=/dev/sda5 ro |
|
|
If the vmlinuz symlink does not exist in /, use the full path to the kernel in /boot |
|
|
Example: linux /boot/vmlinuz-3.2.0-14-generic root=/dev/sda1 ro |
|
|
8. initrd /initrd.img |
Selects the latest initrd image. |
|
If the initrd symlink does not exist in /, use the full path to the initrd image in /boot |
|
|
If successful, after ENTER there will be a slight delay and no messages. |
|
|
9. boot |
Boot to the latest kernel on the selected partition. |
* Wubi users only — substitute these commands in Steps 2 and 7:
1.set root=(loop0)
2. linux /vmlinuz root=/dev/sdXY loop=/ubuntu/disks/root.disk ro
Some additional considerations:
-
The current prefix and root settings may be checked at any time with the set command. To remove a setting, use the unset command.
Example: unset prefix
-
Modules must be loaded before they can be used. If a module has not been loaded a unknown command error is displayed. If an incorrect path is specified, a file not found error message may be displayed.
-
The linux module must be loaded to be able to load both the kernel and the initrd image unless the normal module is loaded first.
-
If the modules cannot be found in the /boot/grub folder, the user may be able to load them from the /usr/lib/grub/i386-pc folder. The address if Ubuntu was installed on sda1 would be (hd0,1)/usr/lib/grub/i386-pc and the command would be:
insmod (hd0,1)/usr/lib/grub/i386-pc/normal.mod
Refer to the section if the system successfully boots.
No Such Partition Grub Rescue Windows 10 FAQ
How do I fix no such partition grub rescue?
- Rebuild MBR with MiniTool Partition Wizard
- Rebuild BCD Files with Windows 10 Automatic Repair
- Restore the Boot Sector Code with Windows 10 Automatic Repair
- Manually Configure the Active Partition
How do I fix grub after installing Windows 10?
There are two ways you can fix grub after installing Windows 10: Run Boot Repair and Reinstall GRUB. This post — Windows 10 deleted GRUB gives much information to you.
How do I get into grub rescue mode?
To know how to get into grub rescue mode, you can follow these steps in the wiki article – Recovery Mode.
How do I manually rebuild my BCD?
Open Command Prompt and use these commands: bootrec /fixmbr, bootrec /fixboot, bootrec /scanos and bootrec /rebuildbcd.
Guessing the boot partition number #
If you don’t memorize your partition table by heart like me, your first mission
is to guess the partition where your
directory is located.
There are three common scenarios.
-
Your boot partition is encrypted: If you fall into this category then
you’ve chosen the wrong guide. However, this blog
post
may be helpful for you. -
Your directory is located in the root partition: You’ll have to
find which partition is your root partition. It is usually recommended to use
filesystem for root partitions. A typical GNU/Linux directory
structure is explained in this
post. -
You have a separate boot partition: I installed my Arch Linux using
system encryption method. Hence, I have a separate boot partition that I
formatted using . , and are all
supported for the boot partition on modern
GNU/Linux distributions.
Filesystem of each partition
For each partition, we need to find out what filesystem is being used.
If the filesystem is unknown then we just ignore the partition.
I tried this same command with all partitions until I found out that my
partition is using . I don’t have any partition, but I guess that
GRUB is not very accurate and mistakes for .
At this stage, we need to find out where GRUB modules are located.
Add a to the last command to show the content of .
The GRUB modules directory
is the directory we’re trying to find.
Let’s list the content of to make sure it’s the right GRUB modules directory.
If your directory is located in the root partition, your GRUB modules
path is probably .
Как удалить загрузчик Grub в UEFI
Эта проблема тоже решается с помощью утилиты Bootice. Только на это раз вам нужна именно 64-битная версия программы.
Одно из преимуществ UEFI на MBR в том, что здесь можно устанавливать сразу несколько загрузчиков на специальный раздел. Для удаления загрузчика Grub и восстановления функциональности Windows достаточно переместить Grub чуть ниже в очереди загрузки UEFI.
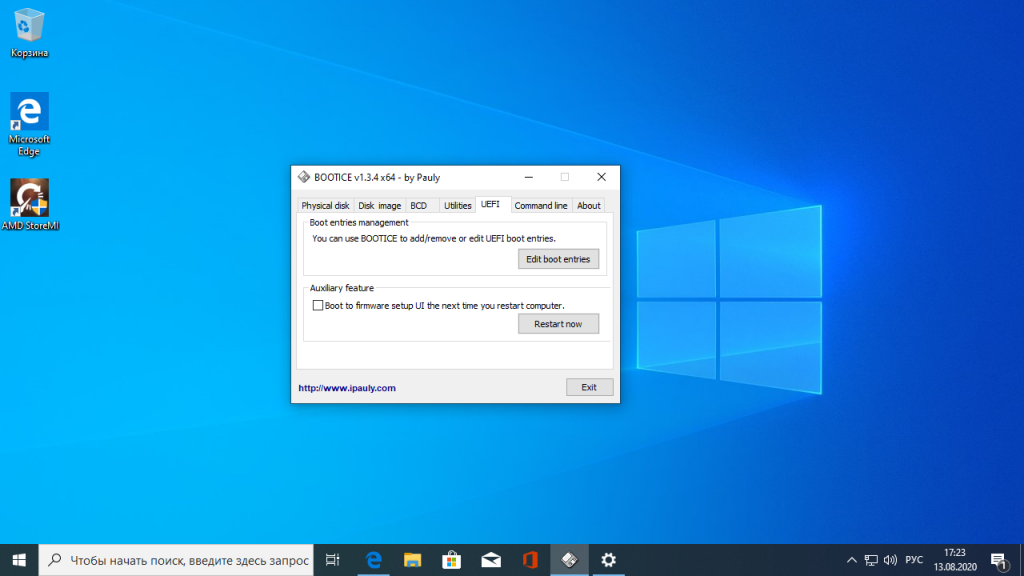
Откройте программу, перейдите на вкладку UEFI и нажмите Edit Boot Enteries. Откроется такое окно:

Здесь у вас есть два варианта действий. Либо опустить Grub ниже загрузчика Widnows кнопкой Down, либо полностью удалить запись о загрузчике кнопкой Del. Но в обоих случаях файлы загрузчика останутся на диске. Полностью удалить загрузчик Grub со всеми его файлами нужно из командной строки. Это немного сложный процесс, но всё же мы его разберём.
Кликните в левом нижнем углу экрана правой кнопкой мыши, в открывшемся контекстном меню выберите Командная строка от имени администратора.
Далее нам понадобится утилита diskpart, все действия мы выполним с помощью неё. Запустите её командой:
Затем смотрим доступные диски:
И выбираем наш единственный диск, на котором сейчас установлена Windows, а раньше была установлена Ubuntu:

После того, как был выбран диск, мы можем посмотреть список разделов на нём:

Среди этих разделов есть и раздел с файлами EFI, для обычной системы он скрыт, но не для этой утилиты. В нашем случае это Volume 2. Как правило, это небольшой раздел с файловой системой FAT32 и отмеченный как системный.
Мы выбрали этот раздел текущим с помощью команды:
Затем назначим ему букву, чтобы можно было с ним работать:
Утилиту можно закрывать. Дальше продолжаем выполнять действия в консоли. Сделать всё с помощью проводника вы не сможете, потому что нужны права администратора. Переходим на диск E:
Переходим в папку EFI:
Удаляем папку с файлами загрузчика Ubuntu:

Готово: удаление загрузчика Grub завершено, и теперь его файлов больше нет в системе.
Способ 1
Что делать в случае ошибки unknown filesystem grub-rescue? Перед вами окно, в котором можно использовать только 4 команды, их вполне достаточно, чтобы исправить все проблемы и успешно загрузиться:
- ls — позволяет вывести всё содержимое;
- set — применяется для установки переменных;
- unset — очищает переменную;
- insmod — необходима для загрузки модулей.
Также можно сделать доступным ряд других команд. Сделать их доступными можно, загрузив модуль «normal». Для этого пропишите:
После этого станут доступны:
- dump — для очистки памяти;
- exit — команда выхода из загрузчика;
- chainloader — необходима, чтобы указать последующей команде boot передать управление цепочечному загрузчику;
- kfreebsd — несколько команд, позволяющих загрузить ядро FreeBSD, его модули;
- rmmod — позволяет выгрузить указанный модуль ядра;
- multiboot.
Первым делом нужно отыскать модули, чтобы загрузить их. Для этого введите:
Результатом выполнения команды будет следующее:
Из этого можно сделать вывод, что загрузчик не может определить файловые системы дисков, поэтому определяет их как msdos. Теперь необходимо угадать видимые диски. В конкретном примере перед вами два диска: hd0 (с тремя разделами) и hd1 (с двумя разделами). Допустим, вы знаете, что Linux инсталлирован на диск, который имеет три раздела. В таком случае вам нужен диск с индексом «0».
GRUB даёт названия разделам в обратном порядке. В связи с этим, неясно как трактовать запись: «(hd0,msdos3)». Ведь можно посчитать это как первым разделом, так и третьим. К счастью, из этой ситуации можно выйти при помощи такого синтаксиса команды: «(hd0,1)»
Обратите внимание, что в программе-загрузчике GRUB отсчёт дисков идёт с 0, а разделов с 1
Допустим, что Линукс хранится в первом разделе, тогда он будет обозначаться (hd0,1). В этом случае команда, которую необходимо прописать, будет иметь вид:
Теперь модули могут быть загружены. Использовать их можно только после загрузки.
После того как вы выбрали нужный диск, проверьте содержится ли там то, что нужно. Для этого пропишите:
В результате выполнения на экране появится список md файлов.
Далее, пропишите:
После этого загрузчик будет переведён в режим полной функциональности. Затем автоматически будут найдены разделы с операционной системой, и откроется меню программы.
Теперь остаётся загрузить Linux. Делается это при помощи команды:
3 — Configure and Set Active Partition
A very common cause for error no such partition to show up is not having the correct partition set as active. The BIOS tries to start the boot loader up from the active partition, and the bootloader searches for its configuration data from the active partition as well. So if the active partition is corrupted or incorrectly set, the Error: no such partition. Grub rescue can happen.
Like rebuilding MBR demonstrated below, you have two ways to set system partition as active: one is using EaseUS partition management software, and the other is using Diskpart to manually input command lines to finish the job.
Method 1. Set Active Partition in One-click by Using EaseUS Partition Master
Step 1. Run EaseUS partition manager software. On the disk map, right-click the traget partition and choose «Advanced».
Step 2. Then, select «Set Active» from the drop-down menu. The software will automatically execute the operation and create an active partition for you.
Method 2. Mark System Partition as Active Using Diskpart
Step 1. Use diskpart from the command line to set the correct partition.
Step 2. Connect the Windows 10 bootable media to your computer (DVD or USB flash drive).
Step 3. Restart your computer to enter into Automatic Repair mode.
Step 4. Go to «Troubleshoot» > «Advanced Options» > «Command Prompt» to launch the CMD.
Step 5. Now, Type diskpart and hit the Enter. Type the following commands in order and hit enter afterward:
list disk: (this lists all hard drives in your computer)select disk n: (n means the disk where Windows 10 is installed. Here you can choose disk 0 or any other disk where Windows 10 is installed)list volume: (this list all volumes on system disk)select volume n: (n refers to the number of system partition)active: (it can mark the correct system partition active)
Type quit to exit Command Prompt. Restart your PC and check if this resolves the Windows 10 grub rescue error.
Ярлыки
ubuntu
FreeBSD
Ubuntu Server
Apache
PHP
Ubuntu 20.04
Mysql
Icinga2
PHP 7.0
Ubuntu 16.04
linux
FTP-сервер
FreeBSD 11
Icinga Web 2
Proftpd
SNMP
SVN
BIOS
Bind
LAMP
Lubuntu
NetBeans
PhpMyAdmin
SVN-сервер
Subversion
USVN
Ubuntu 18.04
VLAN
VirtualBox
Wordpress
netplan
network
pecl
Мониторинг
Установка
.tar.gz
7zip
ALTQ
AMD-V
Asus F80S
Bash
Bind tools
Chromium browser
DHCP Relay
DHCP Server
DNS-server
DNS-сервер
FDB-таблица
FTPS
FreeBSD memstick
GraphicsMagick
HTTPS
Huawei EC306
Icinga Director
Icinga2 SNMP
Icinga2 Update
Icinga2 добавление хостов
Icingaweb2
ImageMagick
Imagick
Intel-VT
LibreOffice
MRTG
ModemManager
Monitoring
MysqlDump
NTP-сервер
Named
PostgreSQL
RDP-server
RapidSVN
Ruby
SEO-сервис
SMPlayer
SNV-клмент
SSL
SVN Web-interface
Samba
TFTP-сервер
TSL
UltraISO
VLC
VLC remote
VirtualBox x64
VirtualHost
WIN32 Disk Imager
Webmin
Windows
Windows 7
ZIP
atftpd
bind9
bzip2
column
fdb
freebsd upgrade
freebsd-update
gmagick
grub
gzip
host
htaccess
ipfw
kernel
libfaudio0
libwebkitgtk-3.0
memcached
mod_dav
nslookup
php extension
portupgrade
pscp
route
scp
service
smb
snmp example
snmpwalk
sort
ssh
tar
telnet
template
tftpd-hpa
udev
usb-modeswitch
user roles
userdir
vdi
vino
vnc
wine
winehq
wp-emoji
xargs
xrdp
Архиватор
Информация о БД
Обновление портов
Обновление системы
Таблица MAC-адресов
большая нагрузка процессора
запись образа
контроль версий
обновление BIOS
передача файлов
полезные команды
проблемы с звуковой картой
резервное копирование
сервер времени
транслит
удаленное управление плэером
ядро
Способ 1. Приоритет в загрузке
Если у вас есть двойная загрузка систем Ubuntu и Windows, и вы получаете при загрузке файловую систему с ошибками, вы бы хотели перенести свои приоритеты одной из операционных систем. Вам необходимо запустить свой компьютер с Extranal Live CD или USB Ubuntu.
Как только вы запустите Ubuntu, вам нужно открыть терминал (Ctrl + Alt + t), для этого действия нужно быть root для доступа к корневым файлам:
Затем последовательно введите следующие команды:
После того, как это будет сделано, откроется окно восстановления при загрузке с двумя вариантами, выберите первый вариант (нужно быть терпеливым, потребуется время). Перезагрузите компьютер без компакт-диска или USB-накопителя и проверьте, не устранена ли проблема.
Если не помогло, тогда запустите снова живую ubuntu, откройте терминал и введите . Он снова отобразит окно, в котором нужно выбрать второй вариант. Дождитесь выполнения, перезагрузитесь и посмотрите, решилась ли проблема. Все должно запускаться.
Восстановление Grub2 без LiveCD
В некоторых случаях повреждения Grub не вызывает полную невозможность загрузки. Например, когда загрузочный код в MBR цел, но программа не может получить доступ к файлам на диске. Тогда загрузчик открывает вместо меню некое подобие терминала с сообщением: Minimal BASH like line editing is supported. С помощью этого терминала мы можем попытаться загрузить систему. Восстановление grub2 без LiveCD не такая уж и сложная задача, хотя, это сложнее, чем первый способ.
Все что вам потребуется — это знать на каком устройстве расположена система и само ядро Linux. Синтаксис и команды очень похожи на обычные команды bash, но немного отличаются по назначению. В начальном режиме восстановления доступны только несколько команд это ls, insmod, set и unset.
Чтобы посмотреть список подключенных к компьютеру дисков просто выполните:
Важно отметить, что в grub диски и разделы именуются немного по другому. Здесь каждый жесткий диск имеет название hd и номер диска, например, hd0 или hd1. Разделы именуются начиная с единицы
Разделы именуются начиная с единицы.
Вы можете работать только с одним разделом в определенный момент. Чтобы установить раздел, с которым нужно работать, нужно указать его в переменной root. Для установки переменных окружения используется команда set. Например, у если у меня файлы загрузчика grub находятся на /dev/sdc2, то получится hd2,2:
Загрузим нормальную оболочку grub:
После этого можно найти и запустить ядро. Для этого используйте команду linux. Обычно ядро находится папке /boot:
И наконец загружаемся:
Теперь, когда система загрузится, вам останется только открыть терминал, и выполнить следующие команды, чтобы завершить восстановление загрузчика linux mint:
Где sd* — имя вашего диска, на котором установлена система
Обратите внимание, что нужно именно имя диска, а не раздела, никакие цифры добавлять не надо. Вот и все
When Error No Such Partition Grub Rescue Windows 10 Happens?
Suppose that there are two systems, Windows 10 & Ubuntu and you may want to do some disk and partition operations to these two operating system partitions on the same hard disk; this is when the problem would occur. (Especially to Ubuntu OS partition)
1. Delete Ubuntu Partition
There are times when you don’t like such a system because you think the command line based system is too difficult to use. You then want to uninstall it in order to create a new partition. However, sometimes disk space is very limited, and then you would decide to delete such a partition to free up some disk space and expand other partitions.
2. Resize/Merge/Split Partition
When you manage your hard drive and do operations such as resize/merge/split Ubuntu partition, this issue may appear during the process when restarting computers.
3. Reinstall Ubuntu OS
Sometimes, you will reinstall the Ubuntu operating system for reasons including system breakdown, or system file damage.
4. Restore Ubuntu OS to the Old Version
After installing an update, some issues or errors will appear which leads to you choosing to restore Ubuntu OS to the old Version, for example, Ubuntu 8.X.
To fix grub rescue go with following steps:
First thing is we have to start our OS only then after we can fix grub.
#to start OS—>
error: unknown filesystem.
Entering rescue mode…
grub rescue>
When you see such an error first we have to check for “Filesystem” is ext2′
grub rescue> ls # type ‘ls’ and hit enter to see drive partition.
(hd0) (hd0,msdos6) (hd0,msdos5) (hd0,msdos4) … # you will see such things
this are our drives now we have to check which one is ext2.
go for another drives until you get “Filesystem is ext2”.
now set the path
Now just fix grub by following command on any Ubuntu
sudo grub-install /dev/sda
sudo apt-get update
# to update grub
sudo apt-get upgrade
make sure you must update grub after login into OS
Entering rescue mode
Итак, в случае проблем с загрузкой Ubuntu вы можете оказаться в режиме grub rescue.
Machine UUID...
Booting from Hard Disk...
error: no such partition.
Entering rescue mode...
grub rescue>
Это может символизировать как простую ошибку, которую легко исправить, так и серьезные проблемы. Рассказываю, что нужно делать в таком случае и как починить загрузку системы.
Первым делом запускаем команду ls и смотрим, какие разделы у нас доступны.
> ls
(hd0) (hd0,gpt3)
В моем случае доступен только один 3-й раздел, скорее всего корневой. Раздела /boot, который обычно 1-й или 2-й нет. Проверим это наверняка. Смотрим содержимое доступного раздела:
> ls (hd0,gpt3)/
По содержимому раздела видно, что это корневой. Самого раздела /boot, с которого должна начинаться загрузка ubuntu тут не видно. Если его никто специально не удалял и не затирал, то он пропал в результате какого-то сбоя или ошибки. Можно попробовать это исправить. Сделаем это отдельно ниже, а пока рассмотрим случай, когда boot раздел тут все же присутствует и имеет имя, к примеру, (hd0,gpt2). Тогда там же в консоли grub продолжаем.
> set prefix=(hd0,gpt2)/grub
> set root=(hd0,gpt2)
Далее загружаем некоторые модули. Какие будут нужны, точно не известно и зависит от типов разделов диска. Показываю самые популярные:
> insmod ext2
> insmod lvm
> insmod part_msdos
Можно для начала попробовать вообще без модулей, а потом добавлять по одному. В самом конце загружаем модуль normal.
> insmod normal
> normal
После этого у вас должно открыться стандартное меню загрузки Ubuntu. Если это так, то вам повезло. Дальше загрузится система. Вам нужно будет в нее зайти и далее перейти в раздел по восстановлению grub в этой статье. Получилось так, что у вас сам загрузочный раздел жив, но сбились его настройки, поэтому он сам не смог загрузить основную систему. Это не трудно исправить и ниже я показываю как.
Further Reading: Reasons for No Such Partition Grub Rescue Windows 10
You may ask me what the specific factors are causing such a problem on your computer. Here we will give a detailed analysis of this error to you.
1. Generally speaking, the most common reason for this error is a misconfigured boot loader file. While installing Ubuntu in Windows, a part of Grub lives in the Master Boot Record (MBR), and the other parts live in the Linux boot partition.
This means that although the Ubuntu partition is deleted, Grub is still in MBR. In addition, the active partition is not correctly set. As a result, you will receive the error of «no such partition grub rescue» during your Windows 10 operating system startup.
2. When resizing Ubuntu partition,UUID is modified, so that Grub can’t read the boot information.
3. When reinstalling Ubuntu system, you may install it to a new partition. Although the original partition has been formatted, you haven’t reinstalled Grub 2.
4. While restoring to Ubuntu 8.X, the Grub is version 1. So, Grub 2 is damaged.
Такая ошибка есть на всех дистрибутивах?
Из этих многочисленных дистрибутивов Linux Ubuntu, Mint, Fedora, openSUSE и Debian являются одними из самых популярных операционных систем.
Если мы посмотрим на статистику, Ubuntu, произносится как «oo-boon-too», является самой популярной операционной системой с открытым исходным кодом. Для большинства из нас Ubuntu была фаворитом, если говорить про операционную систему на базе Linux.
Поиск программного обеспечения с вашим интересом намного проще в Ubuntu Linux. Вам просто нужно открыть Ubuntu Software Center и найти все полезное программное обеспечение. Просто нажмите кнопку установки и пакет будет установлен. Кроме того, вы можете установить множество программ с несколькими простыми командами. Для базового использования Ubuntu поставляется с предустановленным множеством программ, таких как Gimp, Chromium, VLC и Firefox. Но самое удобное это то, что здесь все можно починить за несколько минут. О чем мы и поговорим в следующем способе.
Новые версии Ubuntu с последним ядром Linux. Это позволяет запускать большее количество старых аппаратных средств, а также новые системы с последними чипами. Ubuntu также поставляется со многими предустановленными драйверами, которые экономят время.
Восстановление с помощью LiveCD/USB
Первый способ
Запустите систему с LiveCD/USB и откройте терминал. Для этого можно нажать Alt + F2 и ввести команду:
Далее необходимо узнать Вашу таблицу разделов. Используйте команду:
На экран должна быть выведена примерно такая таблица:
Из таблицы видим, что Linux стоит (в нашем случае) на разделе /dev/sda1
Теперь подключим этот раздел в /mnt следующей командой (следим за пунктуацией, особенно, за пропусками между кодами):
Затем, для записи grub в MBR, вводите следующую команду:
В случае, если нужно только восстановить MBR диска (например, после переустановки Windows), то этого достаточно.
Если нужно обновить и меню grub (например, после установки Windows), то нужно сделать:
Восстановление используя chroot
Запустите систему с LiveCD/USB и откройте терминал. Для этого можно нажать Alt + F2 и ввести команду:
Далее необходимо узнать Вашу таблицу разделов. Используйте команду:
На экран должна быть выведена примерно такая таблица:
Теперь нужно примонтировать Ваш Linux раздел (здесь это sda1) и еще несколько важных директорий:
Теперь перейдем в окружающую среду chroot:
Теперь необходимо установить GRUB, используя команду:
Также в некоторых случаях может помочь вариант:
Если все прошло успешно, выходим из chroot командой:
Теперь необходимо отмонтировать разделы:
Если Вы монтировали раздел /boot воспользуйтесь командой:
Затем перезагрузим Ваш компьютер командой:
При необходимости Вы можете обновить меню загрузчика командой:
2 — Restore Boot Sector Code with Windows 10 Automatic Repair
Damaged boot sector code may cause the Windows 10 grub rescue error prompt. If rebuilding MBR can’t fix Windows 10 grub rescue issue, you should try to restore the boot sector code into consideration with the Windows repair option.
Step 1. Restart your PC a few times during the boot sequence.
Step 2. From the list of options, select «Troubleshoot» > «Advanced options» > «Startup Repair».
Step 3. The repair process will now start.
Step 4. After the repair process finishes, check if error no such partition is resolved.
You can also solve this problem by using a Windows bootable DVD or USB flash drive. To start restoring the boot sector code, follow the steps shown below:
Step 1. Connect your USB flash drive to your computer or insert Windows 10 DVD to your PC.
Step 2. Restart the computer to enter into Automatic Repair mode.
Step 3. Click «Troubleshoot» > «Advanced Options» > «Command Prompt» to open CMD.
Step 4. In the CMD window, type the following command and hit Enter afterward:
diskpartselect disk 0list volume
Step 5. Now, all volumes will be displayed here. In the Type column, you will find the «DVD-ROM» value, remember the drive letter of the Windows 10 bootable disc. Here we take the letter F as an example. Type the following command lines and hit Enter afterward:
ExitF:cd bootDir
Step 6. Next, you need to check if you have bootsect.exe files in the list. If so, enter the following command:
bootsect /nt60 SYS /mbrExitbootsect nt60 SYS mbr
Step 7. Exit the command prompt and restart your computer. Check if no such partition grub rescue error is resolved.
Search & Set
A great many boot problems are due to incorrect paths to required files. The GRUB 2 terminal, in either ‘failure’ mode, provides a robust ability to search hard drive(s) and partitions and to inspect their contents.
In order to boot successfully, the root, prefix, linux and initrd variables must be correct. The user must verify the paths and names of these items. If they are incorrect, use the commands below to find and fix them. GRUB 2 variable settings can be viewed with the set command.
In the following examples, X is a hard drive number; Y is a partition number. If a command example includes either of these replace them with the appropriate value.
How & Where to Search
In the graphic below, the text in red are commands to be entered by the user, and text in green is the output of the command on an operating system (i.e. what you would like to see if your Ubuntu installation is on sda1).
-
The first hard drive is . The first partition is 1. Thus sda1 becomes (hd0,1), sdb5 is (hd1,5).
-
Use the ls command in the follow manner
- «Tab completion» may work — enter part of the filename and press the TAB key.
|
Command |
Purpose |
|
ls |
Search the entire computer for devices and partitions: (hd0) (hd1) (hd0,1) (hd0,5) (hd1,1) |
|
ls / |
Search the root directory of the device designated as root (use the set command to check root). |
|
ls (hdX,Y) |
View information about a partition — format, size, UUID, etc. |
|
ls (hdX,Y)/ |
View the root contents of a partition. Use this command to look for the presence of vmlinuz and initrd.img symlinks |
|
ls (hdX,Y)/boot/ |
View the contents of a folder |
|
ls (hdX,Y)/boot/ |
Inspect the /boot folder. It should contain the actual kernel (linux-3.2…) and initrd image (initrd.img-3.2….) |
|
ls (hdX,Y)/boot/grub/ |
Inspect the /boot/grub folder. It should contain grub.cfg and many *.mod files. If looking for a specific file, include the name in the search to limit the number of returns. If available, the command set pager=1 will also limit returns to a single screen. |
|
What to Look For |
Where It Should Be (Default Installation) |
Specific / General Search Example |
|
grub.cfg |
(hdX,Y)/boot/grub/ or /boot/grub/ |
ls (hdX,Y)/boot/grub/grub.cfg or ls /boot/grub/ |
|
vmlinuz |
(hdX,Y)/ or |
ls (hdX,Y)/vmlinuz or ls /vmlinuz or ls / |
|
linux-3.2.0-14* |
(hdX,Y)/boot/ or /boot/ |
ls (hdX,Y)/boot/vmlinuz-3.2.0-14 |
|
initrd |
(hdX,Y)/ or |
ls (hdX,Y)/ or ls /initrd |
|
initrd.img-3.20-14 |
(hdX,Y)/ or /boot/ |
ls (hdX,Y)/boot/initrd.img-3.20-14 or ls (hdX,Y)/boot/ |
* Note: Use the full kernel name, including -generic, when searching or setting a kernel variable. Using the «TAB completion» technique may eliminate some typing and be more accurate if available.
Use the following commands to set these parameters (if incorrect). Substitute the correct value for X and Y. (Example: set root=(hdX,Y) becomes set root=(hd0,5) )
|
Task |
Command |
Notes |
|
Set the prefix |
set prefix=(hdX,Y)/boot/grub |
Use the actual location of the grub folder |
|
Set root |
set root=(hdX,Y) |
|
|
Set the kernel |
linux /vmlinuz root=/dev/sda1 ro |
Set the kernel if the symlink vmlinuz exists in / |
|
Set the kernel |
linux (hdX,Y)/boot/vmlinuz-3.0.2-14 root=/dev/sda1 ro |
Set the kernel itself |
|
Set the initrd image |
initrd /initrd.img |
Set the initrd image if the symlink exists in / |
|
Set the initrd image |
initrd (hdX,Y)/boot/initrd.img-3.0.2-14 |
Set the initrd image itself |
The commands which follow assume you have determined the proper parameters for prefix, root, linux, and initrd. Review the section of this page for guidance .
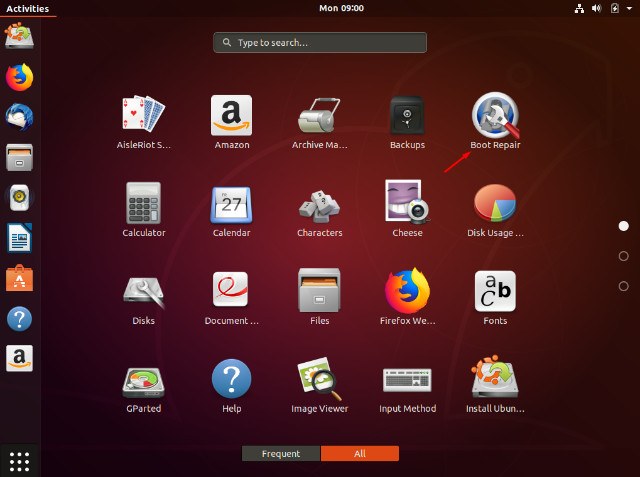
Способ 3. Ремонт с помощью Boot Repair в Ubuntu
Ошибка Grub Rescue Unknown Filesystem также исправляется с помощью этой утилиты.
Boot Repair — простой инструмент для восстановления частых проблем с загрузкой для Linux, Windows и других ОС. Он бесплатный, с открытым исходным кодом и простой в использовании (ремонт одним щелчком мыши).
Так как загрузчик не работает, следует запустить Ubuntu с Live CD или USB-карты. И далее, через терминал скачать эту утилиту для починки загрузчика.
Важно! Чтобы каждый раз не проводить эту операцию заново, Вам нужно будет восстановить загрузчик Grub. Как это делается я уже рассказывал, в предыдущей статье
Заключение
В целом, мы выполнили типовую процедуру восстановления загрузки любого linux сервера, в том числе ubuntu. Если бы раздел boot не получилось восстановить, его нужно было бы создать вручную и проделать все то же самое с восстановлением grub. Это ключевой элемент загрузки linux. Система перестает загружаться чаще всего из-за проблем с ним. Он может быть поврежден установкой рядом других систем или неправильной разбивкой диска.
Важно понимать, что если корневой раздел системы жив, то восстановление непосредственно загрузки — дело техники. Чаще все это все исправляется и система продолжает работать