Тривиальный протокол передачи файлов — trivial file transfer protocol
Содержание:
- TFTP Server Configuration
- How to Install TFTP Server on Windows Server 2012 R2
- Часто встречающиеся ошибки при настройке Filezilla Server
- Настройка и установка NFS в Fedora Core
- Allow TFTP Protocol in Windows 10 Firewall
- Остаточные настройки FTP-сервера
- Установка TFTP сервера на Windows Server 2012 R2
- TFTP Installation
- haneWin TFTP Server
- Как передавать файлы в сети TFTP
- The best macOS TFTP server
- Соображения безопасности
- Настройка и установка NFS в Ubuntu
- Install TFTP Client
- [edit] General
- Настройка брандмауэра
- Data structures
- Function list
- Troubleshooting
TFTP Server Configuration
Once you install the TFTP server, it will start running as a daemon and ready to receive and send files. By default the TFTP uses port 69. tftpd-hpa uses the directory “/srv/tftp” for uploading and downloading. To change that, you must edit the following configuration file:
netbeez.net$ cat /etc/default/tftpd-hpa
# /etc/default/tftpd-hpa
TFTP_USERNAME=»tftp»
TFTP_DIRECTORY=»/srv/tftp»
TFTP_ADDRESS=»0.0.0.0:69″
TFTP_OPTIONS=»—secure»
|
1 2 3 4 5 6 7 |
netbeez.net$catetcdefaulttftpd-hpa # /etc/default/tftpd-hpa TFTP_USERNAME=»tftp» TFTP_DIRECTORY=»/srv/tftp» TFTP_ADDRESS=»0.0.0.0:69″ TFTP_OPTIONS=»—secure» |
The “- -secure” option adds security to TFTP by limiting all transactions in the TFTP_DIRECTORY. In addition, files can be uploaded in “/srv/tftp” only if they already exist in that directory and are publicly writable. If you want to allow TFTP clients to upload new files in “/srv/tftp” then you need to add the “- -create” option like this: TFTP_OPTIONS=”- -secure – -create”. After you edit “/etc/default/tftpd-hpa”, restart the tftp server with “service tftpd-hpa restart”.
How to Install TFTP Server on Windows Server 2012 R2
All Windows Server version support the ability to run built-in TFTP server. Though there is no dedicated role or service of the TFTP server (don’t look for it in the FTP section of your IIS server), this feature, like in Windows Server 2003, is a part of Windows Deployments Services (WDS). TFTP service operates inside WDS process svchost.exe.
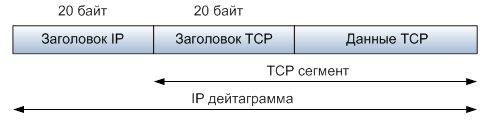
TFTP (Trivial File Transfer Protocol) is a simplified file transfer protocol offering an easy way to download and upload files. As a rule, TFTP is used in PXE boot systems (network boot, diskless workstations, etc.), import/export network equipment configurations and some other specific tasks. This protocol has no means of security, authentication or management. Its main advantage is easy client-side implementation and high performance when large files are transferred. The protocol uses UDP port 69.
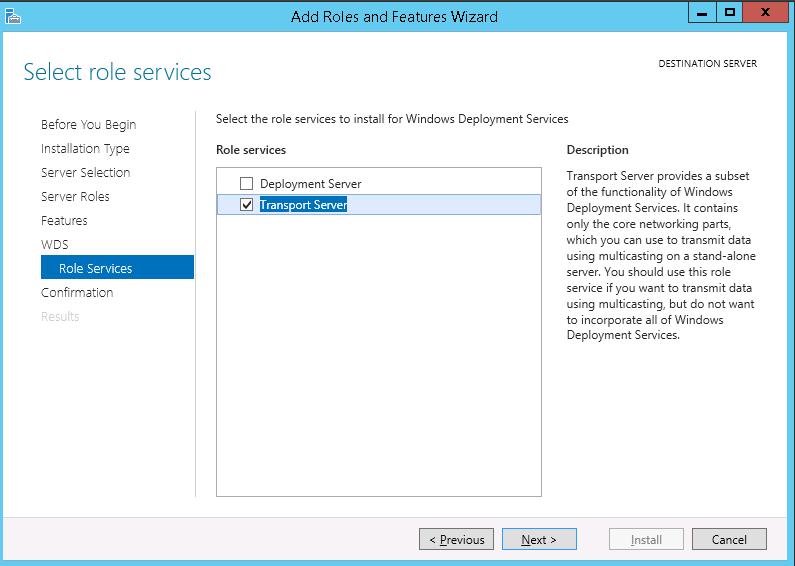
To install the TFTP service on Windows Server 2012 R2, start Server Manager and select Windows Deployment Services role using Add Roles and Features Wiazrd.

In the next step, select only Transport Server in the WDS role components and uncheck Deployment Server.
After the role is installed, create a directory, which is going to be a root directory of the TFTP server, for example, C:\tftp.
Then using the Registry Editor in HKLM\SYSTEM\CurrentControlSet\services\WDSServer\Providers\WDSTFTP create a new string parameter with the name RootFolder and value containing the path to the root directory created earlier.
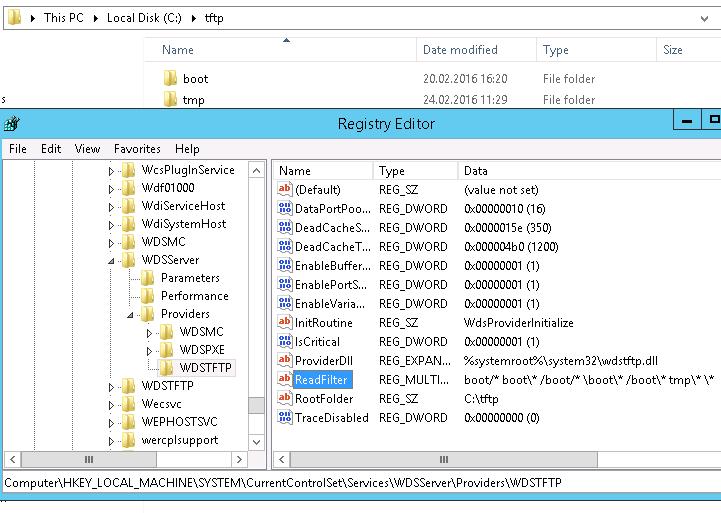
Pay attention to the value of ReadFilter parameter. By default, it allows downloading files only from \boot and \tmp directories. If you need an opportunity to download files from the root or other folders, change the ReadFilter value to \*.
Start WDS with the following command:
In Windows Firewall, a rule will appear, which allows the incoming traffic to UDP Port 69 (the service responds from any port higher than 1023). Some antiviruses can block Port 69 (McAffee Enterprise does so).
So you have configured your TFTP server.
To test the TFTP server, you’ll need the TFTP client. It can be installed using Server Manager, in which you select TFTP Client.

Let’s try to connect to the deployed TFTP server locally and download test.zip file.
You can download the file using this command:
tftp –i localhost GET tmp\test.zip C:\temp\test.zip
In theory, it should, but in practice I got the following error after running the last command:

When starting or restarting Windows Deployment Services Server, the following event from WDSTFTP service and EventID 259 appeared in the Application log:

We have considered how to deploy a TFTP server in Windows Server 2012 easily with no third-party tools. The features of this kind of a server will be crippled, so in more complicated installations the alternative TFTP server implementations are preferable, e. g., tftpd32.
Часто встречающиеся ошибки при настройке Filezilla Server
Не стоит забывать о том, что некоторые пользователи периодически допускают самые настоящие ошибки при работе с клиентом, среди которых чаще всего встречаются следующие неполадки:
- Утилита не подключается к хостингу – проверьте соединение.
- Выплывает ошибка при включении – посмотрите настройки плагина.
- Происходит обрыв соединения – неправильно прописан порт или домен.
- Останавливается загрузка файлов – некорректно введен адрес расположения объекта на устройстве.
Помимо всего прочего, появление неполадок можно связывать с достаточно низкой скоростью соединения с сетью, что также весьма негативно влияет на корректность работы всего приложения.
На сегодняшний день все пользователи могут самостоятельно создавать удаленные сервера с регулярным доступом к сети. В этом нет существенных трудностей, если предварительно прочитать и ознакомиться с параметрами, которые нужно подвергнуть корректировке после включения всего необходимого. Впоследствии, все это позволит вам максимально безопасно хранить личные данные, а кроме того способ защиты устройства от хакерских атак, вирусов и вредоносного программного обеспечения.
Настройка и установка NFS в Fedora Core
1) Установка пакета
2) Настройка конфигурации В этом файле содержится описание директорий, которые будут доступны для монтирования по NFS:
Пример записи в файле »/etc/exports», позволяющий монтировать директорию с файловой системой для Embedded Linux:
rw — возможность чтения и записи содержимого директории no_root_squash — доступ к файлам с правами суперпользователя (root) no_all_squash — сохранение uids и gids пользователя файлам sync — NFS отвечает на запросы лишь после модификации файлов
3) Запуск службы NFS
Должны появится следующие надписи:
В случае, если NFS запускается в первый раз, то вместо «service nfs restart» необходимо написать «service nfs start». Процедуру «restart» необходимо выполянть каждый раз, когда вы меняете записи в »/etc/exports».
4) Проверка NFS Чтобы убедиться, что директории экспортированы, надо выполнить команду:
Если какие-либо директории из файла »/etc/exports» отсутствуют, то проверьте конфигурацию в файле.
5) Включение службы NFS
После выполнения этой команды NFS сервер будет стартовать автоматически для уровней выполнения 3, 4 и 5.
Allow TFTP Protocol in Windows 10 Firewall
Let’s assume you use multiple tools and programs which use the TFTP protocol. It is not advisable to follow the earlier step and add each program in the firewall. Instead of that, we can add the common TFTP protocol which usually used in all the TFTP programs.
TFTP uses port 69. We will simply enable this port in incoming and outgoing traffic.
12) In the usual Windows defender firewall settings page, click on ‘Advanced Settings.’
13) In the ‘Inbound Rules’ create a new rule.
14) Select ‘Port’ and enter 69 as TCP port.
15) Make sure that ‘Allow the connection’ is selected on the next screen, select all 3 network types.
16) Give a name to the rule and press OK.
17) Make sure it is enabled and listed in ‘Inbound Rules’.
18) Repeat the same steps in ‘Outbound Rules’
With these above steps, your client Windows 10 PC is ready to use the TFTP client.
Остаточные настройки FTP-сервера
Если вы не хотите часто сталкиваться с ошибкой типа «Не подключается», необходимо внести также остаточные настройки, которые помогут избежать некоторого ряда сбоев и проблем при работе, а именно:
- первым делом вы выставляете лимит по скорости для включения;
- также вам следует активировать режим для сжатия файлов;
- для активации безопасного соединения, потребуется включить протоколы SSL и TLS, а кроме того прописать путь к закрытому ключу;
- дополнительно, здесь вы можете подключить блокировку для юзеров, которые совершают n-ную попытку включения, но не могут подключиться к ресурсу по некоторым обстоятельствам.
На практике, включение всех этих дополнительных опций не является обязательным, однако, позволит вам существенным образом дополнить работу проекта, а кроме того ограничить трафик посещения и нежелательных гостей.
Установка TFTP сервера на Windows Server 2012 R2
Линейка продуктов Windows Server с незапамятных времен поддерживает возможность организации TFTP сервера. Хотя выделенная роль и служба TFTP сервера отсутствует (не стоит искать ее в разделе FTP сервера), этот функционал, как и в Windows Server 2003, является частью Windows Deployments Services (WDS). TFTP сервис функционирует внутри процесса svchost.exe службы WDS.
Протокол TFTP (Trivial File Transfer Protocol) упрощенный протокол передачи файлов, обеспечивающей простую возможность скачки и закачки файлов. Как правило, TFTP используется для организации систем загрузки по PXE (сетевая загрузка, бездисковые рабочие станции и пр.), загрузки/выгрузки конфигурации сетевого оборудования и ряда других специфичных задач. В проколе отсутствуют средства защиты, аутентификации и управления. Основное его преимущество – простота реализации клиентской части и высокая производительность при передачи файлов большого объема. Протокол работает по порту 69 UDP.
Чтобы установить службу TFTP на Windows Server 2012 R2, откройте консоль Server Manager и с помощью мастера Add Roles and Features Wiazrd выберите роль Windows Deployment Services (Службы развертывания Windows).
TransportServerТранспортный сервер),
C:\tftp
Затем с помощью редактора реестра в ветке HKLM\SYSTEM\CurrentControlSet\services\WDSServer\Providers\WDSTFTP создадим новый строковый (String) параметр с именем RootFolder, и значением, содержащим путь к корневому каталогу TFTP, созданному ранее.
ReadFilter\*
Запустим службу WDS с помощью команды
Совет. Для автоматического запуска службы нужно изменить тип загрузки службы Windows Deployment Services на Auto с помощью оснастки services.msc или из командой строки PowerShell с помощью командлета Set-Service:
В брандмауэре Windows должно появится правило, разрешающее входящий трафик на порт UDP 69 (отвечает служба с произвольного номера порта выше 1023). Некоторые антивирусу могут блокировать порт 69 (в этом был замечен McAffee Enterprise)
На этом настройка TFTP сервера завершена.
Чтобы протестировать работу TFTP сервера, нам понадобится клиент TFTP. Установить его можно с помощью Server Manager, выбрав компонент TFTP Client.
Скачать файл можно при помощи команды
tftp –i localhost GET tmp\test.zip C:\temp\test.zip
Результатом выполнения такой команды будет сохранённый файл c:\temp\test.zip, скачанный с локального сервера.
Это все в теории, а на практике после выполнения последней команды у меня появилась ошибка:
WDSTFTP259
The root folder for the Windows Deployment TFTP server is not configured.Error Information: 0x2
TFTP Installation
There are a few implementations of TFPT. You can search Debian repositories for TFTP packages by using the following command:
netbeez.net$ apt-cache search tftp
tftp — Trivial file transfer protocol client
tftp-hpa — HPA’s tftp client
tftp-hpa-dbg — HPA’s tftp (debug)
tftpd — Trivial file transfer protocol server
tftpd-hpa — HPA’s tftp server
|
1 2 3 4 5 6 |
netbeez.net$apt-cache search tftp tftp-Trivial file transfer protocol client tftp-hpa-HPA’s tftp client tftp-hpa-dbg — HPA’stftp(debug) tftpd-Trivial file transfer protocol server tftpd-hpa-HPA’stftp server |
This may give a long list, but you can easily identify the ones that are actual TFTP packages.
You can install the TFTP server with:
netbeez.net$ apt-get install tftpd-hpa
| 1 | netbeez.net$apt-get install tftpd-hpa |
If you are on Windows or MAC OS, you can find online TFTP clients or servers for your machine.
haneWin TFTP Server

haneWin TFTP Server is a shareware offering for Windows. It supports both current and legacy Windows versions ranging from XP to Windows 10, and it can run as a service in the background on Windows 95/98/2000 without a user account logged in.
Data security options provided by haneWin include profiles based on the operation requested, IP address, and the file directories used by the server.
You can configure the server to transfer data through a range of UDP ports depending on your firewall settings and network traffic.
The client that comes with haneWin’s TFTP server is a Win32 console app that implements TFTP configurations in its command line options. For instance, you can set up a pipeline that will direct file transfers to other applications.
Как передавать файлы в сети TFTP
После установки клиента и перенаправления порта перейдем к передаче файлов. Убедитесь, что сервер запущен, затем следуйте инструкциям:
Нажмите Win + R, в диалоговом окне наберите cmd для вызова командной строки. Перенесите или скопируйте файлы, которые хотите передать, в корневой каталог сервера.
Для отправки файлов нужно использовать параметр PUT, при получении GET. Синтаксис команды выглядит следующим образом:
Например, для передачи используйте команду:
Если хотите получить файл, то команда будет выглядеть:
Если хотите переслать на удаленное устройство за пределами сети, нужно указать публичный IP-адрес в командной строке, а затем порт. Примером может быть:
The best macOS TFTP server
1. macOS TFTP server
macOS has a built-in TFTP server that won’t be loaded by default. The easiest way to get it running is to simply type:
Then, provide your password when prompted. You can use something like netstat to confirm it is running:
$ netstat -n | grep *.69
 udp4 0 .69 .*
 udp6 0 .69 .*
The TFTP server is now running on port 69 waiting for connections. You can use any TFTP client to connect to the server and upload or download files. To shut down the TFTP server, simply use the command:
Pros:
- Already part of the macOS, just needs to be loaded
- Easy setup, only takes a minute or two
- Runs incredibly lean, using few resources
Cons:
Configuration options might be difficult to find
Key Features:
- Native to Macs’ operating system
- Command line
- Free TFTP server for macOS
Соображения безопасности
TFTP не включает механизмов входа в систему или контроля доступа
Необходимо соблюдать осторожность при использовании TFTP для передачи файлов, когда требуются аутентификация, контроль доступа, конфиденциальность или проверка целостности
Обратите внимание, что эти службы безопасности могут быть предоставлены выше или ниже уровня, на котором работает TFTP
Также необходимо проявлять осторожность в правах, предоставляемых процессу сервера TFTP, чтобы не нарушать безопасность файловой системы сервера. TFTP часто устанавливается с такими элементами управления, что только файлы с общедоступным доступом для чтения доступны через TFTP
Также обычно запрещены перечисление, удаление, переименование и запись файлов через TFTP. Передача файлов по TFTP не рекомендуется, если присущие протоколу ограничения могут вызвать непреодолимую ответственность.
TFTP часто устанавливается с такими элементами управления, что только файлы с общедоступным доступом для чтения доступны через TFTP. Также обычно запрещены перечисление, удаление, переименование и запись файлов через TFTP. Передача файлов по TFTP не рекомендуется, если присущие протоколу ограничения могут вызвать непреодолимую ответственность.
Настройка и установка NFS в Ubuntu
Настраиваем, какие именно директории мы хотим открыть для совместного пользования и кому. Все это делается в файле /etc/exports:
В приведенном ниже примере я выделил директорию /data (директория с данными на сервере) в совместное пользование всем компьютерам с правами чтения и записи:
домашняя директория пользователя serhiy стала доступной в режиме только чтение для компьютера с IP 192.168.1.34. Все остальные компьютеры сети к этому разделу доступа не имеют.
ro — права только на чтение. Можно и не указывать, так как она установлена по умолчанию.
rw — дает клиентам право на запись.
no_root_squash — по умолчанию пользователь root на клиентской машине не будет иметь доступа к разделяемой директории сервера. Этой опцией мы снимаем это ограничение. В целях безопасности этого лучше не делать.
noaccess — запрещает доступ к указанной директории. Может быть полезной, если перед этим вы задали доступ всем пользователям сети к определенной директории, и теперь хотите ограничить доступ в поддиректории лишь некоторым пользователям.
Теперь нужно перезапустить nfs-kernel-server:
Если после этого вы захотите поменять что-нибудь в файле /etc/exports, то для того, чтобы изменения вступили в силу, достаточно запустить следующую команду:
Источник
Install TFTP Client
At this point, the TFTP server is installed and configured.
Now, you will need to install a TFTP Client on the Client computer.
You can install the TFTP Client on the client computer by following the below steps:
1. Click on the Start Menu and click on Control Panel.
2. Click on the Programs and Features => Turn Windows features on or off. This will open the Windows Features dialog box.
3. Scroll down until you see the TFTP Client check box and CHECK it as shown below:
4. Click on the OK button to start the installation process of the TFTP client.
This process will take some time to finish the installation. Once you are finished, you can proceed to the next step.
[edit] General
This article describes how to do an initial flash or a TFTP recovery flash for your device.
- Unplug the router, get a for the PC, and connect it via network cable to a router LAN port
- Set a fixed IP address on the PC with the same network as your router, e.g. Router: 192.168.1.1, PC: 192.168.1.2
- Setup the TFTP client, then start a continuous ping (-t switch is needed for this in Windows) to the router
- Plug in the router and start the TFTP client as soon as there is a TTL=100 ping response. The client should show transfer.
- TTL=64 means application code has been reached. If the router isn’t responding, it is soft-bricked (use OEM firmware)
- Read about timing problems below:
Special Asus TFTP Flashing Procedures
Some routers like the Asus WL-500xx series (WL-500G, WL-500G Premium, WL-500W, WL-500G Deluxe), need additional steps to perform a complete and proper initial flash. See this wiki page: Asus TFTP Flash
Special for Vista, Win7 and Win 2008
In order to catch the narrow window for TFTP flash, you should use platforms with simple TCP/IP implementations that don’t have CTCP implemented: Windows XP or Linux are reported to work, but some have reported significant problems with Vista, Windows 7 or Windows 2008.
For more information see this posting
Edit: While some may have reported problems, CTCP is definitely not the issue, because it is disabled by default in Windows Vista and Windows 7. So unless people are specifically turning it on, it isn’t running. I personally just used TFTP on my router with no difficulties, although mine is a Netgear WNDR3700 that was waiting for a TFTP flash and didn’t have this race condition at boot as some of these routers seem to. But again, even if you have an issue it’s not CTCP. Check out the wikipedia article on CTCP for information on how to check if it is running and how to disable it (both are simple command line entries).
If having issues, try connecting a separate network switch between the PC and router, so the PC network port sees a connection before the router port is up. This should allow for a faster ping reply. Then follow the instructions as normal.
Special for Linksys WRT54GL Users
If the router seems to be bricked so that the power light is constantly blinking and pinging the router results in TLL=100 continuously, then there is still a great chance that tftp can help.
Firstly you must flash the router with the original firmware available at Linksys homepage www.linksys.com, since flashing it with DD-WRT probably won’t give any result at all. Then do a 30/30/30 and after that you can flash with DD-WRT Mini. The initial flashing can be done with only the mini version, perhaps later you can move on to bigger versions of it.
Настройка брандмауэра
После установки клиента нужно либо отключить Брандмауэр Windows, либо добавить исключение для соединений TFTP.
- Откройте панель управления, измените просмотр на крупные значки и выберите Брандмауэр Windows.
- С левой стороны нажмите на кнопку «Включение или выключение брандмауэра Windows».
Переключите флажки в двух секциях в положение «Отключить». - Если не хотите полностью отключать эту функцию защиты, можно добавить исключение для соединений TFTP. Для этого вернитесь в предыдущее окно и выберите «Разрешить запуск программы или компонента через брандмауэр».
- Нажмите на кнопку «Разрешить другую программу», затем на «Обзор». Найдите и добавьте исполняющий файл TFTP.exe, который находится в каталоге Windows\System32.
- Установите флажки в полях «частная» и «публичные» и нажмите на ОК.
Data structures
Error pack
All error packages are predefined globals which are ready to use given the address info and fd required to send.
typedef struct
{
    uint16_t opcode;
    uint16_t error_code;
    char message;
    size_t size;
} error_pack;
Client value
Client value is the value out of the (key, value) pair in the client pool dictionary. The key being the address.
typedef struct
{
    FILE* file_fd;
    char buffer;
    size_t buffer_size;
    uint16_t block_number;
    uint16_t resends;
    mode md;
    char temp_char;
    time_t last_action;
} client_value;
Server info
Server info holds various variables for receiving and sending and is mostly to avoid bloated parameter list.
typedef struct
{
    int32_t fd;
    sockaddr_in address;
    sockaddr_in received_from;
    char input;
} server_info;
Function list
int32_t main(int32_t argc, char **argv);
void int_handler(int32_t signal);
void exit_error(const char* str);
void start_server(server_info* server, char** argv);
void init_server(const char* port, server_info* server);
uint16_t convert_port(const char* port_string);
bool some_waiting(server_info* server);
gboolean timed_out(gpointer key, gpointer value, gpointer user_data);
guint client_hash(const void* key);
gboolean client_equals(const void* lhs, const void* rhs);
sockaddr_in* sockaddr_cpy(sockaddr_in* src);
void socket_listener(server_info* server);
void ip_message(sockaddr_in* client, bool greeting);
void send_error(server_info* server, error_code err);
void start_new_transfer(GHashTable* clients, server_info* server, char* root);
void continue_existing_transfer(GHashTable* clients, server_info* server);
void read_to_buffer(client_value* client);
size_t construct_full_path(char* dest, const char* root, const char* file_name);
int32_t get_mode(char* str);
void destroy_value(gpointer data);
client_value* init_client(mode m);
Troubleshooting
TFTP file transfer doesn’t work from local computer
- Check if your TFTP server is running and listening
- Check if TFTP folder is set up correctly (location, access rights)
- Check if firmware file is set up correctly (location, access rights)
TFTP file transfer works from local computer, but not from another computer:
- Check if network cable is connected properly
- Check if server IP is set correctly
- Make sure server firewall allows inbound TFTP on UDP port 69
TFTP file transfer works from another computer, but not from router:
- Check if server IP is set correctly (same as router is searching for)
- Try using alternate cable, a crossover cable or alternate switch/speed
- Try connecting to an alternate port on the router / routers switch
- Pay attention to any output or verbosity from the router console or led activity if available
- Verify the arp cache on either host… server side is easier…
- Use arp -s to add a static mapping or arp -d to delete stale entries…
- Use a third host to simply ping the router, both with static addresses if possible
- Try an alternate server software, client software or TFTP transfer mode
- If you get some activity, timing can often yield results, power cycle the router and start the transfer earlier or later…