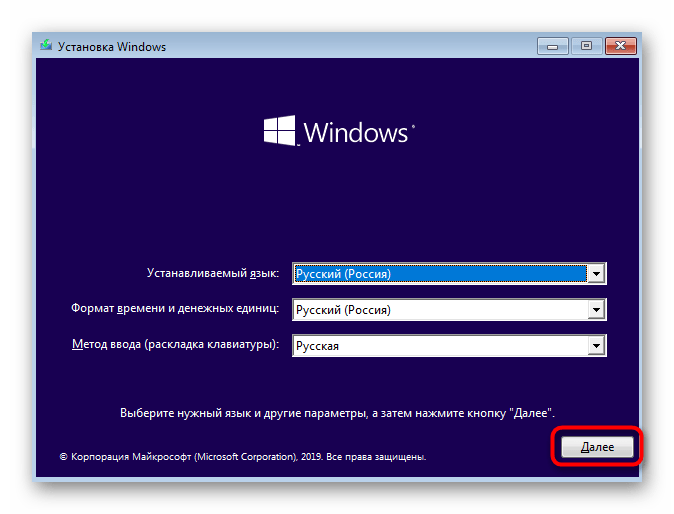
Как создать загрузочный efi-раздел windows на gpt-диске вручную
Содержание:
- Better partition&disk management tool for Windows 10/8/7
- More Information
- diskpart in Windows 10
- What Is Diskpart
- How to Format Hard Drive Using Command Prompts?
- Conclusion
- Creating primary partition using fdisk
- Разметка чистого жёсткого диска с созданием загрузочного и системного разделов с помощью утилиты Diskpart GUI Micro на Live-диске от Sergei Strelec
- Partition hard drive with Diskpart under Windows PE
- diskpart in Windows 8
- 102 виндат на “установка windows 7 с флешки через командную строку”
- Diskpart in Windows 7
- Как создать разделы и отформатировать стертый диск?
- Изменение разделов диска.
- Windows 10 Diskpart Extend Volume
- Method 2: initialize a disk with AOMEI Partition Asssitant GUI
- Создание конфигурации разделов для разметки GPT
- Method 3: initialize disk with AOMEI Partition Assistant command-line
Better partition&disk management tool for Windows 10/8/7
Fortunately, the third-party disk partition software — AOMEI Partition Assistant Professional allows you to extend partition whether or not there is unallocated space next to the partition you plan to extend. What’s more, you can even enlarge partition without unallocated space on hard drive. The following will show you 2 methods to extend partition with Partition Assistant.
Method 1: Extend partition when there is non-contiguous unallocated space
Before you do:
You can merge one or more parts of unallocated space into a partition.
«System Reserved» partition could not be merged.
If there is running applications in the partition you are going to operate, AOMEI Partition Assistant will suggest you to close them or perform the operation under PreOS Mode.
If there is no unallocated space on the disk, please go to Method 2.
Step1. Install AOMEI Partition Assistant Professional and launch it. Right-click on the partition you need to extend (e.g. D Drive) and choose Merge Partitions.
Step2. Tick the checkbox before the unallocated space and then click OK.
Step3. Now you can preview the unallocated space that has been added into C drive. To save the change, please click Apply button at the top left corner.
Method 2: Extend partition when there is no unallocated space
Before you do:
-
If there are four primary partitions on a MBR disk, and you want to split one of them, the partition that is being split will be converted to logical partition automatically.
-
If one disk has four primary partitions, the program would not allow you to split the system partition or boot partition, unless you could convert one of other partitions from primary to logical partition, and then the program will allow you to split system partition. The new generated partition will be automatically set as logical partition.
Step1. Open this software, right-click a partition that has enough space (here is D partition), and then choose Allocate Free Space.
Step2. Enter the size of free space you would like to add into another partition (here is C drive), and then click OK.
Step3. Now you can preview that some free space has been allocated to C drive from D partition. Click Apply to save the changes. Then you will extend partition C.
☞ Note: When the free space of C drive is inadequate, you can also choose to run Disk Cleanup on it, move installed applications from it to another drive, and so on.
More Information
Support Links
-
Easy Recovery Essentials for Windows – our repair and recovery disk.
It’s an easy-to-use and automated diagnostics disk. It’s available for Windows 8, Windows 7 and Windows Vista. It’s also available for Windows XP and Windows Server.Read more at Windows Recovery Disks.
Applicable Systems
This Windows-related knowledgebase article applies to the following operating systems:
- Windows XP (all editions)
- Windows Vista (all editions)
- Windows 7 (all editions)
- Windows 8 (all editions)
- Windows 8.1 (all editions)
- Windows 10 (all editions)
- Windows Server 2003 (all editions)
- Windows Server 2008 (all editions)
- Windows Server 2012 (all editions)
diskpart in Windows 10
If you can boot into Windows 10
If you can boot into your Windows 10 system, you simply need to open Command Prompt to access diskpart. To do so, follow these steps:
- Boot into Windows 10
- Press the Windows key and C to open the charm bar
- Type
- Click Command Prompt
- When Command Prompt opens, type
- Press Enter
For the full list of diskpart commands and paremeters, go to .
If you can’t boot into Windows 10
If you can’t boot into your Windows 10, you have these options available:
- Use the original DVD or USB with Windows 10 to access the Repair your computer option
- Boot into the System Recovery Options with Shift and F8
- Use Easy Recovery Essentials to launch Command Line
If you have the installation disc:
If you can’t boot, but you have the installation disc, follow these steps:
- Insert the Windows 10 or USB
- Restart the computer
- Press any key to boot from the media
- Click Repair your computer or press R
- Select Troubleshoot
- Select Command Prompt
- Type
- Press Enter
For the full list of diskpart commands and paremeters, go to .
If you don’t have the installation disc:
If you don’t have the installation disc, you can boot into System Recovery Options or use Easy Recovery Essentials.
To access diskpart without an official Windows 10 media, follow these steps:
- Reboot the system
- Press Shift and F8 very quickly
- At Choose an option, select Troubleshoot
- Select Command Prompt
- Type
- Press Enter
For the full list of diskpart commands and paremeters, go to .
If you use Easy Recovery Essentials:
Easy Recovery Essentials can run from any CD, DVD or USB flash drives.
To access diskpart using Easy Recovery Essentials, follow these steps:
- Download Easy Recovery Essentials
- Burn the ISO Image. Follow our instructions on how to burn a bootable ISO image. If you’d like to have a recovery USB instead, follow our instructions on how to make a recovery USB.
- Boot Easy Recovery Essentials from the CD, DVD or USB
- Select Launch Command Line
What Is Diskpart
DiskPart is a command-line disk partition management tool built-in all Windows versions, such as Windows 10, Windows 8, Windows 7, which replaces its predecessor, FDISK. See: Alternative to FDISK Format Tool — MiniTool Partition Wizard.
This utility enables users to perform many disk and partition operations. You can use it to view, create, delete, and resize the computer’s disk partitions. Diskpart supports the use of scripts to automate its usage.
How to Open Diskpart
Some users may ask: how can I open the diskpart window? Well, don’t worry about that. Here are 3 ways to access diskpart.
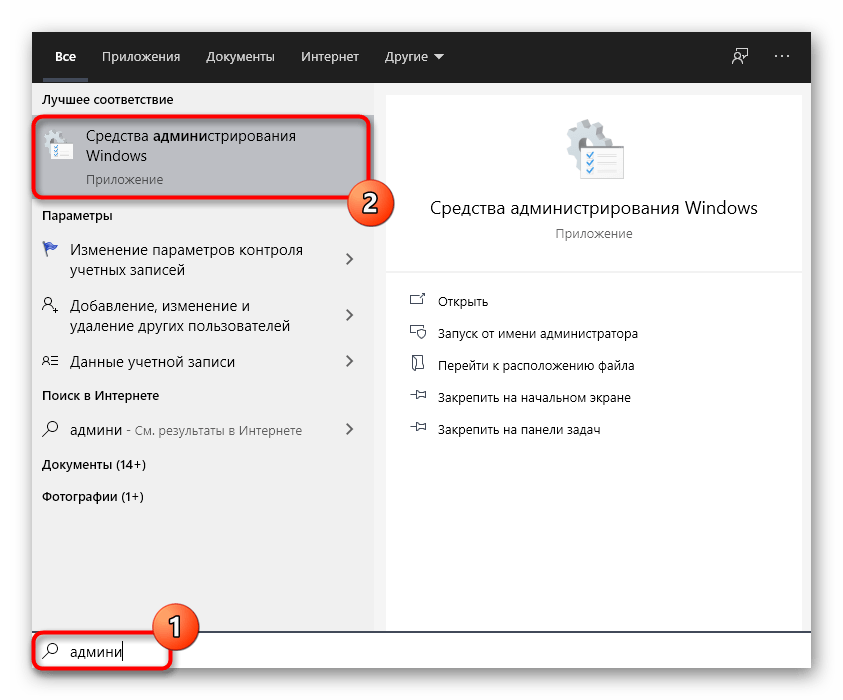
- Type diskpart in the Windows 10 Cortana search box, and then right-click the best match diskpart in the search results to select Run as administrator. Then Diskpart command window will show up.
- Press Windows keyand R at the same time OR right-click the Windows Start menu to choose Run, and then type diskpart in the pop-up Run
- Type cmd in the Runbox and press the Enter key to launch the Command Prompt. Then in the command prompt window, type diskpart and press the Enter key again. The command prompt will launch the diskpart utility in a new window.
This is how to diskpart in three different ways. Next I will show you how to create new partition diskpart in Windows 10.
How to Format Hard Drive Using Command Prompts?
While formatting a hard drive, you can clean both storage media- internal as well as external. But before beginning the formatting, you need to complete the cleaning of the drive first. The steps are the same as explained above. Once the disk cleaning is successful; you can continue with the formatting of the drive.
To understand how to format using DiskPart look for detailed steps below:
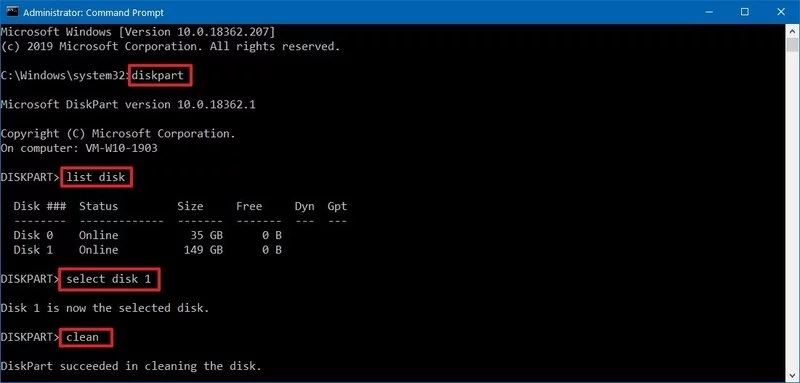
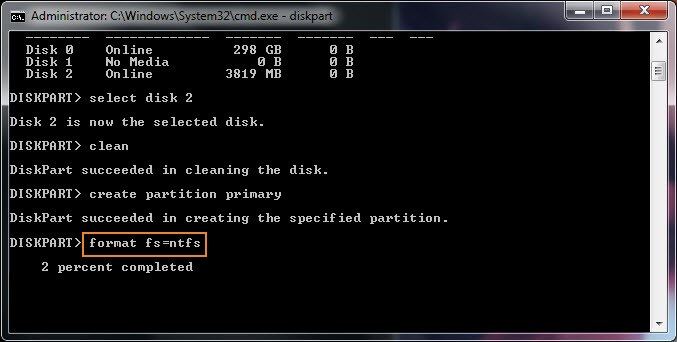
Step 1 Open the command prompt and run as administrator.
Step 2 Type diskpart and press »Enter’.’ It will launch the DiskPart.
Step 3 Type list disk to let the Diskpart list all the drives of the computer.
Step 4 Select the required drive by typing select disk *, here * is the number of the drive that will undergo formatting.
Step 5 Clean the files and folders on the selected drive using the clean command.
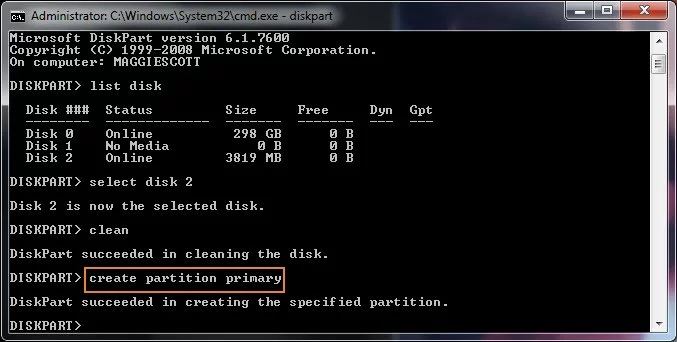
Step 6 Type list disk and press »Enter» to confirm the drive that needs to be formatted is still selected.
Here the output that comes out has an asterisk (*) before the selected drive.
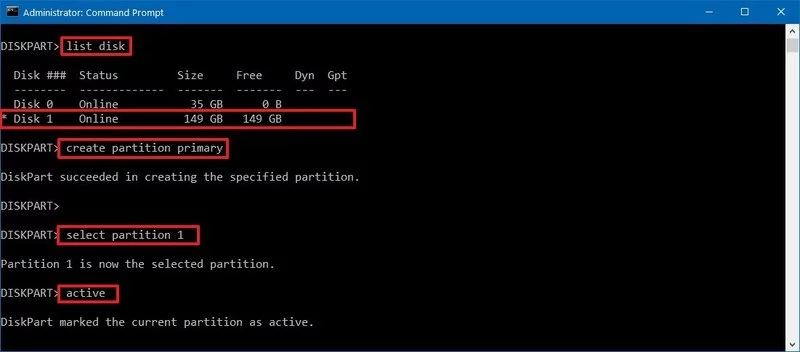
Step 7 Create a new partition by typing create partition primary and press »Enter’.’
Step 8 Select the created partition and press ‘Enter’ after typing the command select partition 1.
Step 9 Type active so that the selected partition comes in an active state. Press ‘Enter’ after that.
Step 10 Format the drive with the command format fs=ntfs. Press ‘Enter’ to begin the process.
Step 11 Assign a letter to the drive, to make it available in the File Explorer and then exit.
Press ‘Enter’ after typing assign letter=*, type your preferred letter in place of * that you want to assign to the partition.
Then to exit the DiskPart, type exit and ‘Enter.’
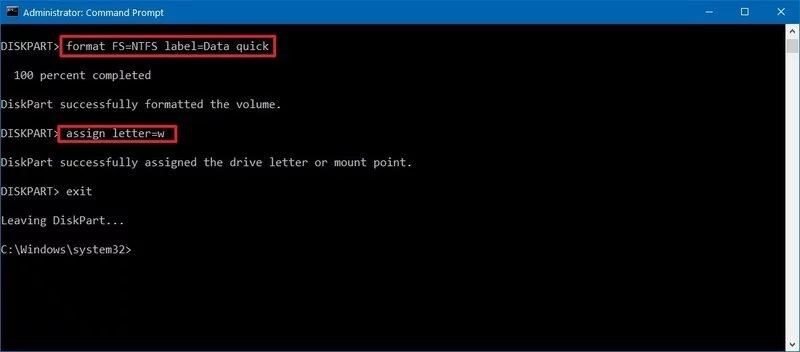
After completing all these steps, the drive is available at File Explorer. You can now start storing files on the drive.
Conclusion
For home and office usage, it is good to use DiskPart to format disk partition. And
AOMEI Partition Assistant also is a really good DiskPart alternative, for it has
simpler syntax to manage the disks, partitions, and its GUI mode is very acclaimed
by users. Plus, it can replace DiskPart to do many things like replacing DiskPart delete partition,
etc. But if you try to find a reliable partition software to optimize the
performance of your servers for small and medium sized business, AOMEI Partition Assistant Server is your best choice. It works on Windows Server 2003, 2008 (R2), 2012
(R2), 2016 and SBS 2003, 2008, 2011 as well as Windows XP, Vista, 7, 8/8.1, 10.
Experience the excellent server partition manager.
Creating primary partition using fdisk
The fdisk utility is a common partition table manipulator for Linux. Use ‘fdisk –l’ to list the partition table. We will assume you are modifying the first drive on your system.
1. First create a new partition on your drive with the (n) command option:
# fdisk /dev/sdb
Welcome to fdisk (util-linux 2.23.2).

Changes will remain in memory only, until you decide to write them.
Be careful before using the write command.

Device does not contain a recognized partition table
Building a new DOS disklabel with disk identifier 0x96151d76.

Command (m for help): n
2. On the next step either press p or press ENTER which takes up the default value p (primary partition).
Partition type:
   p   primary (0 primary, 0 extended, 4 free)
   e   extended
Select (default p): p
3. Next you can choose a partition number for your primary partition. By default, it will automatically select the next available partition on the drive if you press ENTER.
Select (default p): p
Partition number (1-4, default 1): 1
4. Determine the starting point for the partition, default will select the next available cylinder on the drive. On the next step select the size of your new partition, for example, to make a 1 GB partition you would set the command as +1024M.
First sector (2048-41943039, default 2048):     ### press ENTER here
Using default value 2048
Last sector, +sectors or +size{K,M,G} (2048-41943039, default 41943039): +1024M
Partition 1 of type Linux and of size 1 GiB is set
5. This will then take you back to the command line where you can see your newly created partition. Use the option p to print out the partition table.
Command (m for help): p

Disk /dev/sdb: 21.5 GB, 21474836480 bytes, 41943040 sectors
Units = sectors of 1 * 512 = 512 bytes
Sector size (logical/physical): 512 bytes / 512 bytes
I/O size (minimum/optimal): 512 bytes / 512 bytes
Disk label type: dos
Disk identifier: 0x96151d76

   Device Boot      Start         End      Blocks   Id  System
/dev/sdb1            2048     2099199     1048576   83  Linux
You can see the newly created partition listed in blocks rather than megabytes and the partition ID type automatically defaults to Linux which will allow you to create your filesystem on that partition.
6. Finally save and exit fdisk with the write/quit command (w). Changes will be permanent after this command is executed.
Command (m for help): w
The partition table has been altered!

Calling ioctl() to re-read partition table.
Syncing disks.
7. Run the partprobe command to scan the newly modified partition table:
# partprobe
If partprobe does not identify the newly modified table then a reboot will be required. You can also run the command “fdisk -l” to verify the new partition.
# fdisk -l

Disk /dev/sdb: 21.5 GB, 21474836480 bytes, 41943040 sectors
Units = sectors of 1 * 512 = 512 bytes
Sector size (logical/physical): 512 bytes / 512 bytes
I/O size (minimum/optimal): 512 bytes / 512 bytes
Disk label type: dos
Disk identifier: 0x96151d76

   Device Boot      Start         End      Blocks   Id  System
/dev/sdb1            2048     2099199     1048576   83  Linux
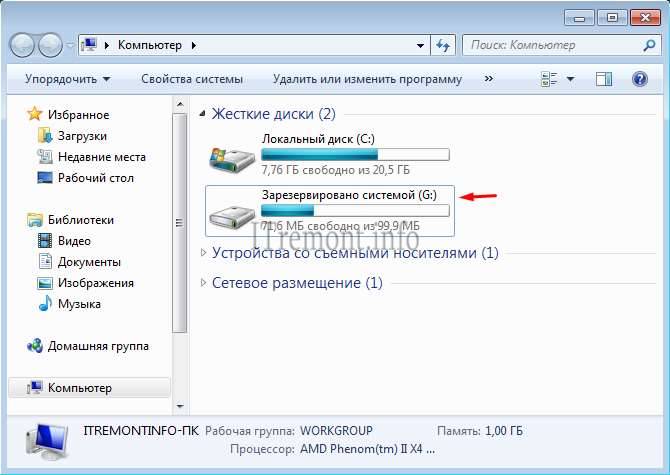
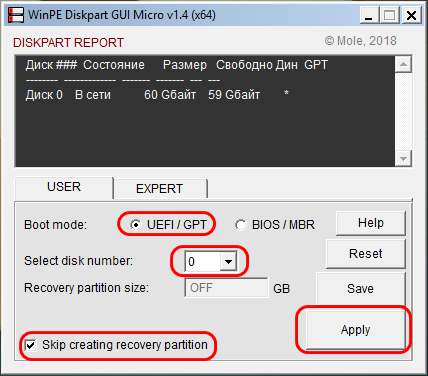
Разметка чистого жёсткого диска с созданием загрузочного и системного разделов с помощью утилиты Diskpart GUI Micro на Live-диске от Sergei Strelec
Как скачать Live-диск от Sergei Strelec, как записать его на съёмный носитель, смотрим здесь.
Если мы хотим установить Windows не обычным способом с использованием её установочного носителя, а альтернативным с использованием описанных в указанной выше статье способов на LiveDisk’е Стрельца, нам понадобится существующая разметка диска со сформированными разделами для Windows:
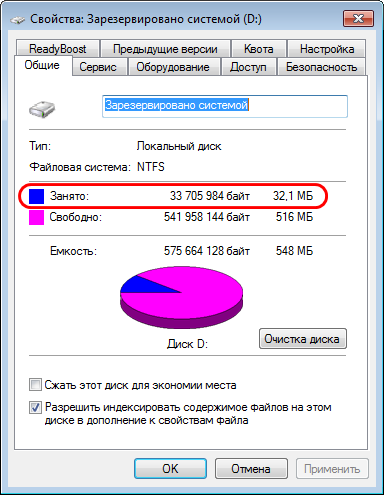
- Загрузочным «Зарезервировано системой» разделом на MBR-диске и разделом С;
- Загрузочным шифрованным EFI-разделом на GPT-диске и разделом С.
Готовая разметка с системными разделами нам будет нужна для процессов развёртывания Windows программами WinNTSetup и Dism++ из наших собственных сборок системы или бэкапов , захваченных в файлы-образы WIM или ESD.
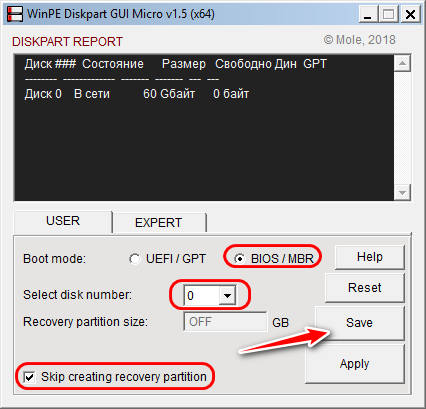
Структуру системных разделов Windows могут формировать отдельные из программ для разметки диска. Одна из таких – утилита Bootice, входящая в состав той же WinNTSetup. На Live-диске Стрельца также есть программа DiskGenius, умеющая создавать структуру разделов EFI-систем Windows. В конце концов, системные разделы можно создать вручную с помощью командной строки. Но я, друзья, исследуя Live-диск Стрельца, нашёл самый простой способ – с помощью кустарной утилиты WinPE Diskpart GUI Micro. Она, по сути, являет собой интерфейс Diskpart.exe – утилиты для работы с разметкой диска в командной строке.
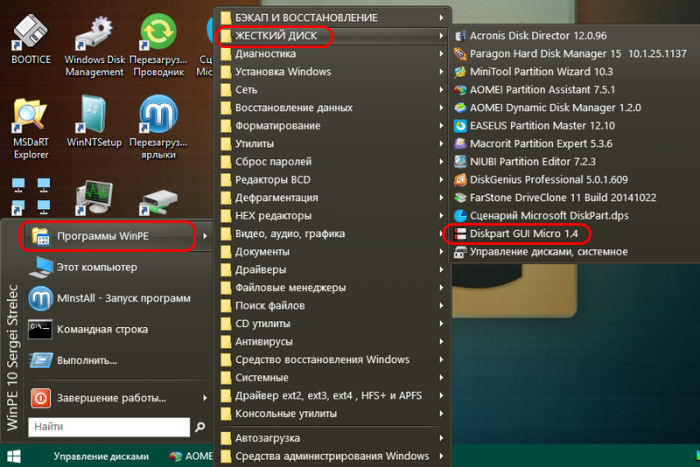
Далее действуем в зависимости от типа BIOS — UEFI или Legacy — и, соответственно, стилей разметки жёсткого диска — GPT или MBR.
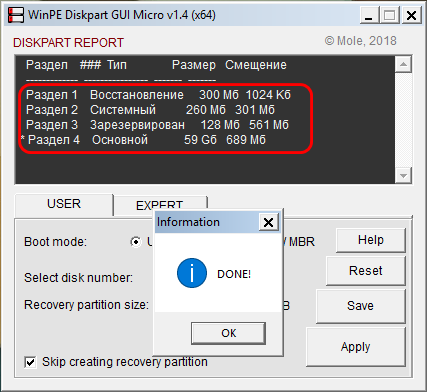
Готово: в тёмном окошке можем наблюдать созданную структуру разделов для EFI-системы.
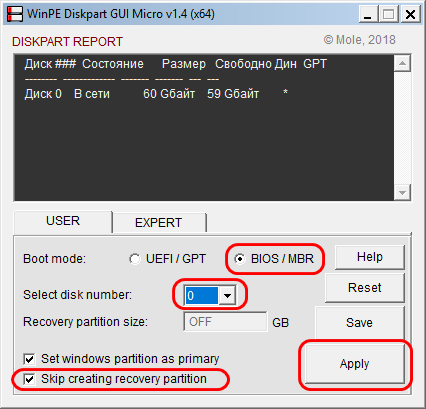
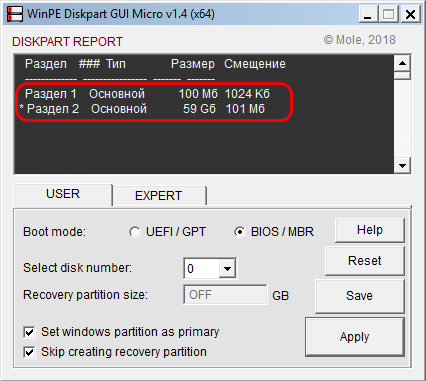
Типичная структура системы на MBR-диске создана.
Вот так вот всё просто, друзья.
Разметка с изменением размера загрузочного раздела
Друзья, этот пункт статьи дописан после её опубликования как ответ на резонный вопрос читателя:
Но если кто-то будет использовать BitLocker, а данные штатной технологии шифрования Windows, как и файлы загрузчика, также хранятся на разделе «Зарезервировано системой», то, возможно, 100 Мб для этого раздела будет мало. И как в таком случае заставить утилиту Diskpart GUI Micro создать раздел «Зарезервировано системой» с большим объёмом, скажем, 500 Мб?
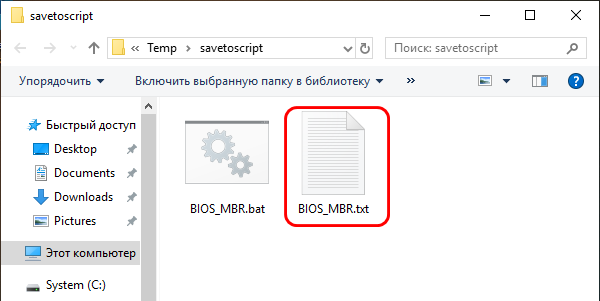
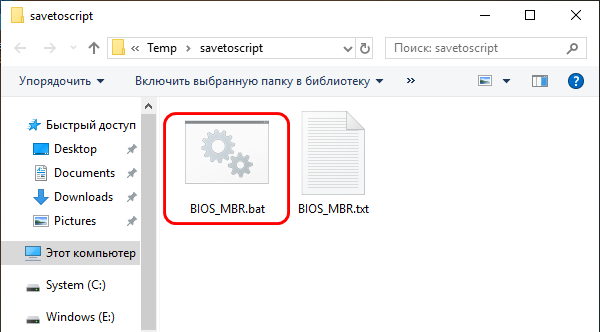
Как и в предыдущем пункте статьи, выставляем опцию разметки диска MBR, указываем порядковый номер самого диска, ставим галочку пропуска создания Recovery-раздела. Но далее нажимаем не «Apple», а «Save».
Откроется папка с автоматически созданным скриптом запуска операций. Открываем файл TXT.
Смотрим в нём строку создания загрузочного раздела «create partition primary size=100 noerr».
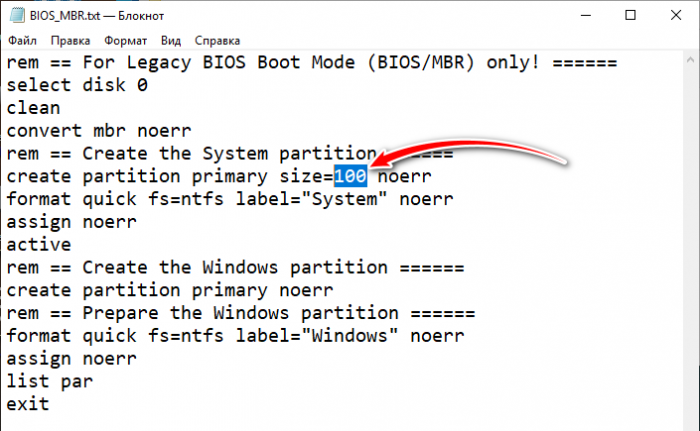
Убираем цифру 100 и вписываем цифру объёма, который хотим указать для загрузочного раздела, в нашем случае это 500. Сохраняем файл TXT.

Снова обращаемся к отрытой папке со скриптом и теперь запускам батник.
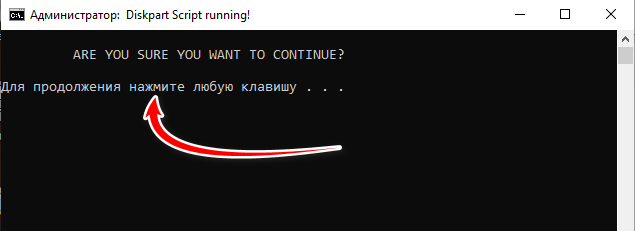
В окне выполнения скрипта жмём любую клавишу.
И ждём, пока скрипт с помощью команд Diskpart разметит диск. По итогу увидим карту дисков. Первый раздел, он же загрузочный имеет объём 500 Мб.
Partition hard drive with Diskpart under Windows PE
Many users installed Windows 7 by themselves. When the installer runs to the
interface that ask you “where do you want to install Windows?”, you will find that
if you partition hard drive here, the partition you created are all primary
partition — there is no option for creating logical partition, which will cause the
rest space cannot be allocated after creating 4 primary partition.
To get out of this situation, many users only create one primary partition and then
install operating system. That means they need to repartition hard drive in Windows 7 with Disk Management or third party software after
installing OS, which is tedious. Is there a simpler and easier way to partition hard
drive under Windows Preinstallation Environment (Windows PE)?
Fortunately, Windows 7 Diskpart allows you to partition hard drive under WinPE. Thus,
you do not need to partition hard drive after installing, and it will not produce a
100MB system reserved partition. Finally, the operation will be effective without
rebooting computer.
But how to use Diskpart during Windows 7 installation? When the installer runs to
create disk partition interface, press “Shift+F10” to open the command prompt.
Type diskpart and press Enter to open Diskpart. Then, you can use
the command-line to partition hard drive in WinPE.
Here is a case of how to partition hard drive into one primary partition and three
logical partitions with Diskpart under Windows PE.
-
1. Typelist disk in the command prompt. It will list all
disk on your computer. Here is only one disk shown as Disk 0. -
2. Type select Disk 0. the Disk 0 will be selected.
-
3. Type clean. It’s Diskpart clean disk command.
-
4. Type create partition primary size=512000. You can decide
the size as your demand. -
5. Typeactive. The new primary partition will be activated.
-
6. Type format quick. It’s diskpart format quick command
that will format the partition you created quickly. -
7. Type create partition extended. It will create extended
partition with the rest space on the hard drive. -
8. Type create partition logical size=512000. it will create
the first logical partition on the hard drive. -
9. Type format quick.
-
10. Type create partition logical size=512000.
-
11. Type format quick.
-
12. Type create partition logical. It will create logical
partition with the left space. -
13. Type format quick.
-
14. Type exit to close Diskpart.
-
15. Type exit to close command prompt.
After those steps, refresh the window of “where do you want to install Windows?”, you
will see the partitions you created with Diskpart. Then, you can select the primary
partition to install Windows 7 OS on.
diskpart in Windows 8
If you can boot into Windows 8
If you can boot into your Windows 8 system, you simply need to open Command Prompt to access diskpart. To do so, follow these steps:
- Boot into Windows 8
- Press the Windows key and C to open the charm bar
- Type
- Click Command Prompt
- When Command Prompt opens, type
- Press Enter
For the full list of diskpart commands and paremeters, go to .
If you can’t boot into Windows 8
If you can’t boot into your Windows 8, you have these options available:
- Use the original DVD or USB with Windows 8 or Windows 8.1 to access the Repair your computer option
- Boot into the System Recovery Options with Shift and F8
- Use Easy Recovery Essentials to launch Command Line
If you have the installation disc:
If you can’t boot, but you have the installation disc, follow these steps:
- Insert the Windows 8 DVD or 8.1 USB
- Restart the computer
- Press any key to boot from the media
- Click Repair your computer or press R
- Select Troubleshoot
- Select Command Prompt
- Type
- Press Enter
For the full list of diskpart commands and paremeters, go to .
If you don’t have the installation disc:
If you don’t have the installation disc, you can boot into System Recovery Options or use Easy Recovery Essentials.
To access diskpart without an official Windows 8 or Windows 8.1 disc, follow these steps:
- Reboot the system
- Press Shift and F8 very quickly
- At Choose an option, select Troubleshoot
- Select Command Prompt
- Type
- Press Enter
For the full list of diskpart commands and paremeters, go to .
If you use Easy Recovery Essentials:
Easy Recovery Essentials can run from any CD, DVD or USB flash drives.
To access diskpart using Easy Recovery Essentials, follow these steps:
- Download Easy Recovery Essentials
- Burn the ISO Image. Follow our instructions on how to burn a bootable ISO image. If you’d like to have a recovery USB instead, follow our instructions on how to make a recovery USB.
- Boot Easy Recovery Essentials from the CD, DVD or USB
- Select Launch Command Line
102 виндат на “установка windows 7 с флешки через командную строку”
Загрузочная флешка – это очень удобно. Не нужно постоянно таскать с собой загрузочный диск, чтобы установить Windows, не нужно опасаться, что он случайно поцарапается и в самый ответственный момент выдаст какую-то не понятную ошибку. Особенно это полезно для тех, кто часто занимается переустановкой Windows. И есть очень много способов создать загрузочную флешку.
В этой статье я вам покажу, как создаётся загрузочная флешка через командную строку. То есть, мы не будем устанавливать на компьютер какие-то посторонние программы, а воспользуемся только встроенными возможностями Windows. Действовать будем через утилиту diskpart.
Diskpart in Windows 7
Diskpart Windows 7 is a powerful tool that can solve a lot of problems of your PC’s
drives. It allows you to partition, remove partitions, remove formatting, assign and
remove drive letter and mount points, convert disks from basic to dynamic, create
and extend volumes, etc. Most commands that you can perform in Windows Disk
Management are available with Diskpart. Before using Diskpart commands, you must
first list, then, select an object to give it focus. When an object has focus, any
Diskpart commands that you type will act on that object. If you want to view the
commands and parameters of Diskpart tool, you can type help in Diskpart command
prompt, it will list all commands and parameters:
Well, how to use Windows 7 Diskpart?
Как создать разделы и отформатировать стертый диск?
Стертый диск нуждается в создании на нем разделов и форматировании в нужной файловой системе. Для этого необходимо выполнить следующее:
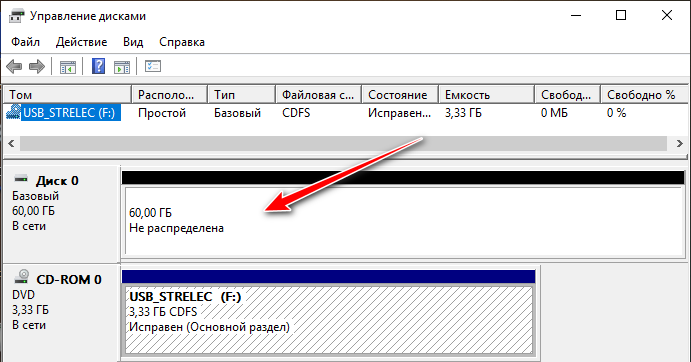
Открываем меню «Управление дисками», нажав ПКМ по кнопке «Пуск» и выбрав соответствующий пункт.
В открывшемся окне находим стертый диск. Как правило, он не имеет буквы или вовсе не отображается в меню, но его можно обнаружить как нераспределенную область в нижней части окна. Нажимаем ПКМ по блоку область не распределена и выбираем первый пункт «Создать простой том».
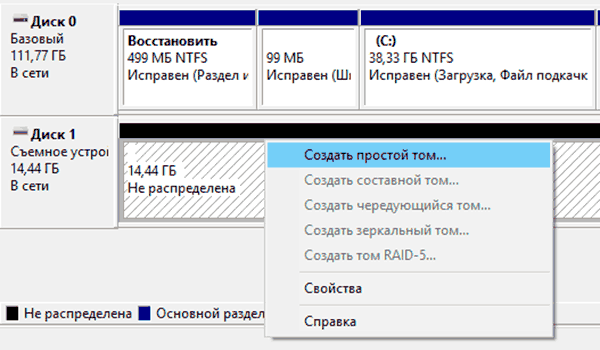
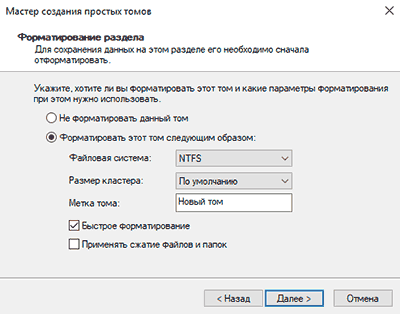
В открывшихся окнах следует выбрать букву, а также файловую систему и размер диска. По умолчанию система сама выбирает максимальный размер, букву, а также файловую систему NTFS, поэтому в данном пункте можно просто нажимать «Далее».
Изменение разделов диска.
Допустим, возникла необходимость разбить существующий на данный момент диск C: на два диска C: и D: без потери данных. Фактически, необходимо освободить часть дискового пространства раздела, которому соответствует диск C: и создать новый раздел в освободившейся области. Порядок действий:
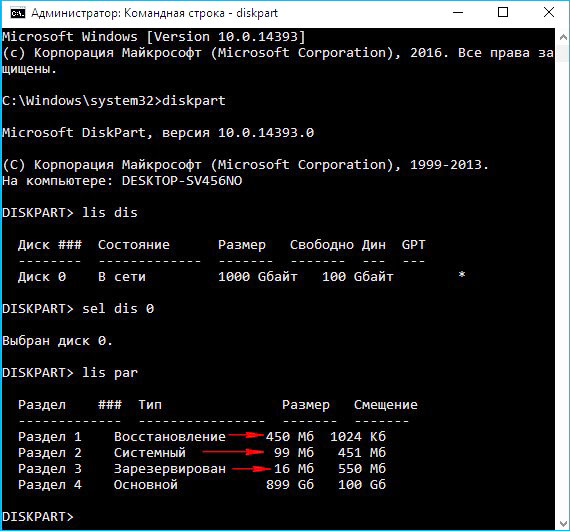
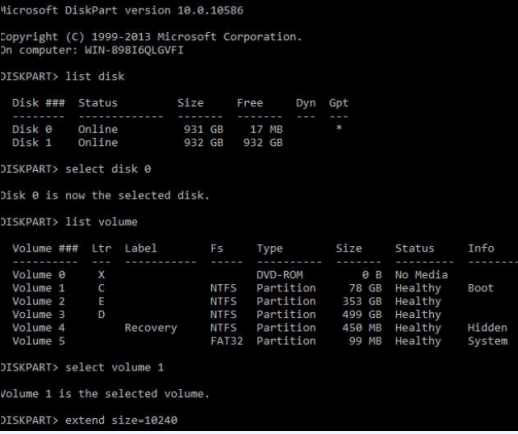
list disk — при необходимости, просмотреть список дисков и выбрать тот, с которым будем работать. Выбранный диск отмечается звездочкой:
list partition — просмотреть список разделов для выбора того, от которого нужно «отнять» дискового пространства. Например:
В данном случае, на диске имеется 3 раздела, два служебных и один, соответствующий диску C: размером 59Gb. При необходимости, уточнить сведения о разделах можно с помощью команды DETAIL PARTITION (после SELECT)
select partition 2 — выбираем раздел, от которого будем отрезать свободное дисковое пространство.
Для сокращения раздела (тома) используется команда SHRINK, подсказку по которой можно получить выполнив:
Для того, чтобы освободить 10000Mb ( приблизительно 10Гб, правильнее в расчетах вместо числа 1000 использовать 1024) из выбранного раздела, выполняем команду:
shrink desired=10000 — освободить 10000Мб.
При выполнении команды отображается объем освободившегося дискового пространства (естественно, не совсем 10Гб):
Теперь можно создать новый раздел, смежный с тем, у которого было отнято дисковое пространство, которое будет занято новым разделом:
create partition primary
Можно посмотреть, как теперь представлен список разделов диска:
Вновь созданный раздел не имеет файловой системы, которую предстоит создать, выполнив команду форматирования. Выбираем раздел :
select partition 4 Выбранный раздел (фокус) отмечается звездочкой в списке. При выполнении команды CREATE фокус автоматически перемещается на созданный раздел. Однако, во избежание неприятностей, стоит взять за правило, выбирать и проверять выбор перед выполнением опасных операций, как например форматирование. Подсказку по использованию команды FORMAT можно получить стандартным HELP FORMAT:
Для быстрого форматирования раздела с использованием метки тома Disk_D и файловой системы NTFS:
format fs=ntfs label=»Disk_D» quick
Ждем завершения операции:
Раздел готов к использованию, и ему можно присвоить букву командой ASSIGN:
assign letter=d — присвоить букву D:
В случае, если указанная буква уже назначена другому разделу, утилита выдаст сообщение об ошибке:
Нужно либо переназначить буквы с учетом нового раздела, либо использовать первую свободную, что делается при помощи команды ASSIGN без параметров:
При успешном присвоении буквы, отображается соответствующее сообщение:
Аналогичным образом решается задача объединения двух смежных разделов в один. Например, созданный в рассмотренном выше случае, диск D: нужно удалить и занимаемое им место присоединить к диску C: . Естественно, команда DISKPART не занимается сохранением пользовательских данных и этим вопросом должен озаботиться сам пользователь, и до того, как будет удален раздел. Для решения задачи нужно удалить раздел 4 (Disk_D в примере выше) и на освободившееся место расширить раздел 2 (Disk_C). Для удаления раздела используется команда DELETE, а для расширения команда EXTEND. Подсказка по использованию может быть получена стандартным образом:
Таким образом, для решения задачи, нужно выполнить последовательность команд:
select partition 4 — выбрать раздел для удаления.
delete partition — удалить выбранный раздел.
Как правило, раздел используется системой и команда удаления может завершиться ошибкой:
delete partition override — удалить выбранный раздел независимо от его использования системой.
После удаления, необходимо переместить фокус на тот раздел, который нужно расширить:
select partition 2 — выбрать раздел 2.
extend — расширить раздел на весь объем смежного свободного пространства.
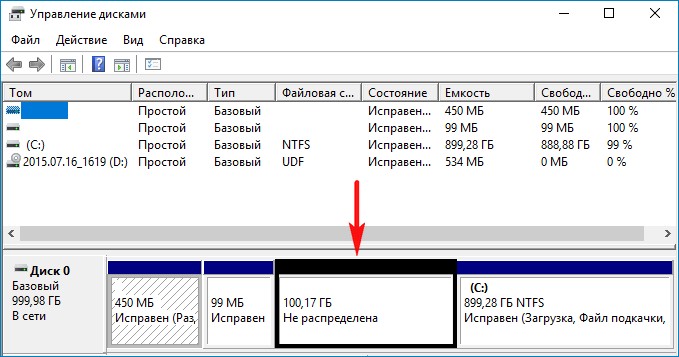
третий служебный раздел 16 Мб (раздел MSR) не виден в Управлении дисками, но виден в командной строке (lis par).
Windows 10 Diskpart Extend Volume
When disk partition runs out of space on Windows 10, somebody would like to run Diskpart command to perform partition resizing so as to increase the size of the volume which has not enough free space.
How to extend volume by running Diskpart command in Windows 10?
1. Click «Start» > «Run» > type «diskpart» and click «OK» so as to open the Diskpart command window
2. Type the «list volume» and it will show which volume you can choose to extend the partition that has low disk space. For example, if the list volume shows to select volume 1, you should type «select volume 1». Then, it will show a message saying «volume 1 is the selected volume». Finally, you should type «extend», after which diskpart will extend the selected partition.
In most case, most people do not like to run Diskpart command to extend volume because it is difficult to handle. You have to type each command on the Diskpart command window, which is a complex task for many computer users.
Method 2: initialize a disk with AOMEI Partition Asssitant GUI
AOMEI Partition Assistant also provides the way to initialize disk with its concise
interface. With the GUI (graphical user interface), you can use a few mouse clicks
to replace initialize disk using Diskpart command.
Step 1. Launch AOMEI Partition Assistant(Pro). Select the disk you want to initialize, right click it. Then, select Initialize
Disk in the pop-out menu.
Step 2. Select to initialize disk to MBR/GPT. ClickOK.
Step 3.Click Applyat the tool bar to confirm
the operations.
The AOMEI Partition Assistant initialize disk with intuitive interface is much
simpler than Windows Diskpart initialize disk. Besides, you can use it to do more
for partition
a hard drive. And it supports most Windows systems, as for the Windows Server system, you can use the Server Edition.
Создание конфигурации разделов для разметки GPT
Вы можете создать рассмотренную выше конфигурацию:
- С помощью графического интерфейса программы установки Windows
- В командной строке утилитой diskpart.
Я покажу оба способа.
Смена курса обусловлена рядом причин. Рекомендуемая структура разделов у Microsoft варьируется , а теперь еще и . Так, отличается размер и расположение раздела Windows RE (он необходим, например, для восстановления диска, зашифрованного BitLocker).
Microsoft сама не успевает оперативно отражать эти изменения в своей документации, куда уж мне 🙂 Да и не планировал я создавать репозиторий скриптов diskpart на каждый чих. Изначально сама статья и первая версия скрипта diskpart в ней были призваны предотвратить , которая проявлялась при создании образа системы встроенными средствами в Windows 8 и 8.1, что сейчас потеряло актуальность.
Способ 1 — программа установки Windows (рекомендую)
Этот способ работает только при наличии установочного диска, конечно. Достаточно начать установку, дойти до экрана конфигурации дисков и создать раздел на незанятом пространстве.
Программа установки автоматически создаст все необходимые разделы.
Способ 2 – утилита diskpart
Несмотря на отсутствие графического интерфейса, этот способ обладает важным преимуществом: он работает вне зависимости от того, есть ли в наличии установочный диск.
Примечание. Скрипт ниже взят из описания MSDN для Windows 10 (на конец 2016 года) и подоходит для всех поддерживаемых ОС Windows. Порядок разделов и их размеры могут не совпадать с документацией к той или иной ОС, но на работу Windows это не влияет. Перфекционистам и сомневающимся или следовать документации. Дальнейшее обновление скрипта и ссылок на документацию не планируется.
Все команды выполняются в среде Windows PE.
В команде ниже замените N на номер диска.
diskpart
list disk
sel disk N
Теперь выполняйте следующие команды или откройте ранее сохраненный файл в блокноте, скопируйте весь текст и вставьте правой кнопкой мыши в окно командной строки. Подсказка. Если блокнот еще не открыт, необязательно выходить из diskpart. Откройте еще одну командную строку сочетанием Shift + F10 и наберите notepad.
clean
rem == CreatePartitions-UEFI.txt ==
rem == These commands are used with DiskPart to
rem    create four partitions
rem    for a UEFI/GPT-based PC.
rem    Adjust the partition sizes to fill the drive
rem    as necessary.
rem select disk 0
rem clean ==
convert gpt
rem == 1. System partition =========================
create partition efi size=100
rem    ** NOTE: For Advanced Format 4Kn drives,
rem               change this value to size = 260 **
format quick fs=fat32 label="System"
assign letter="S"
rem == 2. Microsoft Reserved (MSR) partition =======
create partition msr size=16
rem == 3. Windows partition ========================
rem ==    a. Create the Windows partition ==========
create partition primary
rem ==    b. Create space for the recovery tools ===
shrink minimum=500
rem       ** NOTE: Update this size to match the
rem                size of the recovery tools
rem                (winre.wim) plus free space                   **
rem ==    c. Prepare the Windows partition =========
format quick fs=ntfs label="Windows"
assign letter="W"
rem === 4. Recovery tools partition ================
create partition primary
format quick fs=ntfs label="Recovery tools"
assign letter="R"
set id="de94bba4-06d1-4d40-a16a-bfd50179d6ac"
gpt attributes=0x8000000000000001
list volume
list par
exit
Да, я знаю, что diskpart можно «заскриптовать», но я не могу предугадать правильный номер диска, поэтому метод копирования-вставки оптимален с точки зрения краткости объяснений и скорости решения задачи 🙂
Структура разделов создана! Две последних команды перед выходом из diskpart покажут вам расклад по томам и разделам диска.
Здесь я хочу обратить ваше внимание на три момента:
- Картинка не соответствует командам, потому что последние неоднократно обновлялись 🙂
- Ключевым разделам назначены буквы W, T и S, но они действуют исключительно в этом сеансе Windows PE. В загруженной системе только раздел Windows получит букву — C.
- Утилита diskpart автоматически создает первый раздел со смещением 1024KB, что оптимально для SSD.
Method 3: initialize disk with AOMEI Partition Assistant command-line
To use partassist.exe command line utility, click «Start» menu, type «cmd»
in the search box or press «WIN + R» keys and type «cmd» to open
a prompt, then run it as an administrator. After that, Command Prompt will open. In
the command window, type «cd + installation directory of AOMEI Partition
Assistant» to get started (e.g. cd C:\Program Files \AOMEI Partition
Assistant). Here we take an example of how to initialize a disk as GPT.
Type: cd C:\Program Files \AOMEI Partition Assistant, press Enter Key.
Then, type: partassist.exe /list, press Enter to list all disks on your computer.
When it list all disks in the command prompt, type“partassist.exe / init:1 /gpt”,
then click Enter. This opreation will convert the Disk 1 into GPT disk style.
Wait till the progress reaches 100%. It will tell you «The operation completed
successfully».
To initialize disk into MBR format with AOMEI partassist.exe, you can follow the
parameters below:
partassist.exe /init:1
Note:
“/init:1” means it initializes a disk as MBR.
No matter you use the Windows Diskpart or AOMEI partassist.exe, you can initialize
the disk to MBR format or GPT format as you want successfully. If you cannot use the
CMD in a right way, you can also use the interface of AOMEI Partition Assistant.
Partassit.exe utility can do much more for users than Diskpart. Besides initializing
disk, you can resize/move
partition without data loss, or rebuild MBR, etc.