Обзор графического редактора gimp
Содержание:
- Changing the Size (Dimensions) of an Image (Scale)
- Paint Select tool
- Digital photography improvements
- Color Management Improvements
- Description
- Roadmap and what’s next
- Source for version 2.8 (Stable)
- Где скачать GIMP
- Dialog generation for plug-ins
- Что такое GIMP? Бесплатный графический редактор
- GIMP (development version) for Unix-like systems
- Rotate and/or Flip an Image
- Better Tools
- Revamped User Interface and Usability Changes
- GIMP for Unix-like systems
- Input Devices dialog
- Как пользоваться редактором GIMP
- Intention
- Панель инструментов GIMP[править]
Changing the Size (Dimensions) of an Image (Scale)
This is a very simple task to accomplish in GIMP easily.
The image we’ll be using to illustrate this with is The Horsehead Nebula in Infrared.
When you first open your image in GIMP, chances are that the image will be zoomed so that the entire image fits in your canvas. The thing to notice for this example is that by default the window decoration at the top of GIMP will show you some information about the image.
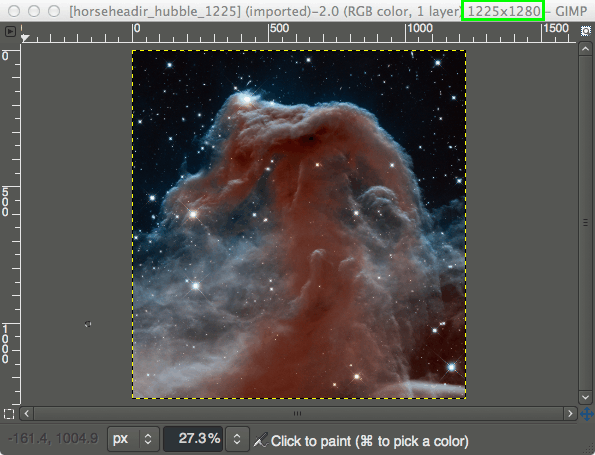
View of the GIMP canvas, with information at the top of the window.
Notice that the information at the top of the window shows the current pixel dimensions of the image (in this case, the pixel size is 1225×1280).
To resize the image to new dimensions, we need only invoke the Scale Image dialog:
Image → Scale Image…
This will then open the Scale Image dialog:
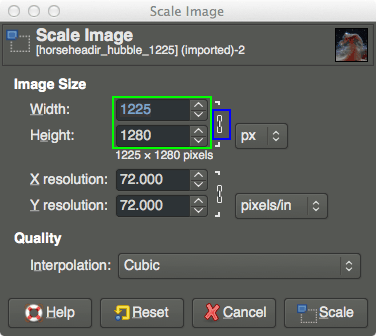
The Scale Image dialog.
In the Scale Image dialog, you’ll find a place to enter new values for Width and Height. If you know one of the new dimensions you’d like for the image, fill in the appropriate one here.
You’ll also notice a small chain just to the right of the Width and Height entry boxes. This icon shows that the Width and Height values are locked with respect to each other, meaning that changing one value will cause the other to change in order to keep the same aspect ratio (no strange compression or stretching in the image).
For example, if you knew that you wanted your image to have a new width of 600px, you can enter that value in the Width input, and the Height will automatically change to maintain the aspect ratio of the image:
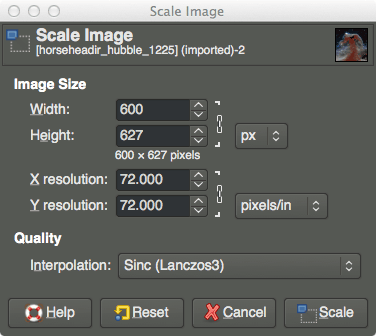
Changing the Width to 600px.
As you can see, entering 600px for the width automatically changes the height to 627px.
Also notice I have shown a different option under Quality → Interpolation. The default value for this is Cubic, but to retain the best quality it would better to use Sinc (Lanczos3).
If you want to specify a new size using a different type of value (other than Pixel size), you can change the type by clicking on the “px” spinner:
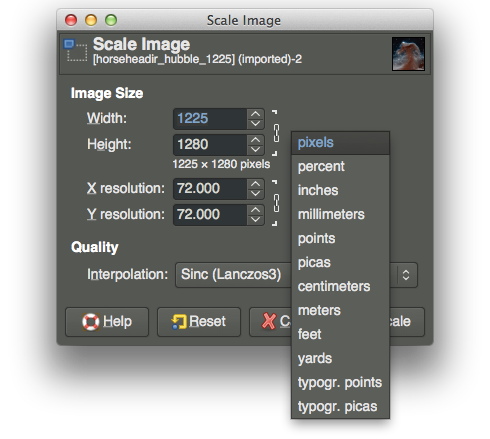
Changing input value types.
A common use for this could be if you wanted to specify a new size as a percentage of the old one. In this case you could change to “percent”, and then enter 50 in either field to scale the image in half.
Once you are done scaling the image, don’t forget to export the changes you’ve made:
File → Export…
to export as a new filename, or:
File → Overwrite {FILENAME}
to overwrite the original file (use caution).
For more detail about using Scale Image, you can see the documentation.
Paint Select tool
The tool is still listed as experimental as it is not yet deemed
finished by its contributor, Thomas Manni. Nevertheless it has already
improved quite a bit and starts getting really interesting.
Several bugs were fixed and selection is now viewport-based which allows
it to be much faster already depending on the zoom. Yet this is not even
the expected optimization which is planned to make the tool work really
fast. Expect more to come!
This work has been happening both on GIMP code base and on our graphics
engine library’s code base, GEGL.
Copy-pasting Wilber in a few seconds with the Paint Select tool (realtime GIF, faster as zoomed-in) — GIMP 2.99.6
As a side note, the Paint Select tool now has its own icons, original
design by Yash Arya, with collaborative work and design finalisation by Aryeom.
New Paint Select tool icon by Yash Arya and Aryeom — GIMP 2.99.6
Digital photography improvements
Some of the new GEGL-based filters are specifically targeted at photographers:
Exposure, Shadows-Highlights, High-pass, Wavelet Decompose, Panorama
Projection and others will be an important addition to your toolbox.
 GEGL Shadow-Highlights filter.
 GEGL panorama projection allows editing panorama images, mapped.
On top of that, the new Extract Component filter simplifies extracting a
channel of an arbitrary color model (LAB, LCH, CMYK etc.) from currently
selected layer. If you were used to decomposing and recomposing images just for
this, your work will be that easier now.
Moreover, you can now use either darktable or RawTherapee as GIMP plug-ins for
opening raw files. Any recent version of either application will do.
A new Clip Warning display filter will visualize underexposed and overexposed
areas of a photo for you, with customizable colors. For now, it’s mostly geared
towards images where colors are stored with floating point precision. You will
mostly benefit from this if you work on 16/32 bit per channel float images such
as EXR and TIFF.
Your browser does not support the video tag.
Contributors: Michael Natterer, Ell, Thomas Manni, Tobias Ellinghaus,
Øyvind Kolås, Jehan Pagès, Alberto Griggio…
Color Management Improvements
The color management implementation got a complete overhaul in this version of GIMP. Instead of being a pluggable module, it is now a core feature. Moreover, we added an abstraction layer that makes GIMP less dependent on LittleCMS. This means that in the future GIMP could use native APIs on Windows and OS X, and/or use OCIO.
For now, it has helped us to clean up the code a lot and introduce a clean implementation of color management to various bits of GIMP such as: previews for color swatches and gradients, patterns, various color widgets (including the drag-and-drop color widget), the Color Picker tool, layer and image preview etc. The only unmanaged bit for now is the color widget in the Script-Fu and Python-Fu plug-ins. Moreover, GIMP will track which monitor the widget is currently on (different monitors would have different ICC profiles assigned to them) and color-correct it accordingly.
Grayscale images are first class citizens in GIMP once again: since v2.9.4, GIMP can color-manage them as well.
Since GIMP currently relies on sRGB (this is bound to change in future versions of GIMP), we decided to expose that in the user interface. So currently GIMP has an option called ‘Color-manage this image’ in two places: the New Image dialog and the submenu. What it means is that instead of taking into consideration the ICC profile embedded into an image (whichever profile it is) it will just treat everything as sRGB. Please note that we are likely to reword the option to make it even more explicit about what it does.
Additionally, there’s now a submenu where you can enable and control softproofing.
The Color Management section of the Preferences dialog has been reorganized to reflect recent changes and provide more consistent wording of options.
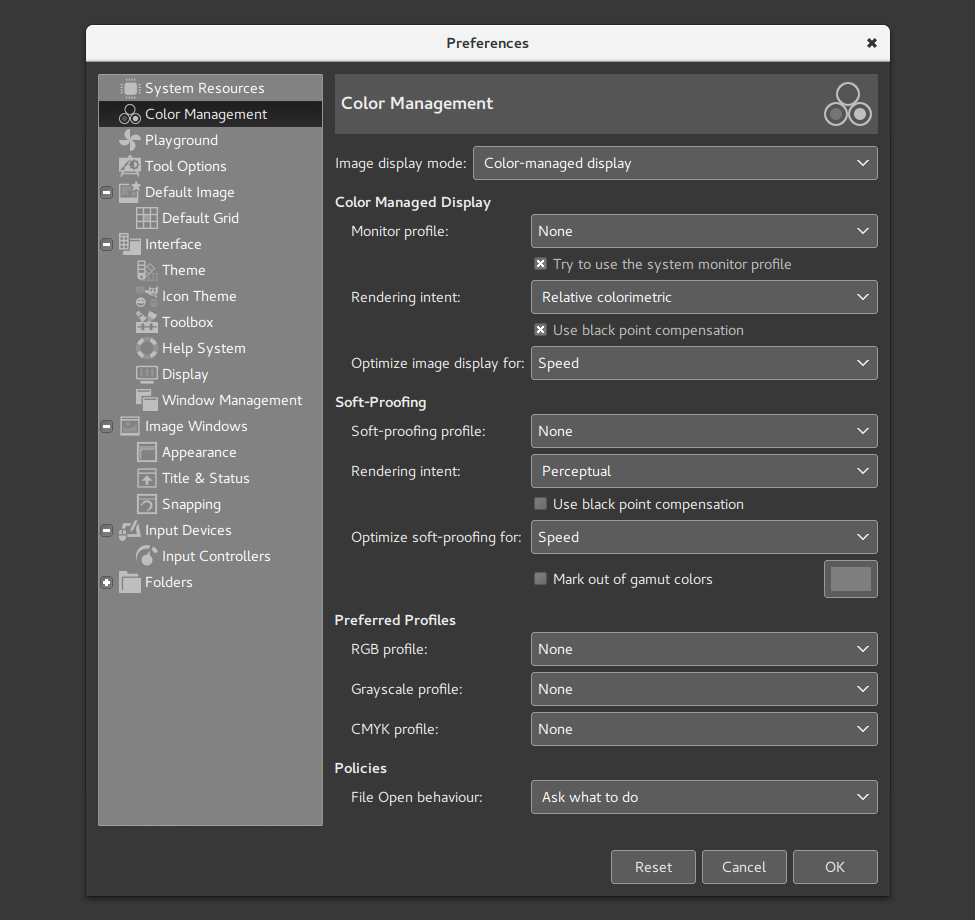
Since color management comes with a speed penalty (at least with LittleCMS), there’s a new option that enables you to choose either better color fidelity of faster processing depending on the kind of work you usually do.
Among smaller changes there’s a new command that does exactly what it says: it dumps an embedded ICC profile to disk as a file. Note that copyright restrictions on ICC profiles may apply, so please be careful.
Description
GIMP is the GNU Image Manipulation Program. It is used to edit and manipulate images. It can load and save a variety of image formats and can be used to convert between formats.
GIMP can also be used as a paint program. It features a set of drawing and painting tools such as airbrush, clone, pencil, and paint brush. Painting and drawing tools can be applied to an image with a variety of paint modes. It also offers an extensive array of selection tools like rectangle, ellipse, fuzzy select, bezier select, intelligent scissors, and select by color.
GIMP offers a variety of plug-ins that perform a variety of image manipulations. Examples include bumpmap, edge detect, gaussian blur, and many others. In addition, GIMP has several scripting extension which allow for advanced non-interactive processing and creation of images.
GIMP ships with a second binary called gimp-console. This binary is a console-only version and behaves as if gimp was called with the —no-interface command-line option.
On platforms with the D-Bus message bus system, GIMP will by default check if an instance is already running in this user session. If it detects that, it will pass all filenames given on the command-line to the already running GIMP instance and quit.
Roadmap and what’s next
We maintain a roadmap for GIMP development
that outlines the order of features to be implemented based on priorities.
The next big update will be v3.0 that will feature GTK+3 port and a lot of
internal changes. For users, this will mostly mean: updated user interface,
better support for graphic tablets, better support for HiDPI displays, better
support for Wayland on Linux.
We are also opening the 2.10.x series for new features. This means you don’t
have to wait for exciting improvements for years anymore: any new feature can
indeed be backported to a 2.10.x release as long as its code is not too invasive
and making maintenance difficult.
All the new features from 2.10.x will be part of 3.0 as well.
Source for version 2.8 (Stable)
GIMP releases available from gimp.org and its contain the source code and have to be compiled in order to be installed on your system.
For instructions, how to build GIMP from source code, please see this page.
GIMP 2.8.22 is now available at https://download.gimp.org/mirror/pub/gimp/v2.8/. You may want to read the Release Notes for GIMP 2.8.
To allow you to check the integrity of the tarballs, here are the MD5 sums of the latest releases:
gimp-2.8.22.tar.bz27e4fd7a53b1d3c32dff642ab1a94b44d
gimp-2.8.20.tar.bz2d405640c426b234d6efc36fb4f5bae57
gimp-2.8.18.tar.bz25adaa11a68bc8a42bb2c778fee4d389c
gimp-2.8.16.tar.bz230e0a1b7c18b0e3415f4ac54567252ac
gimp-2.8.14.tar.bz2233c948203383fa078434cc3f8f925cb
gimp-2.8.12.tar.bz247fefa240c38cfb1016b57ad6324378d
gimp-2.8.10.tar.bz284c964aab7044489af69f7319bb59b47
gimp-2.8.8.tar.bz2ef2547c3514a1096931637bd6250635a
gimp-2.8.6.tar.bz212b3fdf33d1f07ae79b412a9e38b9693
gimp-2.8.4.tar.bz2392592e8755d046317878d226145900f
gimp-2.8.2.tar.bz2b542138820ca3a41cbd63fc331907955
gimp-2.8.0.tar.bz228997d14055f15db063eb92e1c8a7ebb
GIMP help files are available at https://download.gimp.org/mirror/pub/gimp/help/.
Please consider using one of the mirrors listed below.
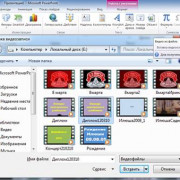
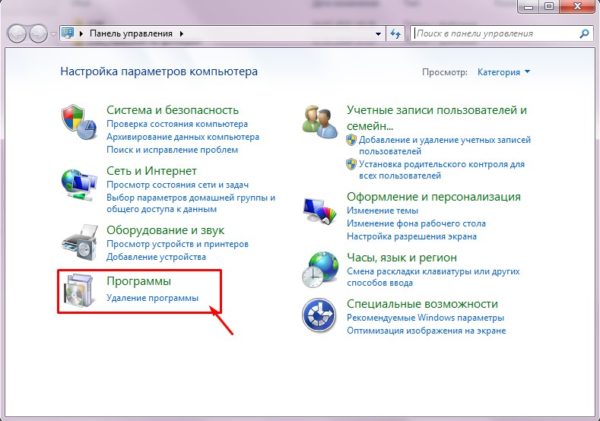
Где скачать GIMP
В настоящее время последней является версия программы 2.10.24, которая весит меньше 230 Mb. При этом определяемся с папкой сохранения файла, затем устанавливаем его стандартным образом: запускаем скаченный установщик программы, выбрав язык и место установки. Кстати, об этом тоже у меня есть урок.
Как скачать и установить GIMP бесплатно на русском языке
Watch this video on YouTube
Для удобства рекомендуется создать ярлык для запуска GIMP, разместив его на рабочем столе. При необходимости деинсталлировать программу лучше воспользоваться меню панели управления по удалению компонентов приложения.
На сегодня это все. До новых встреч на GimpArt.Org!
P.S. Данная статья написана 14 февраля 2021 года, но дату публикации я указал за 2010 год, чтобы расположить этот материал в списке опубликованных самым первым. Таким образом, это краткая выжимка возможностей и функций программы гимп. В первую очередь данный контент ориентирован на начинающих пользователей, ранее не встречавшихся с редактированием фотографий и ищущих для этих целей бесплатную альтернативу фотошопа. Думая теперь вы знаете ответ на вопрос — что это за программа такая Gimp.
Dialog generation for plug-ins
We have been working on dialog generation for plug-ins. A plug-in
historically comes with a “procedure” (which can be called from the core
but also from other plug-ins through the protocol), with
parameters and 3 run methods: interactively, non-interactively and with
last values. The non-interactive and with last values run methods
imply known parameters (given by the caller or previous calls), but an
“interactive” run implies to ask for these parameters in a GUI, usually
with added logics.
Until now, this always needed specific GUI code. We now added new
functions for easy dialog generation from the procedure parameters. In
simplest case, you could therefore generate a full blown plug-in dialog
in less than 5 lines.
Several checks were added, such as mnemonic verification, ensuring that
every displayed property in a plug-in dialog has a unique mnemonic. This
is a very useful feature for usability and accessibility, for people who
mostly use keyboard navigation.
Similar ability used to be available on some specific bindings (Python
and Scheme) up to the GIMP 2.10 series. Unlike this past ability, the
new functions will be available for all plug-ins (i.e. C/C++ plug-ins,
but also for GObject-Introspected bindings, for instance in Python 3,
JavaScript, Vala, or Lua). Moreover, the customizability is much more
powerful and will provide much better dialogs and advanced logics.
Что такое GIMP? Бесплатный графический редактор
Бесплатная программа, незаменимая для всех, кто работает с растровой и векторной графикой, пользуется базовой коррекцией файлов и создает собственные изображения.
Другими словами, это своеобразный аналог фотошопа изначально проектировался, как комфортный в применении инструмент, с помощью которого можно создавать графику и логотипы, ретушировать фотографии, раскрашивать рисунки, комбинировать многослойные изображения, преобразовывать картинки в любой формат.
Теперь эта многофункциональная программа имеет версии для всех операционных систем, обладая при этом максимальными возможностями и дополнениями.
GIMP (development version) for Unix-like systems
We provide 2 Flatpak unstable builds: on Flathub for point
development release and on the GNOME nightly repository.
The development releases are manually selected and tested
snapshots of the code, hence deemed presentable to the public
whereas nightlies are untested by definition. Nightlies are
automated builds at random point in development process.
If there are no development releases, the latest stable version
will be provided instead in the development repository whereas
the nightly repository will always contain moving
work-in-progress code.
Install GIMP development flatpak (unstable)
Install GIMP nightly flatpak (very unstable)
Flatpak builds available in: x86-64 (both
development and nightly builds) and AArch64
(development releases only).
Flatpak additional instructions
If the link above doesn’t open your software installer,
install with following command:
Run with following command line:
To update:
Note: If you installed both the stable and beta
repositories, the desktop (menus, etc.) will see only one
version at a time.
To make sure your desktop sees the development version, run this
command:
Or respectively to restore the stable version as the visible
GIMP application:
You may also create shortcuts running specifically one of the
other version.
Systems without flatpak support
GIMP can also run on Solaris and is available for the BSD
family of systems such as FreeBSD and OpenBSD. Third party
development packages may be available for these systems.
Please refer to the documentation for your Unix-like system on the installation of software.
Rotate and/or Flip an Image
There may be a time that you would need to rotate an image. For instance, you may have taken the image with your camera in a vertical orientation, and for some reason it wasn’t detected by GIMP as needing to be rotated (GIMP will normally figure this out for you, but not always).
There may also be a time that you’d like to flip an image as well. These commands are grouped together under the same menu item:
Image → Transform
Flip an Image
If you want to flip your image, the Transform menu offers two options, Flip Horizontally, or Flip Vertically. This operation will mirror your image along the specified axis. For example, here are all of the flip operations shown in a single image:
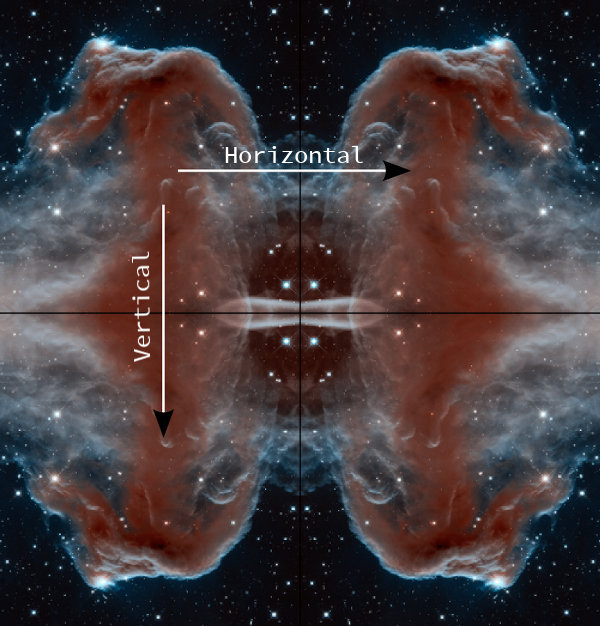
All flips applied to base image (top left).
Rotate an Image
Image rotation from the Transform menu is contrained to either 90° clockwise/counter-clockwise, or 180°.
Don’t mis-interpret this to mean that GIMP cannot do arbitrary rotations (any angle). Arbitrary rotations are handled on a per-layer basis, while the image rotation described here is applicable to the entire image at once.
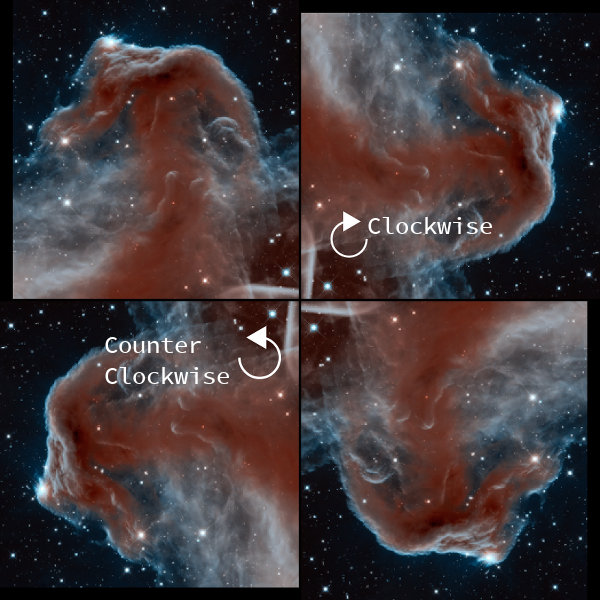
Original (top left), 90° clockwise (top right)
90° counter-clockwise (bottom left), 180° (bottom right)
Better Tools
The Fuzzy Select and Bucket Fill tools got a new feature for selecting/filling diagonally neighboring pixels.

The Blend tool got shapeburst fills resurrected, and allows the placement of their handles on the canvas, outside of the image area. Additionally, the Blend tool now displays its progress thanks to a new GEGL feature available in several GEGL operations including .
The Text tool now fully supports advanced input methods for CJK and other non-western languages. Minimal support already existed, but the pre-edit text was displayed in a floating pop-up instead of inline, within the text tool box, and without any preview styling. It is now displayed just as expected, depending on your platform and Input Method Engine. Several input method-related bugs and crashes have also been fixed.
Revamped User Interface and Usability Changes
The new version features several new themes by Benoit Touchette in various shades of gray: Lighter, Light, Gray, Dark, Darker. The system theme has been preserved for users who prefer a completely consistent look of user interfaces across all desktop applications.
Note that we still consider this feature a work in progress, as dark themes still need some fine-tuning (especially regarding the color of inactive menu items).
The new UI themes are accompanied by symbolic icons originally created by Barbara Muraus and Jakub Steiner, and heavily updated and completed by Klaus Staedtler. The existing icon theme from past releases of GIMP has also been preserved, and users can freely switch between available icon themes and easily add their own ones.
Note that themes and icon themes are now separate: you can easily mix your favorite UI with various icon sets. Also since most 2.8 themes would end up broken in 2.9.x, themes are not migrated from GIMP < 2.9. Users who want custom themes will have to install ones specifically made for GIMP 2.9/2.10.
All work on icons by Klaus Staedtler is made on vector (SVG) images, which should allow better support for HiDPI displays (also commonly known as Retina) soon. Vector icons are an experimental feature, available after using the build configure option. Note that this option does not allow HiDPI support at this time.
We cleaned the Preferences dialog a little and reordered options in a more logical manner. The Color Management page was redesigned following both internal and user-visible changes in relevant parts of GIMP (see below), and the Snap Distance options have been moved to a dedicated Snapping page.
Additionally, it is now possible to configure the size of undo step previews in the Undo dialog via the Preferences dialog, which was previously only possible by manually editing GIMP’s configuration file GIMP’s configuration file, by a complete oversight on our part.
The startup splash screen now features a pulsing progress bar to indicate that GIMP is not frozen. This, as well as initializing fontconfig in the background (also a new feature in 2.9.4), is meant to address a common issue where rebuilding the fonts cache (or building it for the first time) can take a lot of time hence making an impression that GIMP freezes at startup. We acknowledge that this is a workaround. Fixing the actual reason involves hacking on fontconfig. If you are interested, there is a bug report on that.
GIMP for Unix-like systems
If available, the official package from your Unix-like
distribution is the recommended method of installing GIMP!
The flatpak build is new and has known limitations, though it
will likely provide faster updates, following GIMP releases
closely.
Therefore choose your installation medium according to your
needs.
Flatpak build available in: i386, x86-64, ARM and AArch64.
Flatpak additional instructions
The flatpak link above should open your software installer
and prompt you to install GIMP. Yet it may not work
out-of-the-box on some platforms since the flatpak technology is
new. If that is the case, ensure flatpak is
installed and if clicking the link still does not prompt to
install GIMP, then manually install by command line:
Once installed, it will be made available exactly the same way
as other applications (menus, desktop overview, or any specific
application launch process used by your desktop).
If this is not the case, we suggest to report a bug to your
desktop or distribution asking for proper support of flatpak. In
the meantime, you can still run it by command line (not as the
recommended method, only a workaround):
This installation will also provide regular update. You don’t
have to come back on this page and install again (it will not
work!) when a new version of GIMP is released. Instead if your
distribution and/or desktop has a good support for flatpak, it
should propose to perform updates.
Once again, if your distribution does not have proper support,
you can always fall back to using the following command line:
Input Devices dialog
The infamous “Input Devices” dialog has always felt packed with arcane
features and devices. With GIMP 3, many features will be working
out-of-the-box and it felt like the right time to clean this dialog a bit.
- We now only show entries for actual physical devices attached to your
computer. So no more “virtual devices”. Similarly we now hide
the device which some kind of a test device generated by the X11
server (Linux). - We used to show all possible axes for all devices, including some axes
like “Rotation” or “Slider” which are present very rarely (only on
specific drawing styluses in the market, even uncommon among
professionals). The dialog will now only list the axes returned by the
backend (note that even this list may still show more than what a
specific device really has because drivers are sometimes over-listing,
yet it is still much closer to reality). - When a device is connected, the names of the axes will also be the
ones as listed by the backend, which will get us closer-to-reality
names. Typically the axis for a graphics tablet will be
because these devices are usually meant for absolute pointer
positioning whereas it will be on mice. - Curve editing for the tablet pressure response was one of the most
interesting configuration option in this dialog, even more now that we
don’t need to enable or disable specific devices. This is why when a
device has a “Pressure” axis, it will be selected by default, hence
allowing you to directly work on the curve, without unnecessary clicks.
Call for user input:
There are a few puzzling settings in this dialog and we would welcome
input from anyone who had an actual need for them. How were you using any
of these features? Which OS? What was the goal?
- There used to be a “Keys” list for every device in the dialog. We
actually removed this list back in 2.99.2. Based on tests, code
research, and discussion with Carlos Garnacho, our local GTK and input
device expert, we came to the conclusion that the “Keys” concept was
tied to “keyboard” devices (a type of devices not shown in this
dialog) and it was meaningless on “pointer” devices (mice, touchpads,
graphics tablets…). Yet here was the option! Maybe it actually had a
hidden usage to someone, someday? If this is your case, please explain
us so that we can think of a way to restore the feature with an
understandable interface. - The “Axes” list has the ability to set the “axis use” for a given
axis (the little numbers next to each axis). Yet we never managed to
do anything with it. This looks mostly either broken or meaningless.
Has anyone a use for this axis settings? - Each device has 3 “modes”: Disabled, Screen, and Window. “Disabled”
simply means that the device will share the main virtual device
pointer while “Screen” will make it look independent. The “Window”
mode, on the other hand, is a concept only meaningful for “floating”
devices (a concept maybe not even valid on all platforms) and even
then it looks broken, as far as our tests went. Is there anyone in the
world who actually uses the “Window” mode and sees a difference with
“Screen” in recent GIMP versions?
If anyone has the use for these features, we would definitely welcome
feedback because we are as puzzled as many others whether users actually
rely on these things. On one hand, we are tempted to remove these settings, because it doesn’t make sense to show a non-working configuration. On the
other hand, we don’t want to remove actual features if someone somewhere
has a use for them. So if you are one of those people, please contact us.
E.g. open a report
to tell us more.
Maybe there are other ways to improve this dialog for more people? Tell us
what you expect from it!
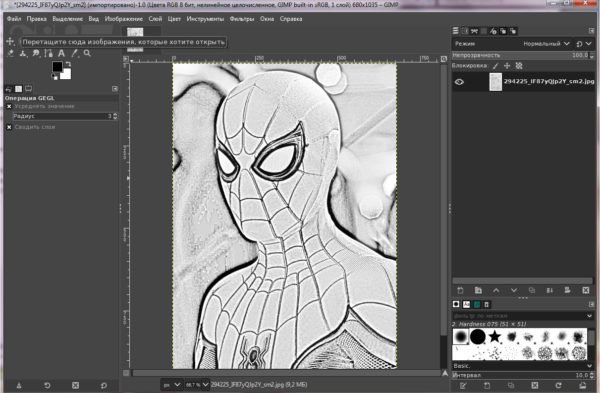
Как пользоваться редактором GIMP
У начинающих пользователей возникает вопрос: как пользоваться GIMP?
Основная часть окна редактора отведена под область редактирования: там можно увидеть любые отображаемые изменения. По обе стороны от окна редактирования можно отыскать удобные панели инструментов. Там же можно зайти в панель настроек, посмотреть историю действий, выбрать параметры конкретного инструмента. Прямо как в фотошопе!
Рабочее поле или так называемый холст
Пример работы в GIMP
Посмотрите один из примеров работы в редакторе. Думаю вам понравится.
Как работать в GIMP 2.10?
Watch this video on YouTube
А если хотите подробнее научится работать в gimp, то у меня есть бесплатный видеокурс для начинающих
и электронная книга

Работа с фотографиями в GIMP
Основными задачами, почему стоит обратиться к программе GIMP, являются кадрирование и редактирование изображений. Посредством актуальных инструментов можно легко устранить недочеты заваленного горизонта, эффект красных глаз, неправильную экспозицию. Также редактор позволяет создавать из фотографий художественные композиции или дизайнерские коллажи различной сложности. Можно сделать даже превью для видео на ютуб.
Как сделать превью для видео YouTube с помощью GIMP
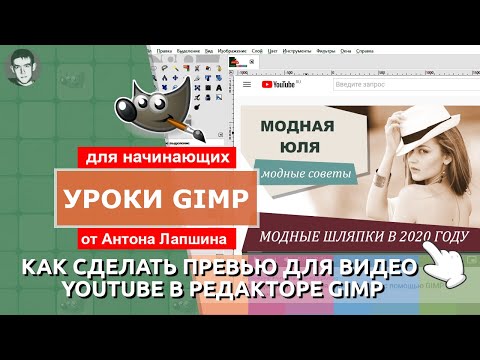
Watch this video on YouTube
Чтобы привести свои фото в безупречный вид, улучшить их качество, нам стоит воспользоваться базовым набором манипуляций. Это кадрирование, исправление уровня яркости, коррекция четкости. Все эти инструменты можно настроить, исходя из своих целей и комфорта.
Если есть потребность применить более продвинутые варианты работы с изображениями, помогут в этом инструменты выделения, при помощи которых легко удалить фрагменты фото.
Также можно изменить размеры, повернуть или отзеркалить изображение. Работая с кривыми, мы настроим баланс цветопередачи, показатели яркости и контрастности. Подробные уроки про кривые:
Есть в программе и фильтры, чтобы добавить фотографии художественный эффект.
Если фото вышли засвеченными из-за съемки в яркий солнечный день, можно поработать с инструментом Тон/Насыщенность. Посредством ползунков можно изменить тон снимка, степень освещенность и насыщенности.
При размытом изображении рационально использовать технику повышения резкости.
Сделав фото в условиях недостаточного света или с короткой выдержкой, мы получим кадр с повышенной зернистостью. Исправить ситуацию поможет инструмент Выборочное Гауссово размывание либо использования фильтра Удаление пятен.
Избавиться от эффекта красных глаз можно при помощи одноименного фильтра.
При проблемах с выдержкой лучше применить регулировки яркости и контраста. Также исправить недочеты выдержки можно при помощи инструментов Уровни или Кривые. Последний подразумевает перемещение управляющих точек кривой, которые создают оптимальную яркость.
Как пользоваться программой, если надо убрать нежелательный объект из изображения? Благодаря специальному фильтру Resynthesizer можно избавить кадр от лишних предметов.
Рисование в программе GIMP
Помимо работы с изображениями бесплатный графический редактор позволяет создавать свои изображения. Открыв новое изображение, можно при помощи инструментов Кисть и Карандаш. Также стоит попробовать инструмент «Аэрограф», воспользоваться градиентом, каллиграфическим пером, заливкой, убирая лишнее ластиком. Данная тема мало представлена на моем блоге, так как мы в основном редактируем готовые изображения.
При необходимости, в программу гимп для рисования можно установить любой удобный нам набор кистей. Кисти для графической программы можно скачать из сети или в этом разделе.
Таким образом, расширение возможностей программы зависит только от фантазии и мастерства пользователя.
Гимп отлично подойдет как для любительского рисования, так и для проработки векторных иллюстраций. Легко настроить инструменты графического редактора и под выполнение серьезных профессиональных заданий, создавая логотипы, интерфейсные элементы для интернет-страниц любой сложности.
Intention
So you installed GIMP on your computer, congratulations! GIMP is a very powerful image manipulation software, but don’t let that intimidate you. Even if you don’t have time to learn advanced computer graphics, GIMP can still be a very useful and handy tool for quick image modifications.
It is my hope that these few examples will help to solve those small, quick modifications that you may need to apply to an image. Hopefully this will lead to learning even more powerful image editing capabilities that GIMP is capable of as well.
For quick access, these are the four main points I’ll cover in this quick tutorial:
In keeping with the spirit of the predecessor to this page, I will be using images from the Astronomy Picture of the Day (APOD), provided by NASA.
All you need to know to follow these quick examples is to be able to find your image and open it:
File → Open
Панель инструментов GIMP[править]
Рассмотрим инструменты, с помощью которых осуществляется работа в редакторе Gimp:
Описание инструментов ведется слево направо, в соответствии с рисунком “панель инструментов”.
Это такие инструменты как:
|
|
|
|
|
|
|
|
|
|
|
|
|
|
|
|
|
|
|
|
|
|
|
|
|
|
|
|
|
|
|
|
|
|
|
|
|
|
|
|
|
|
|
|
|
|
|
|
|
|
|
|
|
|
|
|
|
|
|
|
|
|
|
|
|
|
|
|
|
|
|
|
|
|
|
|
|
|
|
|
|
|
|
|
|
|
|
|
|
|
|
|
|
|
|
|
|
|