Gamemaker studio 2.3: new ide features
Содержание:
- Runtime Changes
- Обучение GameMaker: Studio
- CHAINED ACCESSORS
- Test Re-Applying Your Saved Preferences
- GameMaker Projects
- Обзор интерфейса
- NEW PHYSICS FUNCTIONS
- Configure Any Protection Software
- SUMMARY
- Maths
- FUNCTIONS, SCRIPTS AND METHOD VARIABLES
- EXCEPTIONS, TRY, CATCH AND FINALLY
- THE MARKETPLACE
- Где я могу получить GameMaker: Studio?
- SUMMARY
- Версии приложения
- Backup Before You Begin!
Runtime Changes
Many functions have been added in GameMaker Studio 2, the following sections outline those that have been added and those that have been removed, please consult the manual (Help -> Open Manual) for further info.
Our Windows Desktop Runner has also changed from using DX9 to using DX11 this may mean that there are some compatibility issues that may need to be addressed, there are some known issues at present
- No Anti Aliasing implemented — all functions return 0 for the number of anti aliasing levels, we will implement this in the future
- Line drawing — unfortunately line drawing is not consistently implemented by hardware vendors, this means that between different manufacturers and different drivers from the same manufacturer you may get different results, we reccomend that you do not rely on line drawing in released games, but the functions are still there for you to try.
- Windows XP is no longer supported for games created using GameMaker Studio 2.
Обучение GameMaker: Studio
GM:S предлагает два различных способа создавать игры. Первый это так называемый интерфейс Drag and Drop (сокращённо DnD). Он довольно мощный и позволяет создавать сложную логику. Однако, он не такой мощный, как второй вариант: использование языка программирования GameMaker Language (сокращённо GML). GML — это прекрасный язык сценариев, который может делать все, что может делать DND, и многое другое.
Начало работы
После того, как
вы загрузили версию движка GM:S которая соответствует вашим потребностям, вам следует ознакомиться с учебными материалами,
которые поставляются вместе с GM:S. Их можно найти во вкладке Tutorials после того, как вы откроете GM:S.
В начале уроков будет показано, как использовать drag and drop интерфейс, а более поздние руководства начинают охватывать язык программирования GML. Самое приятное в предложенных уроках — это то, что они фактически добавляют окно к
интерфейсу, в котором вы узнаете, как создавать каждую игру, поэтому вам
не нужно обращаться к веб-странице — все доступно изложено для вас в GM:S!
Я рекомендую
проработать столько, сколько вам нужно, до тех пор, пока вы не
почувствуете, что у вас есть четкое представление об общем процессе
работы и инструментах, которые предлагает движок GM:S. Дополнительные уроки вы можете найти на вики сайте YoYo games по адресу http://wiki.yoyogames.com/index.php/GameMaker:Studio_Tutorials включая некоторые более продвинутые руководства.
Для самого продвинутого обучения можно посмотреть демки на вкладке Demos после запуска GM:S. Они не откроют окно обучения, но они предоставляют доступ ко всему используемому исходному коду, чтобы можно было просматривать его, запускать отладчик и наблюдать за тем, что происходит, так что вы получите хорошее представление как использовать их методы в своих играх.
Руководство
Руководство по GM:S можно найти в меню Help в разделе Contents…. Это должно быть первым местом, где вы будете искать ответы на свои вопросы, если сразу перейти на форумы, люди по всей вероятности огорчат вас за то, что вы просто не проверили справку. Существует также онлайн-руководство, которое можно найти по адресу docs.yoyogames.com
Руководство в программе GM:S
Если вы выполняете поиск как в прилагаемом руководстве, так и в онлайн-руководстве и не можете найти ответы, не бойтесь! На reddit существует большое сообщество /r/gamemaker и есть официальные форумы. Кроме того, имеется отличный сайт полон инди-разработчиков, некоторые из них часто используют GM:S на форумах TIG. Эти сообщества полны полезных людей, поэтому не бойтесь задавать свои вопросы!
CHAINED ACCESSORS
Another change to GML is the ability to chain accessors. Much like you can now chain arrays together, you can chain the different Data Structure accessors together too, making accessing the data from nested structures much easier.
A simple example of this would be a DS grid, where each grid entry is a ds list. Previously you’d have to first retrieve the index of the list from the grid, and then access the data in the list, but now it’s as simple as doing something like this:
This would retrieve the data from the 6th position in the DS list that is being held in the grid (0, 0) position. Other examples of use are:
Test Re-Applying Your Saved Preferences
Once your installation is complete and you have confirmed your issue is gone, close down GMS2 and navigate back to (Windows) %AppData%\GameMakerStudio2\\ or (macOS) ~/.config/GameMakerStudio2/\ and put the .json files you saved earlier back into here, overwriting the new versions GMS2 will have made.
Start GMS2 again now and confirm that it still starts and works correctly. If the issue which made you uninstall GMS2 has now returned, then you know it’s a value in Preferences which is causing the problem. You can either delete your json files to restore to defaults again next time you start GMS2, or you can investigate which particular setting is causing the issue (we can’t help you with this, unfortunately, as your issue may well not reproduce on another machine).
GameMaker Projects
GameMaker Studio 2 is not backwards compatible with Legacy GameMaker projects (those made with any version from 8.1 and below), but it will import projects made with recent versions of GameMaker: Studio 1.4 (v.157+ or ideally EA v.465+). However, that doesn’t mean they will run without making some major changes to the project structure, as a lot has been done to optimise and improve things in GameMaker Studio 2. The most obvious changes are that D&D actions have been overhauled and the code they create on import must be rewritten to fit the normal GML functions, and also the removal of the background resource and the changes to tiles (as covered above already). The functions dealing with these things no-longer exist in GameMaker Studio 2, and a number of other functions have been changed or removed (relating to views and drawing in particular.
However all is not lost, as GameMaker Studio 2 has a very comprehensive import system for your 1.4 projects that will create Compatibility Scripts and report on all the changes that need to be made to your project. Hopefully what this means is that any 1.4 project can be imported into GMS2 and then run with little or no changes from you to the code or resources.
For more information on how this works, please see the section below:
Porting A GM:S 1.4 Game To GMS2
Обзор интерфейса
Последней версией Game maker studio №1 была 8.1.140, на сегодняшний день она перестала поддерживаться, так была выпущена новая версия Game maker studio 2.
Так же на официальном форуме можно скачать русификатор для движка.
Ссылка на русификатор: Google drive
После того как вы скачали и установили Game maker studio запускаем его и в окне вводим данные, которые зарегистрировали на официальном сайте при скачивании. После ввода данных нам открывается интерфейс движка.
Так как мы используем бесплатную версию программы, категория «Изучение» нам не будет доступна.
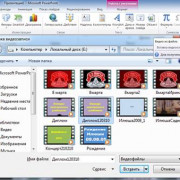
Для того, чтобы начать разработку игры, нажимаем на кнопку «Создать» и в следующем окне «Drag and Drop» после чего откроется окно, в котором нужно придумать название проекта и сохранить в удобное для вас место.
После того как откроется рабочее пространство, можно увидеть вкладки с правой стороны окна, где и будут сортироваться наши части игры.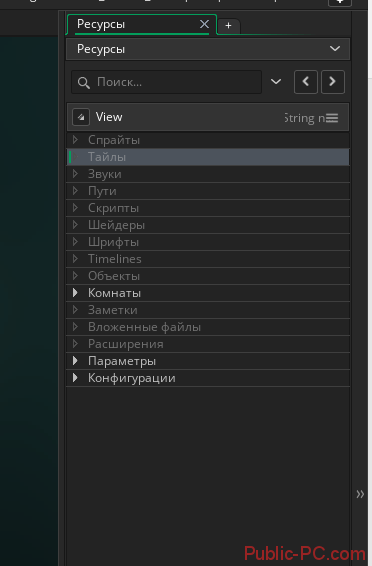
Для того что бы начать работать и создавать объекты нам нужно будет нажать правой кнопкой по пустому пространству, и выбрать пункт «Ресурсы». В выпавшем окне выбираем с создания чего будем начинать разработку.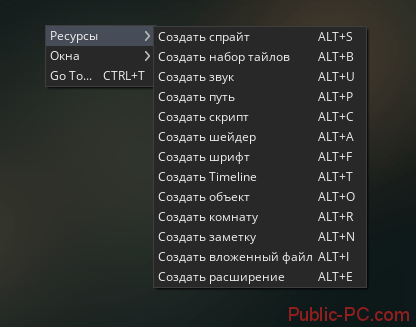
При создании спрайта нам откроется меню создания, анимированные персонажа нашей игры. Тут можно полностью с нуля, попиксельно, нарисовать персонажа или же импортировать уже готового. Так же анимировать его, создать по кадровую анимацию действий персонажа.
Для создания карты нам нужно выбрать «Ресурсы», а затем в выпавшем окне «Создать комнату». В редакторе комнаты предоставляются возможности задать размер, фон, установить элементы взаимодействия, разместить персонажей, нарисовать пути и т.д. В редакторе комнаты так же можно импортировать уже готовый фон или создать его саму с помощью этого редактора.
Создание событий можно произвести без обращения к программированию и созданию скриптов, все делается с помощью довольно интуитивно понятных меню и окон. Можно продумать и создать довольно сложные сценарии действий для объекта с помощью визуального редактора Game maker studio.
С помощью параметров можно выбрать платформу для которой создается игра и провести тонкие настройки игры, такие как размер окна для воспроизведения игры, версии, ярлыки, заставки при загрузке и т.п.
Стоит заметить часть программы, в которой нам дается возможность работать с кодом на языке GML. Очень радует та легкость, с которой простые командные функции могут быть сделаны. Поэтому если вы начинающий Game creator и готовы посвятить этому большую часть времени, тогда вам просто необходимо заняться изучением языка GML.
NEW PHYSICS FUNCTIONS
There has been a major update to the built-in physics library, which now includes a soft-body particle simulation based off the Liquid Fun library for Box2D. permit the creation of simulated soft-bodies using rigid body physics. Basically, this means that you can create a shape from particles that maintain cohesion and so simulate a full body, which, due to the interaction of the particles, gives the impression of a soft body. You can also use the physics particles to simulate liquids and other particle based physics systems.
You can find out more information about the new physics particles from the YoYo Games Tech Blog and the GameMaker Manual.
Configure Any Protection Software
The next step is to ensure that there is nothing on your machine which is blocking GMS2 from writing its files. If during this reinstall process so far you saw any prompts from your protection software for allowing GMS2 to access your machine, then you should now step through our guide User Permissions and Internet Access Required by GMS2 one more time, but now using this information to configure your protection software fully to «whitelist» GMS2 and allow it to modify your files.
Ensure you also allow it to modify wherever you want to save your projects!
If your software is fairly strict in how you allow permissions, then you may need to add the same rules again, but specific for the tools GMS2 uses when building projects. These would be Igor.exe and GMAssetCompiler.exe, which can both be found in:
- %ProgramData%\GameMakerStudio2\Cache\runtimes\\bin\ on Windows
- /Users/Shared/GameMakerStudio2/Cache/runtimes//bin/ on macOS
SUMMARY
As you may imagine, this is a rather important update to GameMaker Studio 2 with a lot of new features and a lot of changes «under the hood» to make life easier and to make the product easier to use and more compatible with things like source control. We’ve said it already during in this blog post, but it’s worth repeating… read the manual! This is especially important when starting to use the new Sequences asset, as the editor has a lot to it and — especially if you are not an artist or have never used any kind of animation or video editing software — it can be a bit overwhelming to start with. However, we think this is an incredibly powerful tool and opens up GameMaker Studio 2 in a big way to people who are less experienced with code and who prefer a more visual approach to making games.
One final thing should be said about importing pre-2.3 projects. On importing a project made with a version of GameMaker Studio 2 prior to this update, you will be prompted to save the project again using a new name before continuing. This is absolutely essential as the changes made to the project file format are not backwards compatible and once you update a project to 2.3 it can’t be loaded into previous versions, so it’s a good idea to keep separate folders for pre and post 2.3 versions of any game you are working on.
Thanks for reading and we can’t wait to see what you all do with the new features!
Happy GameMaking!
Maths
- matrix_build_identity() — return an identity matrix
- matrix_build_lookat(xfrom,yfrom,zfrom,xto,yto,zto,xup,yup,zup) — builds a «look-at» (view) matrix for a camera at position (xfrom, yfrom, zfrom) and looking at a point (xto, yto, zto) with an up vector of (xup, yup, zup)
- matrix_build_projection_ortho(width,height,znear,zfar) — build an orthographic projection matrix with width, height and a z range from znear to zfar
- matrix_build_projection_perspective(width,height,znear,zfar) — build a perspective matrix with width, height and a z range from znear to zfar
- matrix_build_projection_perspective_fov(fov_y,aspect,znear,zfar)- build a perspective matrix with field of view ange fov_y and an aspect ration and a z range from znear to zfar
- matrix_transform_vertex(matrix, x, y, z, ) — multiply the given vector (x,y,z,w) by the matrix NOTE: if no w component given then it is treated as 1
- matrix_stack_push(optional_matrix) — push matrix onto the matrix stack
- matrix_stack_pop() — pop matrix from the top of the matrix stack
- matrix_stack_set(matrix) — set the given matrix as the top of the matrix stacl
- matrix_stack_clear() — clear the matrix stack
- matrix_stack_top() — return the value at the top of the matrix
- matrix_stack_is_empty() — return true if matrix stack is empty, false otherwise
FUNCTIONS, SCRIPTS AND METHOD VARIABLES
Above we outline some changes to the GameMaker Language, but now it’s time to talk about the good stuff… what’s been added! To start with we want to talk about in-line functions and scripts. Previously, a script was a single resource that was created on a global scope and used to create a single custom function which would then be called using the script name as the function name. This is no longer the case and scripts, while still global in scope, are now a type of «container» for one or more functions.
What this means is that when you compile your project, scripts are no longer called individually, but are actually all run at the start of the game in the global scope, so all variables that are defined in the script (outside of function definitions) will be considered global. That said, you should still use the identifier to explicitly define and identify global variables in your code.
The reason for this change is that scripts can now contain multiple functions. If you’ve only used GML to code projects then the idea of functions may be something new to you, but think of them as being the same as scripts, only explicitly assigned to a variable. This variable is called a method and is used to call the code that is in the function, the same as you would have previously called the script name. This is easier to visualise with an example, so let’s look at one. Consider this simple script :
Now, however, this would be defined as a function like this:
or like this:
You would call this function just as you would have called the script:
So, as we mentioned above, scripts can now contain multiple functions and these should be defined with the format shown above where you have the JS doc comment to identify the function, then the function definition below, and then the next JS Doc comment, and then the function, etc…
Above, we briefly mentioned that functions as variables were called method variables, but it should be explained in a bit more detail. Basically, when you create a function with a variable like this, you are creating a method variable, and they can have different scopes. Consider this function:
-
In the case of a script a variable called «foo» is declared at global scope
-
If the function is declared in an event then the variable «foo» is on the instance that ran that event
-
If the function is declared in an event using the keyword then the variable «foo» is local to the event only
-
If «foo» is declared inside a then it is declared on the that is active at that time
This means that if you have some code that you need to use only within a loop in an alarm event (for example), then you can define it as a local scope method variable at the start of the event and then use it within the loop without the need to clutter up the script assets with it.
It is worth noting that while the variable will be in the chosen scope, the actual function will be bound to the scope that it was initially defined in. Going back to script functions, these are all global scope and are considered «unbound» (ie: they are not associated with any instances), but if you have a script function that creates another function within it and then you call this script from an instance, the function used within the script will be bound to the instance. In general this is not something you ever need to think about but for more complex operations with method variables it’s worth taking into consideration. This also applies when using other constructs like — when you create a method variable inside a , the function will be bound to the instance that is currently in scope.
The following new functions have also been added to deal with methods:
Check the manual for details fo how these functions should be used.
EXCEPTIONS, TRY, CATCH AND FINALLY
The final new language feature that has been added in the 2.3 update that we want to discuss here is the ability to control to a much greater degree how errors are handled when they are encountered in your code as well as the ability to generate your own error messages.
To start with we have the new operator, which — as the name implies — can be used to «throw» a runtime error message. This has the following syntax:
The expression used can be a value or a string or any other data type, and this will then generate an exception error which is — by default — shown on the screen, and on closing the error message the game will end. For example calling this:
will cause the following unhandled exception error to be shown:
This is the default way the error can be handled, but you can «take over» this error message and use your own handler code by calling the new function . This runtime function permits you to supply a custom method to use that will be called whenever any unhandled exceptions occur in your game.
Apart from the ability to throw your own errors and handle them using functions, we also have the new , , and operators. These can be used in your game for error checking and permit you to test out blocks of code and control what happens if any runtime exceptions occur. Using these will prevent the exception ending the game and will also prevent showing the standard error message to the user, but this means that you will have to handle what happens next in this case, like — for example — saving out log files and ending the game gracefully (note that if you choose to do nothing, your game may become unstable and not perform correctly).
At it’s most basic the syntax is as follows:
However, having a without anything to actually handle any exceptions the code may produce will not be very helpful, so we usually pair it with a , with the following syntax:
What does is permit you to run extra code supplied in the following block when an exception from the previous has been caught. If this is a runtime exception, then the supplied variable can be used to access a struct which will contain the following information:
A simple example of use is shown below:
It may be that you want to run some code regardless of whether an exception was thrown or not, and so for that you can add in a block. The syntax is:
It is worth noting that you can have any combination of these together, ie: / , / or / / , and that within the block you cannot use , , or statements as they have no meaning in this context and the compiler will generate an error if they are used.
THE MARKETPLACE
The new GameMaker: Marketplace permits you to buy and sell (or give away for for free!) assets and extensions. It has been designed to be as easy to use as possible and you will find that in 1.4 you have a new «Marketplace» menu option in the IDE. From there you can log in to the Marketplace and create, download, and manage all your asset packages. These packages can contain anything that you wish, including scripts, extensions, audio, sprites — basically anything that can be used as a resource in your games can be bundled as a package and uploaded to the Marketplace.
It is worth noting that Standard GMS users can access the Marketplace to buy or download asset packages, but to upload them you are required to have the Pro version of GMS. You can find all the information about the GameMaker: Marketplace (including guides on how to prepare your assets and upload them) from the YoYo Games Helpdesk.
Где я могу получить GameMaker: Studio?
Основной сайт движка GM:S — это http://www.yoyogames.com/. Вы можете загрузить бесплатную версию или приобрести одну из лицензионных версий.
Ниже приведено сравнение различных версий GameMaker, взятых с веб-сайта YoYo Games:
Как вы видите, бесплатная версия (Studio) довольно ограничена, но это отличный способ увидеть рабочий процесс и расположение инструментов, а также потратить некоторое время на изучение языка.
Обновление: Бесплатная версия GameMaker: Studio теперь та же, что и стандартная версия! Для получения дополнительной информации см. GameMaker: Studio будет бесплатной.
Стандартная версия отлично подходит для разработчиков одиночек, которые только планируют разработку компьютерных игр; Профессиональная версия идеально подходит для небольшой команды разработчиков планирующих переходить в конечном итоге на кроссплатформенную разработку, поскольку они могут добавлять различные модули с течением времени после получения некоторого дохода; и Master Collection отлично подойдет для небольших команд, которые являются частью созданных студий, и хотели бы использовать кроссплатформенную разработку с самого начала.
GM:S также
доступен в Steam, но я бы рекомендовал не покупать его там, так как
YoYo Games не знает, что вы его приобрели, и,
следовательно обладателям их продукта будет больше хлопот в отделе обслуживания клиентов. Кроме
того, они иногда предлагают дешевые апгрейды для тех, у кого уже есть определенная версия GM:S, и они не могут дать то же обновление пользователям купившим в Steam. Кроме того, если вы покупаете у Steam, то необходимо войти в Steam, чтобы запустить GM:S, а это может раздражать.
SUMMARY
Well, we’ve come to the end of this rather long blog post, and as you can see we’ve been working hard to improve the GameMaker Language and bring it up to par with other more common programming languages, We hope that these new features are of use to you, and that they help your workflow and enable you to make bigger and better games! Note that all the features discussed here are available from GameMaker Studio 2.3 onwards, and we recommend that you read the manual fully before using any of them, as there are details and nuances related to their use that we just haven’t got the space to talk about here. Also note that the 2.3 update includes a number of changes and improvements to the GameMaker Studio IDE which we’ll discuss a separate blog post.
Happy GameMaking!
Версии приложения
Изначально была одна версия программы, но впоследствии приложение разделилось на две редакции: упрощенную (Lite) и профессиональную (Pro). Профессиональная версия расширяет возможности игрового редактора, добавляя, например, функции:
- создания многопользовательского режима;
- импортирования и экспортирования ресурсов для совмещения разных проектов;
- продвинутого редактирования изображений и анимаций;
- расширенных средств программирования.
Профессиональная редакция также может работать в Windows 7 и других версиях. При запуске в ней отсутствуют всплывающие надписи, призывающие к обновлению до версии Pro, а в создаваемых программах нет логотипов.
Разделение приложения на Lite и Pro актуально для версии 8.0.
Backup Before You Begin!
Please note that you will lose your GMS2 preferences as part of a fresh install. It is worth saving this file to a safe place before you begin, so you can see if it’s safe to re-apply once the reinstall is complete.
Open the folder (Windows) %AppData%\GameMakerStudio2\\ or (macOS) ~/.config/GameMakerStudio2/\ and locate the .json file(s) in here. Move them all to a safe place while you reinstall.
Here, on Windows, I have local_settings (my main preferences file), cloud_settings (how I have configured GMS2 to work with online YoYo services like the Marketplace), and two files relating to my source control integration with Github. You might not have all of these — likely, only «local» and probably «cloud».
Note that all other files/folders will be left alone just now so they can be deleted later.
Android Developers
If you are an Android developer, please ensure your Android keystore file is in a safe place before continuing with this guide — you MUST NOT lose this file if you have published games on Google Play or Amazon (and other Android stores), as you would be unable to update these products!
To find the location of your keystore file, go to Preferences -> Platform Settings -> Android and scroll down (if required) to the Keystore Filename field. This file should be backed up along with your alias and password information.
Marketplace Publishers
If you are a GameMaker Marketplace publisher, please ensure your Marketplace Certificate file is in a safe place before continuing with this guide — you MUST NOT lose this file if you have published assets on the Marketplace, as you would be unable to update these products!
To find the location of your certificate file, go to Preferences -> Marketplace and see the Certificate File field. This file should be backed up along with your password.
Check For Anything Else Important
Other information and Preferences are generally replaceable, but feel free to back up any information or take note of any values that you want to ensure can be re-entered after your fresh install.
If you have certificates or passwords for stores or other third-party services not listed above, please make sure you back these up also!