Изучаем sublime text 3: плагины для веб-разработчиков
Содержание:
- Интерфейс программы
- Add Your Repository to the Default Channel
- Обзор SublimeText
- Установка темы Material Design
- Компиляция SASS в Sublime Text 3
- Usage
- Install
- Список полезных плагинов
- Pick a Name
- 3.0 Beta
- Package Takeover Vulnerability Notification
- Changelog:
- Description
- Installation
- What is improved?
- Configuration
- Установка и настройка Sublime Text 3. Компиляция LESS, SASS, JADE. Все необходимые плагины. Полная инструкция
- Установка редактора
- Installation
- Alt-Left/Right to move between words (Unix)
- Settings
- License
- Case Conversion
- Configuration:
- Установка Package control
- Подводим итог по Sublime text 3
Интерфейс программы
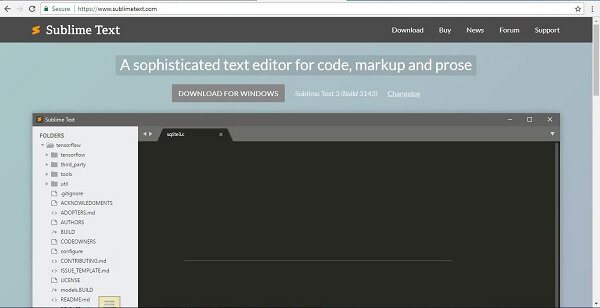
После того, как Вы в первый раз откроете текстовый редактор он будет выглядеть так:

Как ранее упоминалось в нем нет ничего лишнего. Многие ищут русификатор для Sublime Text 3, но на самом деле и без него все понятно. К тому же все англоязычные и русскоязычные мануалы написаны с учетом английского интерфейса.
Настроить интерфейс можно через верхнее меню – VIEW, где:
- view – side bar –show side bar. Показывает левый сайд бар, по началу он пусто, но если мы создадим на рабочем столе папку: new project и просто перетащим ее в Sublime, то она там появится и далее мы сможем работать с проектом, который будет находиться в этой папке.
- View – show minimap. Показывает в правом сайд баре в каком месте кода вы находитесь. Очень удобно при работе с большими проектами.
- View – show tab Показывает все открытые вкладки
- View – show status bar. Показывает нижнее меню. Кстати в самом правом углу можно менять кодировки. Вообще в зависимости от открываемого файла Sublime Text 3 по расширению понимает, что это за файл и сразу его открывает, как надо, но иногда бывает, что нужно подсказать, что это PHP, Python, C++ или что-то еще. Чуть левее находится Индентация, с помощью нее можно менять табы на пробелы и наоборот приводя код в более структурированное состояние.
- View – hide menu. Нажали? Если да, то меню в Sublime у вас скрылось, для того, чтобы вернуть надо нажать ctrl+shift+p и набрать menu
- View – show console. Показать консоль
- Enter Full Screen и Enter Distraction Free Mode. Полноэкранный и еще более полноэкранный режим.
- Layout, Groups, Focus Group, Move File to Group. Разбивка экрана на 2-3-4 части для работы с несколькими файлами. Разбивать можно как вертикально, так и горизонталью.
Интерфейс (на 7 скриншотах)
Остальные вкладки рассматривать не будем, так как либо они входят в ранее рассмотренные настройки, либо ими почти никто не пользуется.
Add Your Repository to the Default Channel
-
Fork the
Package
Control Channel - Clone your fork to your machine
- Open the package_control_channel/ folder with Sublime Text
-
Add package info based on the type of hosting:
-
GITHUB/BITBUCKET HOSTING: Add your package info to
the proper JSON file in repository/ folder.Example of GitHub hosting:
{
	"name": "Alignment",
	"details": "https://github.com/wbond/sublime_alignment",
	"releases":
}
Example of BitBucket hosting:
{
	"name": "Alignment",
	"details": "https://bitbucket.org/wbond/sublime_alignment",
	"releases":
}
For other options, please read the documentation in the
example-repository.json
file. Please note that the version,
url and date sub-fields are not allowed
in the centralized channel. If you wish to use these, you
must host your own packages.json. -
MANUAL HOSTING: Add the URL for your
packages.json file to channel.json. See
example-repository.json
for documentation about the structure of the
packages.json file.
-
-
Add the platforms key to your releases if necessary.
-
Package that only works on Mac and Linux
{ "name": "Alignment", "details": "https://github.com/wbond/sublime_alignment", "releases": , "tags": true } ] } -
Package that only works on Windows
{
	"name": "Alignment",
	"details": "https://github.com/wbond/sublime_alignment",
	"releases": ,
			"tags": true
		}
	]
}
-
Обзор SublimeText
Автором называют некоего Джона Скиннера. Разработка началась в ноябре 2007 года, причём было объявлено о том, что поставлена цель «создать лучший текстовый редактор всех времён и народов». Первая версия вышла 18 января 2008 года, вторая в 2011, третья в 2013 году. К 2018 году Скиннер со товарищи быстро сориентировались в тенденциях рынка и сосредоточились на Python, накидав много приятных возможностей для программистов «на змее».
Изначально в качестве целевой аудитории подразумевались разработчики, а потому в программе была предусмотрена проверка синтаксиса для множества популярных языков программирования. Это C, C++, C#, CSS, D, Dylan, Erlang, HTML, Groovy, Haskell, Java, JavaScript, LaTeX, Lisp, Lua, Markdown, MATLAB, OCaml, Perl, PHP, Python, R, Ruby, SQL, TCL и XML. Можно подключать плагины и для других языков.
Программа выполнена с суровым интерфейсом без кнопок и декоративных элементов, что позволяет на 100% использовать экранное пространство для дела. Экран можно разбить на несколько рабочих областей. Например, слева открывать файл html, а справа css и параллельно с ними работать. Отдельный плюс – можно открывать не отдельные файлы, а целые каталоги и работать в них. Далее мы подробно рассмотрим, что к чему, на примере нашего проекта.
Подсвечивается всё очень красиво, по дефолту установлена приятная для глаза тёмная тема с контрастным выделением. Её ещё очень любят показывать в фильмах и ТВ-передачах, когда нужно снять «что-то о программистах».
Для установки, удаления и настройки плагинов применяется менеджер пакетов. Настраивается редактор довольно специфично – для этого нужно открывать и редактировать файл настроек. Для этого нажимаете в меню «Preferenses —>Settings», после чего можно будет увидеть расположение файла настроек.
И, пожалуй, самая большая вишенка на торте – возможность мультиколонного выделения.
Вы просто ставите курсор в нужное место, затем зажимаете шифт и правую кнопку мыши и ведёте мышь вверх или вниз. Курсоры появляются в нескольких местах, и вы можете вводить символы или удалять текст сразу в колонке. Другой вариант – можно создать дополнительные курсоры в любом месте «Ctrl + клик мыши».
Недостатки – это, как обычно, обычно оборотные стороны достоинств. Профессионалы скажут, что Sublime не дотягивает до полноценной IDE и будут правы. Новичкам покажется жутковатым способ настройки через JSON. Любителям офисных программ будет скучновато без красивых кнопок в интерфейсе. Кого-то будут раздражать периодические призывы купить программу, а кому-то не понравится необходимость работы со сторонними плагинами. Тем не менее, как показывает опыт, для разработки сайтов средней и малой сложности SublimeText вполне годится.
Установка темы Material Design
Далее я сменю стандартную тему оформления и подсветки кода на Material Design. Она тоже относится к темным темам, но имеет более яркую подсветку кода, и с ней более комфртно и приятно работать при длительном написании кода.
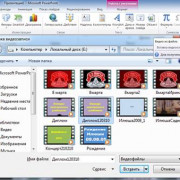
Идем на сайт темы Material Design и жмем кнопкe install. Происходит переход на сайт PC для ST3, понимаем что тема доступна как плагин. В ST3 запускаем Ctrl+Shift+P, выбираем install package, после ищем нужную нам тему, я набираю Material Theme и нахожу ее. Жму Enter и устанавливаю.
Sublime Text 3 — Package Control — установка темы Material Design
После этого иду в меню Preferences, и выбираю установленную тему.
Sublime Text 3 — Package Control — установка темы Material Design
Также после этого, рекомендуется зайти в настройки ST3, и дописать следующие конфиги:
Это позволит отображать тему так как это было задумано ее создателями. В итоге у меня получился вот такой внешний вид ST3.
Sublime Text 3 — тема Material Design
Установка плагинов
Я установил следующие основные плагины:
- Emmet (ускорение написания html и css)
- Hayaku (ускорение написания css)
- LESS (syntax highlighting — подсветка кода less)
- Prefixr (префиксы для CSS)
- Placeholders (Lorem Ipsum наполнители для html файлов)
- SFTP — плагин для работы с FTP
- SideBarEnhancement расширяет возможность сайт бара
- SyncedSideBar синхронизирует SideBar с открытыми файлами по клику на них
- AdvancedNewFile создаём новые файлы и папки при помощи горячих клавиш
- BracketHighlighter подсвечивает открытие/закрытие любого фрагмента в коде
- jQuery набор сниппетов для jquery
- AutoFileName автозаполнение путей к подключаемым файлам
- CSSсomb делает код красивым
- Gist сохранение отдельных участков кода на github прямо во время редактирования
Компиляция SASS в Sublime Text 3
SASS — это другой препроцессор для CSS. Набирает популярность, и уже обгоняет less по распространению использования.
- Устанавливаем Ruby
- Запускаем консоль, и ставим Ruby Gem gem install sass
- Устанавливаем плагин Sass для Sublime Text
- Устанавливаем плагин Sass Build для Sublime Text
- Устанавливаем плагин SublimeOnSave для Sublime Text (мы же говорили о этом плагине в инструкции выше)
Теперь добавим настройки в Sublime Text Settings – Default:
Также не забудьте при открытом .sass файле зайти и выбрать билд систему в Tools → Build System → SASS Compressed Теперь при сохранении .sass файла будет компилироваться .css.
Usage
From now on you can select as the current language in the bottom right corner of ST and enjoy all the benefits. For files with the extension it will be automatically active.
For the coloring (meaning the proper highlighting) there are two choices. By default a light color scheme will be applied.
I personly like the dark coloring more, providing fatigue-proof coding. To change the use of a color scheme go to .
Copy one of these into the file on the right and save:
{
    "color_scheme" "Packages/GDL/GDL-dark.sublime-color-scheme"
}
{
    "color_scheme" "Packages/GDL/GDL-light.sublime-color-scheme"
}
Don’t like the themes?
You can edit the files directly – they are nothing else than files basically. But remember to copy your own color scheme into the folder! Otherwise an update would overwrite your changes. (Of course you then need to point Sublime Text to your new color scheme like above.)
GoTo, Auto completion, Snippets
The “Goto” feature of Sublime Text is pretty powerful. To gain full access you must use . If you e.g. quickly want to got to a subroutine place your cursor into the name and press F12. You will then jump directly to the definition.
Auto completion takes place automatically, if you’re typing. You can force auto completion via ctrl + space.
I have included some example snippets. Try it out by typing in: and then press TAB ↹.
Voilá! There’s a divider.
I hardly encourage you to modify and extend the snippets, so they will suit your needs.
You will find all the shipped snippets in the folder.
Install
Using Package Installer:
Ctrl+Shift+P - Install Package - Transparency
You may also install via git with the below commands:
Windows only
For Sublime Installed:
git clone https://github.com/vhanla/SublimeTextTrans.git "%APPDATA%\Sublime Text 2\Packages\Transparency"
Notice that this location might change on each SublimeText version, you can find the correct path by going to menu Preferences — Browse Packages
For Sublime as Portable:
git clone https://github.com/vhanla/SublimeTextTrans.git "C:\Sublime\Data\Packages\Transparency"
Where C:\Sublime is the portable’s path. So change accordingly.
You can also get it zipped from the Releases section.
Remember, this plugin must be inside its own directory within packages directory where you will unzip it.
Список полезных плагинов
Модификации могут в несколько раз упростить работу, сделать код более понятным и прочее. Также они могут повышать скорость работы. Список таких плагинов собран внизу.
Emmet
Очень полезный плагин для верстальщиков, так как делает из сокращенных выражений на html/css полные фрагменты кода. Например, если написать html и нажать tab, то он создаст полноценную разметку для html документа. Кстати, в прошлом плагин назывался Zen coding.
JavaScript & NodeJS Snippets
Тот же emmet, только для JavaScript и NodeJS. Также повышает скорость работы. Пример работы, document.querySelector(‘selector’); можно не вводить, а вести всего лишь два символа qs, после нажать кнопку табуляции и всё.
Git
Наверно уже поняли из названия, о чем плагин. Верно, он позволяет работать с системой git. Этот плагин сэкономит немалое количество времени, хотя бы потому, что вам не нужно бегать от sublime до git и наоборот, так как всё это можно делать в редакторе. В плагине есть отличные автокомплит, который вызывается методом вписания -add. Так же нельзя не упомянуть про команду quick, которая добавляет изменения и коммитит их.
GitGutter
Данный плагин отслеживает изменения в коде, а также даёт просмотреть статус самого файла. Для удобства подсвечивает измененные строки коммитом.
Sidebar Enhancements
Благодаря этому плагину можно сделать свой левый сайдбар более многофункциональным и полезным. Есть очень много полезных фишек, и одна из них, это «открыть в браузере».
ColorPicker
Небольшое отдельное окно для выбора цвета. Мелочь, но пригодится. Кстати, цвет можно выбрать прямо на экране с помощью инструмента «пипетка». Цвета можно выбирать из палитры в hex-формате.
EditorConfig
Плагин для этакой кроссплатформенности. Плагин позволяет иметь файлы для настроек сразу нескольких редакторов кода. Такие файлы хранят в себе информацию о различных конфигурациях.
Placeholders
В sublime text 3 можно добавлять текст lorem-ipsum. Плагин Placeholders пошёл дальше, теперь можно вставлять не только текст, но и макетные изображения, а также таблицы, списки, формы.
DocBlockr
Этот плагин позволяет крайне быстро делать описание к функциям. Он создает закомментированную область, в которой можно описать функции, возвращаемые значения, переменные и их типы.
Floobits
Позволяет работать сразу нескольким разработчикам в одном коде. И это можно делать в разных редакторах, таких как Vim, Emacs, SublimeText IntelliJ IDEA.
SublimeCodeIntel
Расширение для редактора, которое позволит намного быстрее разобраться в коде. Если нажать на имя функции, то можно попасть к описанию этой самой функции.
Pick a Name
-
Try not to use the word Sublime in your package name.
Every package available via Package Control is for Sublime Text. Using
the word Sublime just adds noise to the list when trying to find
packages. You can use the word Sublime in your marketing
material, but omit it the package list, e.g. Sublime SFTP. -
Don’t use a name too similar to another. We don’t
want Todo and T0d0. -
Use CamelCase or underscore_notation. Other Python packages in
ST3 will be able to more easily interact with it. Additionally, the
search indexer will properly split words, making search results more
accurate. Obviously this does not matter if your package name is a
single word or contains no Python. -
Do not use a . in the package name. If you package
includes any Python code, it will not load in ST3. This is because
Python uses . as a folder separator when importing code. -
Do not use a or other restricted characters in the
package name. Package names are used as part of a file
or folder name, depending on what version of Sublime Text the user is
using. Invalid characters include: <, >,
, ", , \, |,
? and *. -
Use ASCII only if possible. The quick panel that Package Control
uses in Sublime Text for selecting packages does not do match characters
with diacritics unless they are entered by the user. Thus a user
searching for resume will not find résumé. -
Check hard-coded references. The package name is (effectively)
used as the package folder name. Any file path references in a theme or
Python code must use this package folder name. Be sure your local
package folder name matches. See the .no-sublime-package
file discussed in step 5 if you need to ensure files are always unpacked
into a folder.
3.0 Beta
by wbond
at 5:00pm
on Thursday, December 11th, 2014
After a couple of months of bug fixes and feature development, I‘m excited
to announce the first Package Control 3.0 beta! Over the next few days
I would like to get it in the hands of a bunch of users to work out any
final kinks. Hopefully 3.0 will be a little less eventful than the 2.0
rollout.
A set of full release notes will be displayed via Package Control messages,
however here are some highlights:
- depedency support
- an SSL module for Linux
- error-free theme, color scheme and syntax upgrades
- improved HTTP support on Windows
- functionality to sync package removals via the User/ folder
If you are willing to help, perform the following instructions to
upgrade to version 3.0.0-beta. Once upgraded, keep an eye
on the Sublime Text console for Python exceptions. If you experience any
issues, please
open an issue.
-
Open Preferences> Package Settings
> Package Control > Settings – User
and set the install_prereleases setting to true -
Run the Add Repository command and enter
https://sublime.wbond.net/prerelease/packages.json. -
Run the Upgrade Package command and choose
Package Control
Package Takeover Vulnerability Notification
by wbond
at 11:00am
on Wednesday, February 24rd, 2021
At 9:56AM EST February 23nd, 2021, Package Control was notified of a package takeover vulnerability in the default channel package crawler workflow. The issue was reported by Sven Blumenstein of Apple Information Security.
At 10:28AM EST February 23nd, 2021, Package Control confirmed the receipt and nature of the takeover vulnerability. At 11:32AM EST February 23nd, 2021, a mitigation was deployed to the default channel server, fixing the vulnerability.
The process to exploit the vulnerability was as follows:
- An author of a package in the default channel would need to delete their GitHub or BitBucket account
- A new user account (new author) must be created with the same name as the deleted account
- The new author must create a repository with the same name as the package repository
- The new author must create a new release of the package with a higher version number
- New and existing installs of the package would install the version of the package from the new author
The vulnerability existed due to the fact that the crawler for the default channel would allow a hosting service to go offline and come back online. Unfortunately this robust behavior, in the case of a hosting provider going offline, unintentionally allowed for user names (or domain names) to transfer ownership without review.
A review of the package database was conducted after fixing the vulnerability. At the time of reporting, there were 31 GitHub user accounts and 1 BitBucket user account that were vulnerable to takeover. 14 GitHub accounts had transfered ownership, but had not retained previous package repositories. There wasn’t any evidence of malicious takeovers, however the default channel crawler does not maintain logs of every change to every package.
Moving forward, all packages that go offline will have to be manually reviewed before they will be available for installation.
If you have any questions about the incident, please contact me via will@wbond.net or open an issue on the website issue tracker.
Changelog:
v1.4
- Fixed opening default settings and help menu
- Improved window listing on ST3
- Fixed issue #3 thanks to @rexdf
- Only call external executable if ST2/3 window is not already WS_EX_LAYERED
v1.3
Modified SetSublimeLayered.asm to make it smaller and to avoid false positives (tested on VirusTotal)
These are hashes:
- SHA-256    66b72c28f54728c6df3995b0ae026aa1aeeca96911d5b484673a502ec6592f2a
- CRC32        54612762
- MD5         E113BDC6FA08BC054F7A89E7B24411BD
- SHA-1     376707D5579384B42586D0616BB03BBB993C6050
v1.2
- Onload transparency (95% working due to ST API limitations)
- Remember chosen transparency level
- Support for user settings
v1.0
Added support for Sublime Text 3
Description
Provides enhancements to the operations on Sidebar of Files and Folders for Sublime Text. http://www.sublimetext.com/
Notably provides delete as “move to trash”, open with.. and a clipboard.
Close, move, open and restore buffers affected by a rename/move command. (even on folders)
New file/folder, edit, open/run, reveal, find in selected/parent/project, cut, copy, paste, paste in parent, rename, move, delete, refresh….
Copy paths as URIs, URLs, content as UTF8, content as data:uri base64 ( nice for embedding into CSS! ), copy as tags img/a/script/style, duplicate
Preference to control if a buffer should be closed when affected by a deletion operation.
Allows to display “file modified date” and “file size” on statusbar (may be a bit buggy).
Installation
Download or clone the contents of this repository to a folder named exactly as the package name into the Packages/ folder of ST.
Troubleshooting Installation:
- First please note this package only adds a context menu to the “Folders” section and not to the “Open Files” section.
- Open the package folder. Main menu -> Preferences -> Browse Packages.
- Close Sublime Text.
- Remove the folder “Packages/SideBarEnhancements”
- Remove the folder “User/SideBarEnhancements”
- Navigate one folder up, to “Installed Packages/”, check for any instance of SideBarEnhancements and remove it.
- Open ST, with Package Control go to : Remove Package, check for any instance of SideBarEnhancements and remove it.
- Restart ST
- Open ST, check if there is any entry about SideBarEnhancements in Package Control(in sections: “Remove Package” and just in case in “Enable Package”)
- Repeat until you find there no entry about SideBarEnhancements
- Restart ST
- Install it.
- It works
What is improved?
Most of C Improved features tend to facilitate everyday C development experience. This varies from enabling highlighting of operators to more complex enhancements listed below.
Preprocessor issues
C preprocessor directives are relatively simple to parse (even with regular expressions, to some extent). And so related issues were addressed first of all.
Macro highlighting and error handling
Macro parameters (including variadic arguments) and argument stringification now have proper highlighting with handling of some common syntax errors.
Here is an example of two more or less complex multi-line macros.
| Standard C | C Improved |
|---|---|
And below is a result of commenting out a vararg (but missing a preceding comma outside the comment) and accidentally putting tabs after some line continuation backslashes.
| Standard C | C Improved |
|---|---|
Both errors are ignored by the standard package, while C Improved highlights a premature closing paren in the first case as an error, and warns about trailing whitespaces after the backslashes (the second one is immediately followed by an error complaining about an unexpected EOL within macro parameters). See an issue about highlighting.
Macro innards
A macro body (with proper line continuations, if needed) is not able to contribute to the symbol index anymore, nor it can interfere with a code surrounding the macro, or anyhow break syntax highlighting.
| Standard C | C Improved |
|---|---|
In this example the standard C package recognizes inside a macro as a function definition though it is actually a function call.
This leads to incorrect highlighting and also adds a bogus symbol into the symbol list.
Moreover, a function declaration which follows the macro () is not recognized at all.
Scopes for preprocessor directives
All preprocessor directives provide a proper scope now (), which means that you can select a whole macro with ctrl+shift+space or ⌘+⇧+space. It also allows, for instance, the whole macro body to be styled differently (this is up to a color scheme though).
Support for significant projects
The standard C package provides a special support for functions from C standard library and POSIX. For example, a function is highlighted differently.
However, most of major software projects implemented in C have their own internal libraries/frameworks and use some established patterns and idioms all across their sources. This includes not only a set of commonly used functions and types; there could be a handful macro for defining some object, a special kind of function attribute/annotation, etc.
If you use Sublime Text for developing some of the following projects, you should find these improvements rather useful.
Linux kernel source
This adds a special handling of some common macros widely used across the kernel source code, like , or ,
which would otherwise be recognized as functions thus polluting a symbol index and an outline.
| Standard C | C Improved |
|---|---|
CPython interpreter source
This includes:
- Highlighing of Python-related constants (like or ) and main data structures (, , , etc.)
- Widely used , and function annotation. This sanitizes higlighting of annotated functions and the symbol index
- Special highlighting of interned static string literals defined with macro
- Well-marked highlighting of macros involving transfer of control (like ).
| Standard C | C Improved |
|---|---|
Customizable indexing of types/functions/macros
You can adjust which symbols are available for navigation and visible in a symbol index or in an outline.
The following scopes and default preferences are provided:
| Scope name | Description | Outlinectrl+R | Index (ST3) F12ctrl+shift+R |
|---|---|---|---|
| compound type | visible | visible | |
| forward declaration of a type | visible | hidden | |
| type alias () | visible | visible | |
| function definition | visible | visible | |
| function declaration | visible | hidden | |
| function-like macro | visible | visible | |
| object-like macro | visible | visible |
These settings can be changed through files, see .
Configuration
Plugin Settings
The supported options are listed in the default settings file. See
for more information.
The only required setting is . Set this to the ycmd
repository path, and the plugin will automatically launch it when needed.
NOTE: If YouCompleteMe is already installed for vim, this plugin can
use the ycmd repository installed along with it. If installed with Vundle,
it would look something like:
{
  "ycmd_root_directory" "~/.vim/bundle/YouCompleteMe/third_party/ycmd"
}
YCMD Settings
Server settings are loaded from a separate JSON file. The ycmd repository
includes a good set of defaults at . Either
modify that file, or create a copy of it, and use the plugin setting
to point to the copy.
For example, create a copy with custom settings:
cd ~/Documents/ycmd
cp ycmd/default_settings.json ycmd/custom_settings.json
The corresponding plugin settings would be:
{
  "ycmd_root_directory" "~/Documents/ycmd",
  "ycmd_default_settings_path" "~/Documents/ycmd/ycmd/custom_settings.json"
}
Eventually, these settings will be brought into the plugin settings. The
plugin would then be able to generate the ycmd settings file automatically.
Установка и настройка Sublime Text 3. Компиляция LESS, SASS, JADE. Все необходимые плагины. Полная инструкция
Привет, много уже было написано про Sublime Text. В своем блоге я писал про Sublime Text 2. Сейчас Sublime Text 3 уже вышел из альфа версии (альфа — означает — новая и крайне не стабильная версия), и перешел в бету (бета — все еще не стабильная, но уже предназначена для тестирования, после беты обычно идет официальный релиз). И я решил полностью разобраться с Sublime Text 3 (далее в тексте ST3).
Если вы собираетесь установить SublimeText3 то эта самая полная инструкция для вас. Здесь я опишу все что связано с этим редактором, а умеет он действительно многое.
Сперва я удалил из системы ST2 и все его следы. Также удалил node.js и npm который был с ним в паре. Так как я намерен заново — правильно и грамотно настроить компиляцию less, а затем и saas файлов, через sublime. Но об этом позже.
Установка редактора
Sublime Text 3 спокойно поддерживается на:
- linux
- MacOs
- Windows
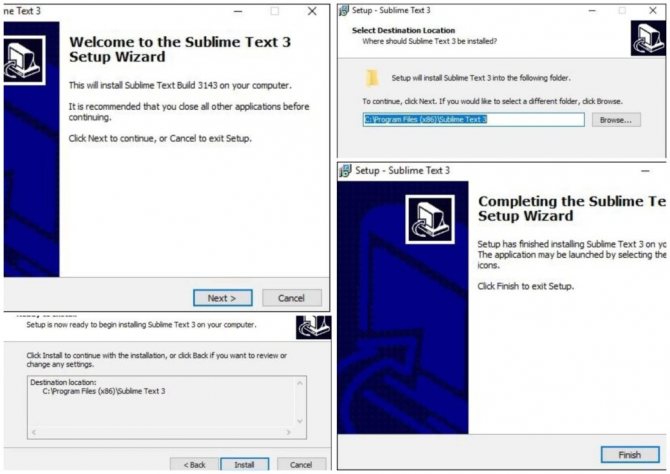
Windows. Установка
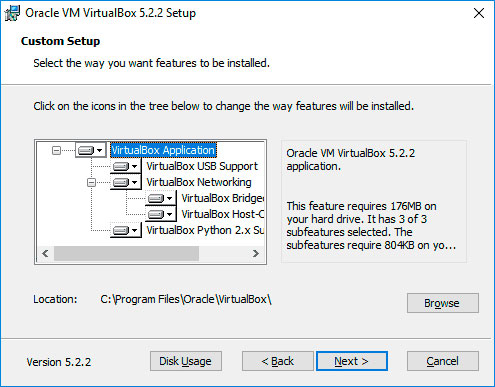
После выбираете путь, куда собираетесь скачать установщик. После заходите к установщику, и выбираете уже то место, куда будет установлена программа. Весь процесс займет минут 5-10.
Linux. Установка
Установить редактор на дистрибутивы linux будет уже не так просто, поэтому просто повторяйте за инструкцией ниже.
- Необходимо использовать командную строку, чтобы установить пакеты редактора sublime text 3. Для установки необходимо ввести следующую команду: sudo add-apt-repository ppa:webupd8team/Sublime-Text-3
- После необходимо обновить уже установленные пакеты. Делается это тоже с помощью команды: sudo apt-get update
- Ну и последний шаг, сейчас нужно установить хранилище Sublime Text 3. Команда: sudo apt-get install Sublime-Text
Готово, если все шаги выполнены правильно, то вы сможете увидеть в списке программ Sublime-Text.
OS X. Установка
Теперь, что касается установки на Мак.
- Загружаете файл с расширением .dmg.
- Открываете его и переносите в папку «приложения».
- Запускаете программу.
Как видите, ничего сложного в установке нет. Ну а теперь, когда Sublime установлен, нужно его настроить.
Installation
Package Control
The preferred method of installation is via Sublime Package Control.
- Install Sublime Package Control
- From inside Sublime Text, open Package Control’s Command Pallet: CTRL SHIFT P (Windows, Linux) or CMD SHIFT P (Mac).
- Type , select command and hit Return. A list of available packages will be displayed.
- Type , select the package and hit Return. The package will be downloaded to the appropriate directory.
Manual Installation
-
Download or clone this repository to a directory in the Sublime Text Packages directory for your platform:
- Mac:
- Windows:
- Linux:
- Restart Sublime Text to complete installation.
The features listed above should now be available.
Alt-Left/Right to move between words (Unix)
-
Bash: add the following in or
if "$TERM_PROGRAM" == "Terminus-Sublime" ; then bind '"\e[1;3C": forward-word' bind '"\e[1;3D": backward-word' fi -
Zsh: add the following in
if  "$TERM_PROGRAM" = "Terminus-Sublime" ; then
bindkey "\e[1;3C" forward-word
    bindkey "\e[1;3D" backward-word
fi
Some programs, such as julia, do not recognize the standard keycodes for and . You could
bind them to and respectively
“json
, “command”: “terminus_keypress”, “args”: {“key”: “b”, “alt”: true}, “context”: },
{ “keys”: , “command”: “terminus_keypress”, “args”: {“key”: “f”, “alt”: true}, “context”: }
]
## Terminus API

- A terminal could be opened using the command `terminus_open` with

```py
window.run_command(
    "terminus_open", {
        "config_name": None,     # the shell config name, use `None` for the default config
        "cmd": None,             # the cmd to execute
        "shell_cmd": None,       # a script to execute in a shell
                                 # bash on Unix and cmd.exe on Windows
        "cwd": None,             # the working directory
        "working_dir": None,     # alias of "cwd"
        "env": {},               # extra environmental variables
        "title": None,           # title of the view, let terminal configures it if leave empty
        "panel_name": None,      # the name of the panel if terminal should be opened in panel
        "focus": True,           # focus to the panel
        "tag": None,             # a tag to identify the terminal
        "file_regex": None       # the `file_regex` pattern in sublime build system
                                 # see https://www.sublimetext.com/docs/3/build_systems.html
        "line_regex": None       # the `file_regex` pattern in sublime build system
        "pre_window_hooks": [],  # a list of window hooks before opening terminal
        "post_window_hooks": [], # a list of window hooks after opening terminal
        "post_view_hooks": [],   # a list of view hooks after opening terminal
        "auto_close": True,      # auto close terminal if process exits successfully
        "cancellable": False,    # allow `cancel_build` command to terminate process, only relevent to panels
        "timeit": False          # display elapsed time when the process terminates
    }
)
The fields and understand Sublime Text build system .
-
the setting can be used to identify the terminal and
-
keybind can be binded with specific tagged terminal
{
        "keys" "ctrl+alt+w"], "command" "terminus_close", "context"
            { "key" "terminus_view.tag", "operator" "equal", "operand" "YOUR_TAG"}

    }
text can be sent to the terminal with
window.run_command(
    "terminus_send_string",
    {
        "string" "ls\n",
        "tag" "<YOUR_TAG>"        # ignore this or set it to None to send text to the first terminal found
        "visible_only" False      # send to visible panels only, default is `False`. Only relevent when `tag` is None
    }
)
If is not provided or is , the text will be sent to the first terminal found in the current window.
Settings
A list of regular expressions patterns to ignore. Note that these regular expressions are compared against the file or directory name.
Boolean to keep selection panel open after selecting a resource to open.
Boolean setting specifying if a single command should be listed in the command palette for viewing and editing files or if multiple commands should be used.
True if, when moving up a directory, you would like the previous selection to be automatically chosen. False otherwise.
License
The MIT License (MIT)
Copyright 2013 Scott Kuroda
Permission is hereby granted, free of charge, to any person obtaining a copy of this software and
associated documentation files (the “Software”), to deal in the Software without restriction,
including without limitation the rights to use, copy, modify, merge, publish, distribute,
sublicense, and/or sell copies of the Software, and to permit persons to whom the Software
is furnished to do so, subject to the following conditions:
The above copyright notice and this permission notice shall be included in all copies or
substantial portions of the Software.
THE SOFTWARE IS PROVIDED “AS IS”, WITHOUT WARRANTY OF ANY KIND, EXPRESS OR IMPLIED, INCLUDING
BUT NOT LIMITED TO THE WARRANTIES OF MERCHANTABILITY, FITNESS FOR A PARTICULAR PURPOSE AND
NONINFRINGEMENT. IN NO EVENT SHALL THE AUTHORS OR COPYRIGHT HOLDERS BE LIABLE FOR ANY CLAIM,
DAMAGES OR OTHER LIABILITY, WHETHER IN AN ACTION OF CONTRACT, TORT OR OTHERWISE, ARISING FROM,
sOUT OF OR IN CONNECTION WITH THE SOFTWARE OR THE USE OR OTHER DEALINGS IN THE SOFTWARE.
Case Conversion
Позволяет переключаться между snake_case, camelCase, PascalCase и т. д. После установки плагина с помощью Package Control (введите «pic» для быстрого доступа к Install Package), попробуйте:
До: navMenu
Нажмите: ;;c, затем ;;c
После: nav_menu
Обратите внимание, что это не будет работать должным образом, если вы попытаетесь преобразовать целую строку. До:
До: <nav id=»menu_system» class=»nav_menu isOpen»>
Нажмите: ;;c, затем ;;c (для camelCase)
После: navIDMenuSystemClassNavMenuIsOpen
Если вы являетесь веб-разработчиком, использующим Package Control Sublime Text 3, советую попробовать перечисленные в этой статье плагины! Если они вам не понравятся, всегда можно удалить их с помощью Package Control: Remove Package.
Пожалуйста, оставляйте ваши отзывы по текущей теме статьи. За комментарии, отклики, дизлайки, лайки, подписки низкий вам поклон!
Configuration:
To set custom transparency levels visit , it will open the user’s custom preferences file for this plugin.
There you can modify the transparency levels, by adding the following and adjusting the levels as you wish:
{

    // If you like to have a different transparency level
    // modify this array of options in your user preferences
    // i.e. just add (copy/paste) this array and modify at wish
    // IMPORTANT: Level of opacity varies from 0 to 255
    // 0 = Totally transparent, 255 = Fully opaque
    "levels": [
        255, // Full opaque i.e not transparency - a.k.a Disabled
        212, // Level 5
        220, // Level 4
        228, // Level 3
        236, // Level 2
        243  // Level 1
    ]
}
You can see other options on file.
Установка Package control
Ранее в преимуществах было упомянуто, что у редактора очень много различных плагинов. Они все разнообразные и могут облегчить местами написание кода, например, подсвечивать синтаксис, делать из сокращений полноценные фрагменты кода, позволять работать с системами типа git и так далее.
Но для установки всей этой прелести потребуется компонент, который называется Package control. Вообще, различные модификации можно ставить и вручную, через код, но куда проще это делать через поисковую строку в Package control.
Теперь к установке:
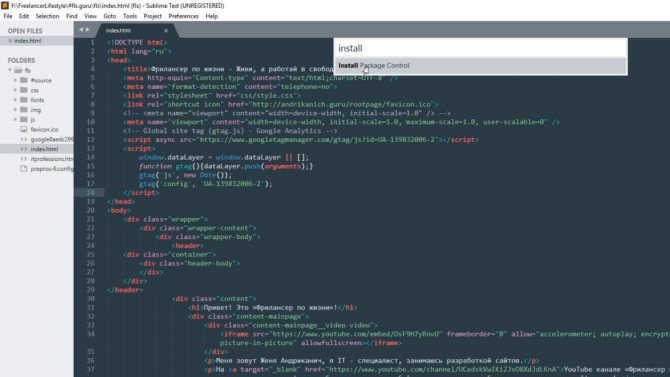
Готово, теперь можно легко и просто устанавливать любые плагины.
Подводим итог по Sublime text 3
Я не давлю на тебя устанавливать все эти плагины, некоторые возможно для тебя будут вообще бесполезными и не нужными, но для меня это все дает возможность оптимизировать работу с самим редактором ускорив сам процесс разработки.
Причем есть очень важный момент, что, избавившись от вещей, на которые тратишь постоянно много времени начинаешь сосредотачиваться на других вещах, что делает процесс разработки более продуктивным.
Из этого всего набора мне не хватает лишь авто импортера какого-то который бы мне постоянно импортировал автоматом все библиотеки, которые я подключаю при работе с angular.
В общем если я был полезен для тебя, не поленись просто поделиться этой статьей. В итоге, у тебя на странице будет быстрый доступ к этой статье, а у меня побывают твои друзья если и им эта тема будет интересна. Круто? Круто! Метки: настройка тестовых редакторов, программирование, текстовые редакторы