Как запустить jquery fancybox при загрузке страницы?
Содержание:
Воспроизведение видео
Плагин Lightgallery позволяет воспроизводить видео с популярных видео-ресурсов, таких, как YouTube, Vimeo, VK, а также различные типы видеоформатов, доступные в HTML5: MP4, WebM, Ogg и т. д.
Чтобы отобразить видео YouTube, Vimeo или VK, вы можете вставить URL-адрес видео или поделиться URL-адресом, который предоставляется YouTube / vimeo в атрибуте data-src. Разметка в остальном такая же, как и для галереи изображений. Lightgallery проверит атрибут data-src и, если это URL-адрес видео YouTube или Vimeo, создаст видео-слайд.
Вы даже можете предоставить изображение постера для каждого видео. Вместо видео будут загружены изображения постеров. Пользователь сможет переходить к другим слайдам с помощью перетаскивания мышью или смахивания. Постеры повышают производительность и сохраняют гибкость вашей галереи, не влияя на взаимодействие с пользователем. Видео будут загружаться, когда пользователь нажимает на изображение-постер. Вы можете поместить URL-адрес изображения постера в атрибут data-poster.
Кроме того, Lightgallery позволяет автоматически загружать миниатюры изображений с YouTube, Vimeo или VK. Вы можете указать размер миниатюр в настройках. Видео будет автоматически приостановлено, когда пользователь начнет переходить к другому слайду.
Пример разметки видео с YouTube и Vimeo с постером
Добавление ссылок на видео в разметку
<div id=»video-gallery»>
<img src=»img/thumb1.jpg» />
</a>
<a href=»https://vimeo.com/1084537″ data-poster=»video-poster2.jpg»>
<img src=»img/thumb2.jpg» />
</a>
…
</div>
|
1 |
<div id=»video-gallery»> <img src=»img/thumb1.jpg»> <a> <ahref=»https://vimeo.com/1084537″data-poster=»video-poster2.jpg»> <img src=»img/thumb2.jpg»> <a> … <div> |
Внимание! Для корректного воспроизведения видео Lightgallery требует, чтобы в ваш документ был включен плагин для видео, доступный на GitHub. Подключение видео-плагина
Подключение видео-плагина
<script src=»js/lightgallery.min.js»></script>
<script src=»js/lg-video.js»></script>
<script>
lightGallery(document.getElementById(‘video-gallery’));
</script>
|
1 |
<script src=»js/lightgallery.min.js»></script> <script src=»js/lg-video.js»></script> <script> lightGallery(document.getElementById(‘video-gallery’)); </script> |
Настройки для видео
При добавлении Lightgallery для видео вы можете указать такие настройки:
Настройки для видеосервисов
lightGallery(document.getElementById(‘video-player-param’), {
youtubePlayerParams: {
modestbranding: 1,
showinfo: 0,
rel: 0,
controls: 0
},
vimeoPlayerParams: {
byline : 0,
portrait : 0,
color : ‘A90707’
}
});
|
1 |
lightGallery(document.getElementById(‘video-player-param’),{ youtubePlayerParams{ modestbranding1, showinfo, rel, controls }, vimeoPlayerParams{ byline, portrait, color’A90707′ } }); |
Для того чтобы в галерее отображались миниатюры для видео-файлов, необходимо подключить еще один плагин, а затем при вызове основной функции плагина, указать такие настройки:
Добавление миниатюр для видео
JavaScript
lightGallery(document.getElementById(‘video-thumbnails’), {
loadYoutubeThumbnail: true,
youtubeThumbSize: ‘default’,
loadVimeoThumbnail: true,
vimeoThumbSize: ‘thumbnail_medium’,
});
|
1 |
lightGallery(document.getElementById(‘video-thumbnails’),{ loadYoutubeThumbnailtrue, youtubeThumbSize’default’, loadVimeoThumbnailtrue, vimeoThumbSize’thumbnail_medium’, }); |
Всю документацию по плагину вы найдете на англоязычном сайте.
How to use
To get started, download the plugin, unzip it and copy files to your website/application directory.
Load files in the section of your HTML document. Make sure you also add the jQuery library.
<head><scripttype="text/javascript"src="http://ajax.googleapis.com/ajax/libs/jquery/1.7/jquery.min.js"></script><linkrel="stylesheet"href="/fancybox/jquery.fancybox.css"type="text/css"media="screen" /><scripttype="text/javascript"src="/fancybox/jquery.fancybox.pack.js"></script></head>
Create your links with a (or ) if you want a title to be shown, and add a class:
<ahref="large_image.jpg"class="fancybox"title="Sample title"><imgsrc="small_image.jpg" /></a>
If you have a set of related items that you would like to group,
additionally include a group name in the (or ) attribute:
<ahref="large_1.jpg"class="fancybox"rel="gallery"title="Sample title 1"><imgsrc="small_1.jpg" /></a><ahref="large_2.jpg"class="fancybox"rel="gallery"title="Sample title 1"><imgsrc="small_2.jpg" /></a>
Initialise the script like this:
<script>$(document).ready(function(){$('.fancybox').fancybox();});</script>
May also be passed an optional options object which will extend the default values. Example:
<script>$(document).ready(function(){$('.fancybox').fancybox({ padding , openEffect 'elastic', closeBtnfalse});});</script>
Tip: Automatically group and apply fancyBox to all images:
$("a,a,a,a").attr('rel','gallery').fancybox();
Script uses the attribute of the matched elements to obtain the location of the content and to figure out content type you want to display.
You can specify type directly by adding classname (fancybox.image, fancybox.iframe, etc) or attribute:
//Ajax:<ahref="/example.html"class="fancybox fancybox.ajax">Example</a>//or<ahref="/example.html"class="fancybox"data-fancybox-type="ajax">Example</a>//Iframe:<ahref="example.html"class="fancybox fancybox.iframe">Example</a>//Inline (will display an element with `id="example"`)<ahref="#example"class="fancybox">Example</a>//SWF:<ahref="example.swf"class="fancybox">Example</a>//Image:<ahref="example.jpg"class="fancybox">Example</a>
Npm specific
** NOTE: I didn’t realize npm’s limitations on versioning. They only allow three numbers. At first I was aiming to keep the versioning equal to fancybox’s, but this is no longer possible without deleting the repo and starting over. You can find the fancybox version this repo uses in either package.json’s «original-version» property, or in a browser console by running: $.fancybox.version.
Install
Example usage
(1) Make sure your html file is referencing the browserified version of your javascript.
(2) This is where fancybox attaches itself to the jquery object.
When turning this into an npm module I decided to standardize the structure a bit. Before fancybox relied on all asset files residing in the same directory. Now if you were to reference the css directly, it expects the images to be relatively located at the ‘../img’ directory. For those unfamiliar, this structure makes more sense because css files should be all concatenated and minified while images won’t be. This means typically you’ll want your css in a separate folder. However, if this doesn’t work with your existing structure then you’ll have to change the paths manually. If you opt to reference the scss instead of the css file, then you have the option of modifying the sass variable ‘$fancybox-image-url’ to match your image folder path. By default this path will be set to ‘../img’. (Note the lack of a trailing slash)
How to Use
Initialize with data attributes
The most basic way to use fancybox is by adding the
attribute to your element. This will automatically bind click event that will start fancybox. Use
or
attribute to specify source of your content. Example:
<a href="image.jpg" data-fancybox data-caption="Caption for single image">
	<img src="thumbnail.jpg" alt="" />
</a>
If you have a group of items, you can use the same attribute
value for each of them to create a gallery. Each group should have a unique value. Example:
<a href="image_1.jpg" data-fancybox="gallery" data-caption="Caption #1">
	<img src="thumbnail_1.jpg" alt="" />
</a>

<a href="image_2.jpg" data-fancybox="gallery" data-caption="Caption #2">
	<img src="thumbnail_2.jpg" alt="" />
</a>
If you choose this method, default settings will be applied. See
section for examples how to customize by changing defaults or using
attribute.
Sometimes you have multiple links pointing to the same source and that creates duplicates in the gallery. To avoid that,
simply use
attribute with the same value used for
attribute for your other links. Optionally, use
attribute to specify index of starting element:
Initialize with JavaScript
Select your elements with a jQuery selector (you can use any valid selector) and call the
method:
Sometimes you might need to bind fancybox to dynamically added elements. Use
option to attach click event listener for elements that exist now or in the future. Example:
Info
Keep in mind, that selected items are not automatically grouped in the gallery. You can create one or more groups by using
the same value for
attribute, similarly to example from the previous section.
Use with Javascript
You can also open and close fancybox programmatically. Here are a couple of examples, visit
section for more information and demos.
Display simple message:
Display iframed page:
Important
fancybox attempts to automatically detect the type of content based on the given url. If it cannot be detected, the type
can also be set manually using
attribute (or
option). Example:
Подключение Fancybox к странице сайта
Скачайте архив с плагином, распакуйте его, скопируйте все файлы, включая сценарии js и файлы стилей css в папку на вашем сервер.
Можете сразу же для порядка разместить файлы в зависимости от типа по соответствующим папкам (файлы css в папку styles, файлы js в папку javascripts), но помните что если вы это сделаете, то вам нужно будет убедиться, что пути в CSS файлах к скриптам и пути в файлах JS к фалам стилей соответствуют новому их расположению на вашем сервере. Так же не забудьте подключить к странице последнюю версию библиотеки JQuery (на момент написания поста это версия 2.1.1)
Пример:
<!— Подключаем jQuery библиотеку —>
<script type=»text/javascript» src=»http://code.jquery.com/jquery-latest.min.js»></script>
<!— Подключаем mousewheel плагин (по необходимости, в основном нужен для мобильных устройств) —>
<script type=»text/javascript» src=»/fancybox/lib/jquery.mousewheel-3.0.6.pack.js»></script>
<!— Подключаем непосредственно FancyBox —>
<link rel=»stylesheet» href=»/fancybox/source/jquery.fancybox.css?v=2.1.5″ type=»text/css» media=»screen» />
<script type=»text/javascript» src=»/fancybox/source/jquery.fancybox.pack.js?v=2.1.5″></script>
<!— По необходимости подключаем вспомогательные элементы — стили кнопок, оформление эскизов и/или медиа файлов —>
<link rel=»stylesheet» href=»/fancybox/source/helpers/jquery.fancybox-buttons.css?v=1.0.5″ type=»text/css» media=»screen» />
<script type=»text/javascript» src=»/fancybox/source/helpers/jquery.fancybox-buttons.js?v=1.0.5″></script>
<script type=»text/javascript» src=»/fancybox/source/helpers/jquery.fancybox-media.js?v=1.0.6″></script>
<link rel=»stylesheet» href=»/fancybox/source/helpers/jquery.fancybox-thumbs.css?v=1.0.7″ type=»text/css» media=»screen» />
<script type=»text/javascript» src=»/fancybox/source/helpers/jquery.fancybox-thumbs.js?v=1.0.7″></script>
|
1 |
<!—ПодключаемjQueryбиблиотеку—> <script type=»text/javascript»src=»http://code.jquery.com/jquery-latest.min.js»></script> <!—Подключаемmousewheelплагин(понеобходимости,восновномнужендлямобильныхустройств)—> <script type=»text/javascript»src=»/fancybox/lib/jquery.mousewheel-3.0.6.pack.js»></script> <!—ПодключаемнепосредственноFancyBox—> <link rel=»stylesheet»href=»/fancybox/source/jquery.fancybox.css?v=2.1.5″type=»text/css»media=»screen»/> <script type=»text/javascript»src=»/fancybox/source/jquery.fancybox.pack.js?v=2.1.5″></script> <!—Понеобходимостиподключаемвспомогательныеэлементы-стиликнопок,оформлениеэскизови/илимедиафайлов—> <link rel=»stylesheet»href=»/fancybox/source/helpers/jquery.fancybox-buttons.css?v=1.0.5″type=»text/css»media=»screen»/> <script type=»text/javascript»src=»/fancybox/source/helpers/jquery.fancybox-buttons.js?v=1.0.5″></script> <script type=»text/javascript»src=»/fancybox/source/helpers/jquery.fancybox-media.js?v=1.0.6″></script> <link rel=»stylesheet»href=»/fancybox/source/helpers/jquery.fancybox-thumbs.css?v=1.0.7″type=»text/css»media=»screen»/> <script type=»text/javascript»src=»/fancybox/source/helpers/jquery.fancybox-thumbs.js?v=1.0.7″></script> |
далее создаем ссылки, которые будут вести на элементы, которые мы собираемся открыть с помощью Fancybox (за каламбур прошу простить )
<a class=»fancybox» rel=»group» href=»big_image_1.jpg»><img src=»small_image_1.jpg» alt=»» /></a>
<a class=»fancybox» rel=»group» href=»big_image_2.jpg»><img src=»small_image_2.jpg» alt=»» /></a>
|
1 |
<aclass=»fancybox»rel=»group»href=»big_image_1.jpg»><img src=»small_image_1.jpg»alt=»»/></a> <aclass=»fancybox»rel=»group»href=»big_image_2.jpg»><img src=»small_image_2.jpg»alt=»»/></a> |
Вызывать Fancybox следует только после загрузки страницы как показано ниже. Если вы не знакомы с JQuery, то вам нужно получить хотя бы минимальные знания. Соответствующие курсы можно спокойно найти в интернете.
<script type=»text/javascript»>
$(document).ready(function() {
$(«.fancybox»).fancybox();
});
</script>
|
1 |
<script type=»text/javascript»> $(document).ready(function(){ $(«.fancybox»).fancybox(); }); </script> |
В следующих постах мы на примерах рассмотрим различные варианты использования Fancybox на страницах вашего сайта.
Друзья,
напишите в комментариях стоит ли мне
записать и выложить видео по подключению
данного скрипта как я это сделал тут:
API
The fancybox API offers a couple of methods to control fancybox. This gives you the ability to extend the plugin and to integrate
it with other web application components.
Starting facybox
When creating group objects manually, each item should follow this pattern:
Example of opening image gallery programmatically:
It is also possible to pass only one object. Example of opening inline content:
If you wish to display some html content (for example, a message), then you can use a simpler syntax. It is advised to use
a wrapper around your content.
Group items can be collection of jQuery objects, too. This can be used, for example, to create custom click event:
Instance methods
In order to use these methods, you need an instance of the plugin’s object. There are 3 common ways to get the reference.
1) Using API method to get currently active instance:
2) While starting fancybox programmatically:
3) From within the callback — first argument is always a reference to current instance:
Once you have a reference to fancybox instance the following methods are available:
You can also do something like this:
or simply:
Events
fancybox fires several events:
Event callbacks can be set as function properties of the options object passed to fancybox initialization function:
Each callback receives two parameters — current fancybox instance and current gallery object, if exists.
It is also possible to attach event handler for all instances. To prevent interfering with other scripts, these events have
been namespaced to
. These handlers receive 3 parameters — event, current fancybox instance and current gallery object.
Here is an example of binding to the
event:
If you wish to prevent closing of the modal (for example, after form submit), you can use
callback. Simply return
:
2. Использование
Fancybox может отображать в модальных окнах изображения, видео, iframes и любой HTML-контент. Для этого плагин имеет много дополнительных атрибутов и JS вариантов, но в этой теме описаны только основные. Более подробную информацию можно посмотреть в первоисточнике.
2.1 Изображения
Для показа галереи фотографии все ее элементы должны содержать одинаковое значение атрибута . Для одиночного фото этот атрибут может быть пустым . Атрибут используется для описания изображения и является не обязательным.
<a href=»image.jpg» data-fancybox=»gallery» data-caption=»Описание фотографии»>
<img src=»thumbnail.jpg» alt=»» />
</a>
|
1 |
<a href=»image.jpg»data-fancybox=»gallery»data-caption=»Описание фотографии»> <img src=»thumbnail.jpg»alt=»» /> </a> |
2.2 Видео
YouTube
</a>
<a data-fancybox=»» href=»https://vimeo.com/151297208″>
Vimeo
</a>
<a data-fancybox=»» href=»video.mp4″>
Ссылка на файл MP4
</a>
<a data-fancybox=»» href=»#myVideo»>
HTML5 элемент
</a>
<video controls id=»myVideo» style=»display:none;»>
<source src=»video.mp4″ type=»video/mp4″>
<source src=»video.webm» type=»video/webm»>
<source src=»video.ogv» type=»video/ogg»>
</video>
|
1 |
<a data-fancybox=»»href=»https://www.youtube.com/watch?v=30BQjlXXamY»> YouTube <a data-fancybox=»»href=»https://vimeo.com/151297208″> Vimeo <a data-fancybox=»»href=»video.mp4″> Ссылка на файл MP4 <a data-fancybox=»»href=»#myVideo»> HTML5 элемент <video controlsid=»myVideo»style=»display:none;»> <source src=»video.mp4″type=»video/mp4″> <source src=»video.webm»type=»video/webm»> <source src=»video.ogv»type=»video/ogg»> </video> |
Для видео можно добавить значение атрибута для создания галереи/плейлиста и описание
2.3 Фрейм <iframe>
<a data-fancybox=»» data-type=»iframe» data-src=»https://fancyapps.com/fancybox/3/docs/#iframe» href=»javascript:;»>
Ссылка на страницу
</a>
|
1 |
<a data-fancybox=»»data-type=»iframe»data-src=»https://fancyapps.com/fancybox/3/docs/#iframe»href=»javascript:;»> Ссылка на страницу |
Обязательный атрибут и , который указывает ссылку на страницу или PDF документ.
Также можно добавить значение для и атрибут
2.4 Встроенный HTML-элемент
<a data-fancybox=»» data-src=»#hidden-content» href=»javascript:;»>
Открыть окно
</a>
<div style=»display: none;» id=»hidden-content»>
Встроенный HTML-элемент
</div>
|
1 |
<a data-fancybox=»»data-src=»#hidden-content»href=»javascript:;»> Открыть окно <div style=»display: none;»id=»hidden-content»> Встроенный HTML-элемент |
Атрибут указывает на ID элемента, который будет показан в модальном окне
Можно добавить атрибут и значение
2.5 Ajax
<a data-fancybox=»» data-type=»ajax» data-src=»/demo/somefile.html» href=»javascript:;»>
Открыть
</a>
|
1 |
<a data-fancybox=»»data-type=»ajax»data-src=»/demo/somefile.html»href=»javascript:;»> Открыть |
Обязательный атрибут и , который указывает ссылку на подгружаемый контент.
Как и во всех предыдущих случаях, можно добавить и значение
Media types
Images
The standard way of using fancyBox is with a number of thumbnail images that link to larger images:
By default, fancyBox fully preloads an image before displaying it.
You can choose to display the image right away.
It will render and show the full size image while the data is being received.
To do so, some attributes are necessary:
- — the real width of the image
- — the real height of the image
fancyBox supports «scrset» so I can display different images based on viewport width. You can use this to improve download times for mobile users and over time save bandwidth.
Example:
It is also possible to protect images from downloading by right-click.
While this does not protect from truly determined users, it should discourage the vast majority from ripping off your files.
Inline
For your Inline HTML you have to place a DIV Container into the content of the page:
And then simply create a link using attribute that matches CSS id selector of the element you want to open ( in this example):
Ajax
To load content via AJAX, you need to add a attribute to your link:
Additionally it is possible to define a selector with the attribute to show only a part of the response. The selector can be any string, that is a valid jQuery selector:
Iframe
If the content can be shown on a page, and placement in an iframe is not blocked by script or security configuration of that page,
it can be presented in a fancyBox:
To access and control fancyBox in parent window from inside an iframe:
Iframe dimensions can be controlled by CSS:
These CSS rules can be overridden by JS, if needed:
If you have not disabled iframe preloading (using an «preload» option), then the script will atempt to
calculate content dimensions and will adjust width/height of iframe to fit with content in it.
Keep in mind, that due to same origin policy,
there are some limitations.
Интеграция библиотеки FancyBox в Вордпресс без плагинов
Если вы трепетно относитесь к вопросу улучшения юзабилити сайта, то наверняка вас волнует скорость работы вашего блога. А мы знаем, что большое количество плагинов может замедлять процесс загрузки страниц. Поэтому далее мы рассмотрим вариант внедрения jQuery скрипта FancyBox на WordPress без плагина. Данный способ рекомендуется применять в том случае, если вы хорошо знакомы со структурой и редактированием шаблона Вордпресс и имеете опыт работы с кодом. В процессе могут возникать конфликты с другими скриптами темы, вызванные включением тех или иных опций. Решение этой проблемы в каждом отдельном случае будет индивидуальным, поэтому заранее предусмотреть все варианты сложно.
Для установки библиотеки файлы FancyBox можно найти и скачать по адресу — fancyapps.com/fancybox/. В разархивированном каталоге открываем папку source и копируем jquery.fancybox.css и jquery.fancybox.js, помещаем их в папку fancybox, которую необходимо предварительно создать в корне темы.

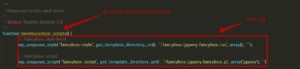
Открываем в текстовом редакторе файл functions.php, находим функцию подключения скриптов и вставляем следующий код:
1 2 3 4 5 |
// Fancybox stylesheet.
	wp_enqueue_style( 'fancybox-style', get_template_directory_uri() . '/fancybox/jquery.fancybox.css', array(), ' ' );

// Fancybox script.
	wp_enqueue_script( 'fancybox-script', get_template_directory_uri() . '/fancybox/jquery.fancybox.js', array('jquery'), ' ');
|
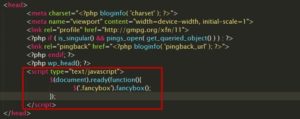
Затем открываем для редактирование файл темы header.php и в head помещаем вызов функции FancyBox:
1 2 3 4 5 |
<script type="text/javascript">
$(document).ready(function(){
                              $('.fancybox').fancybox();
                });
</script>
|
А самой ссылке, оборачивающей изображение, присваиваем class = «fancybox». Таков основной принцип применения библиотеки на WordPress. Детальнее о настройке параметров можно узнать на официальном сайте.
А вот видео о настройке и использовании Fancybox:
Сегодня мы с вами познакомились с широко используемым на сайтах скриптом для красивого отображения картинок в лайтбоксах. Для простоты его интеграции в блог было разработано множество специальных плагинов. Мы рассмотрели одни из самых востребованных: Easy FancyBox и FancyBox For WordPress, узнали, как они работают и в чем их различия. Они проверены опытным путем и работают стабильно. Чтобы понять, какой из инструментов больше подходит вам по функционалу, определите основные задачи, которые он должен выполнять. Нет смысла выбирать тяжелый плагин, чтобы в дальнейшем задействовать только одну или две его опции.
style=»display:block»
data-ad-client=»ca-pub-9438111339940585″
data-ad-slot=»6025635352″
data-ad-format=»auto»>
Интересные дополнительные хаки
Много интересно найдете в официальном описании плагина Easy Fancybox — прокрутите контент до раздела FAQ. Там есть про вызов PDF, открытие контактной формы, обычного модального окна, Youtube видео и т.п.
Отключаем скрипт на странице
В одном из премиум шаблонов с которым работал, был предусмотрен внутренний механизм лайтбокс, поэтому во избежание конфликтов нужно было чтобы Fancybox грузился только в определенной месте сайта.
Это реализуется через следующий код в файле функций темы (functions.php):
add_action( 'wp_enqueue_scripts', 'my_conditional_fancybox',  );
function my_conditional_fancybox() {
    if ( !is_page_template('page-menu.php') ) {
        if ( class_exists('easyFancyBox') )
            easyFancyBox::$add_scripts = false;
    }
}
|
Здесь выполняется проверка !is_page_template(‘page-menu.php’) с отдельным шаблоном страниц, но вы можете использовать любые другие условные операторы — is_single, is_home, is_category и т.п. Установка переменной в значение False отключает модуль.
Итого. Плагин Fancybox в Вордпресс я ставлю практически всегда, когда нужно добавить простой лайтбокс на картинки и галерею. Он работает сходу после установки, как правило, не конфликтует с другими скриптами, имеет пару-тройку настроек и регулярно обновляется. Больше, в принципе, от него ничего и не нужно.
Кстати, если юзаете другие решения по данной задаче — напишите, интересно попробовать еще что-то.
FAQ
Opening/closing causes fixed element to jump
Simply add CSS class to your fixed positioned elements.
Example of using Bootstrap navbar component:
The script measures width of the scrollbar and creates CSS class
that uses this value for property.
Therefore, if your element has , you should positon it using and properties instead. Example:
How to customize caption
You can use option that accepts a function and is called for each group element. Example of appending image download link:
Inside method, refers to the clicked element. Example of using different source for caption:
How to reposition thumbnail grid
There is currenty no JS option to change thumbnail grid position.
But fancyBox is designed so that you can use CSS to change position or dimension for each block
(e.g., content area, caption or thumbnail grid).
This gives you freedom to completely change the look and feel of the modal window, if needed.
View demo on CodePen
Возможности Easy Fancybox в WordPress
- кроме базовой графики доступны форматы Webp и SVG;
- во всплывающем окне разрешается отображать видео с Vimeo, Youtube, Dailmotion;
- поддерживает PDF и Flash файлы;
- может работать с обычным HTML кодом и содержимым внешних страниц;
- совместим с базовой галереей Вордпресс, а также NextGEN;
- у вас не возникнет проблем с Imagemap’ами, бесконечным скроллом Jetpack и при задании лайтбокса пунктам меню;
- про автоматическую обработку картинок уже упоминалось выше;
- из доп.фишек есть автосрабатывание попапа при загрузке страниц веб-ресурса;
- допускается использование как модальное окно для Contact Form 7 — альтернативу Easy Modal (инструкция в описании в репозитории);
- в настройках можно выбрать эффекты открытия, цвет и прозрачной оверлея и некоторые другие визуальные параметры.
Для плагина Fancybox имеется премиальная версия за 12 баксов + последующей подпиской по 4 бакса в год. Из про фишек выделяются: дополнительные опции оформления и автосрабатывания попапа, эффекты слайдшоу, показ заголовка при наведении и т.п. Если вам хочется расширить базовые функции, почитайте об этом детальнее. Мне лично бесплатной версии хватает с головой.
Также на официальной странице модуля есть парочка вариантов почему не работает Fancybox в WordPress, это могут быть:
- конфликты с аналогичными похожими решениями;
- отсутствие wp_footer() в футере;
- некоторые проблемы с плагинами: All in One SEO Pack, jQuery Updater, а также Google Analytics на WordPress и парочка других;
- конфликты с шаблонами — часто в премиальных есть свой скрипт для подобного эффекта (ниже рассмотрю эту ситуацию);
Кроме того, в репозитории на wordpress.org есть чеклист как проверить потенциальные ошибки и какие шаги нужно совершить дабы их исправить. Это одно из немногих расширений, где так много времени уделено возможным проблемам и причинам некорректного функционирования. Если у вас что-то подобное случилось, советую ознакомиться.
Advanced
Helpers provide a simple mechanism to extend the capabilities of fancyBox. There are two built-in helpers — ‘overlay’ and ‘title’.
You can disable them, set custom options or enable other helpers. Examples:
$(".fancybox").fancybox({ helpers{ titlenull}});$(".fancybox").fancybox({ helpers{ overlay null}});$(".fancybox").fancybox({ helpers{ title { type 'inside'}, overlay { css {'background''rgba(255,255,255,0.5)'}}}});$(".fancybox").fancybox({ helpers{ thumbs { width50, height50}}});
Also available are event driven callback methods. The keyword refers to the current or upcoming object (depends on callback method). Here is how you can change title:
$(".fancybox").fancybox({beforeLoadfunction(){this.title='Image '+(this.index+1)+' of '+this.group.length+(this.title?' - '+this.title'');}});
It`s possible to open fancyBox programmatically in various ways:
$.fancybox('<div><h1>Lorem Lipsum</h1><p>Lorem lipsum</p></div>',{ title 'Custom Title'});$.fancybox($("#inline"),{ title 'Custom Title'});$.fancybox({ href'example.jpg', title 'Custom Title'});$.fancybox({ href'example1.jpg', title 'Custom Title 1'},{ href'example2.jpg', title 'Custom Title 2'},{ padding});
There are several methods that allow you to interact with and manipulate fancyBox, example:
$.fancybox.close();
There is a simply way to access wrapping elements using JS:
$.fancybox.wrap$.fancybox.skin$.fancybox.outer$.fancybox.inner
You can override CSS to customize the look. For example, make navigation arrows always visible,
change width and move them outside of area (use this snippet after including fancybox.css):
.fancybox-navspan{visibilityvisible;}.fancybox-nav{width80px;}.fancybox-prev{left-80px;}.fancybox-next{right-80px;}
In that case, you might want to increase space around box:
$(".fancybox").fancybox({ margin 20,60,20,60});