Css scrollbar styling tutorial
Содержание:
- More
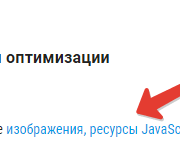
- Images
- ЕЩЁ
- Forcing Scrollbars
- Настройка направления и строгости привязки
- Scroll Bar Colors and Metrics
- Плавная прокрутка
- Раздел 1
- Создать плавную прокрутку
- Поддержка браузеров
- Кросс-браузерное решение
- Customize the Scrollbar
- Angular
- Примечания
- Events
- Ограничения и проблемы
- Разные состояние скроллбара
- Scroll Bar Requests
- Parts of a Scroll Bar
- Images
- Свойства, унаследованные от класса Control
- Scroll Bar Visibility
- Goals & Features
More
Fullscreen VideoModal BoxesDelete ModalTimelineScroll IndicatorProgress BarsSkill BarRange SlidersTooltipsDisplay Element HoverPopupsCollapsibleCalendarHTML IncludesTo Do ListLoadersStar RatingUser RatingOverlay EffectContact ChipsCardsFlip CardProfile CardProduct CardAlertsCalloutNotesLabelsCirclesStyle HRCouponList GroupList Without BulletsResponsive TextCutout TextGlowing TextFixed FooterSticky ElementEqual HeightClearfixResponsive FloatsSnackbarFullscreen WindowScroll DrawingSmooth ScrollGradient Bg ScrollSticky HeaderShrink Header on ScrollPricing TableParallaxAspect RatioResponsive IframesToggle Like/DislikeToggle Hide/ShowToggle Dark ModeToggle TextToggle ClassAdd ClassRemove ClassActive ClassTree ViewRemove PropertyOffline DetectionFind Hidden ElementRedirect WebpageZoom HoverFlip BoxCenter VerticallyCenter Button in DIVTransition on HoverArrowsShapesDownload LinkFull Height ElementBrowser WindowCustom ScrollbarHide ScrollbarShow/Force ScrollbarDevice LookContenteditable BorderPlaceholder ColorText Selection ColorBullet ColorVertical LineDividersAnimate IconsCountdown TimerTypewriterComing Soon PageChat MessagesPopup Chat WindowSplit ScreenTestimonialsSection CounterQuotes SlideshowClosable List ItemsTypical Device BreakpointsDraggable HTML ElementJS Media QueriesSyntax HighlighterJS AnimationsJS String LengthJS ExponentiationJS Default ParametersGet Current URLGet Current Screen SizeGet Iframe Elements
Images
SlideshowSlideshow GalleryModal ImagesLightboxResponsive Image GridImage GridTab GalleryImage Overlay FadeImage Overlay SlideImage Overlay ZoomImage Overlay TitleImage Overlay IconImage EffectsBlack and White ImageImage TextImage Text BlocksTransparent Image TextFull Page ImageForm on ImageHero ImageBlur Background ImageChange Bg on ScrollSide-by-Side ImagesRounded ImagesAvatar ImagesResponsive ImagesCenter ImagesThumbnailsBorder Around ImageMeet the TeamSticky ImageFlip an ImageShake an ImagePortfolio GalleryPortfolio with FilteringImage ZoomImage Magnifier GlassImage Comparison Slider
ЕЩЁ
Полноэкранное видеоМодальное окноШкала времениИндикатор прокрутки Индикатор выполненияПанель навыковПолзунок диапазонаПодсказки при наведенииВсплывающие окнаСкладная секцияКалендарьВключить HTMLСписок делЗагрузчикиЗвездный рейтингПользовательский рейтингНаложениеКонтактные чипыКарточкиФлип-картаКарточка профиляКарточка товараОкно тревогиВыноска сообщенияПримечаниеМеткиКругиHR Горизонтальная линияКупонГруппа списковОтзывчивый текстВырезанный текстСветящийся текстФиксированный подвалЛипкий элементРавная высота столбцовОчистка поплавкаОтзывчивые поплавкиСнэк-бар/тостПолноэкранное режимЧертеж при прокруткеПлавная прокруткаГрадиент фонаЛипкий заголовокИзменить заголовок при прокруткеОтзывчивые столбцы ценПараллаксСоотношение сторонПереключатель нравится/не нравитсяПереключатель скрыть/показатьПереключаель текстаПереключатель классаДобавить классУдалить классАктивный классДревовидное представлениеУдалить свойствоАвтономный режим обнаруженияСделать скрытый элементПеренаправление веб страницыУвеличить при наведенииФлип-боксЭлемент вертикально по центруПереход при наведении курсораСтрелкиФигурыСсылка для скачиванияПолная высота элементаОкно браузераПользовательская полоса прокруткиРазличные устройстваЦвет заполнителяЦвет выделения текстаЦвет макераВертикальная линияАнимированные иконкиТаймер обратного отсчетаПишущая машинкаСтраница заставкиСообщение чатаВсплывающее окно чатаРазделенный экранРекомендацииСчетчик разделаСлайд-шоу цитатЗакрываемые злементы спискаТипичные точки прерыванияПеретаскиваемый HTML элементМедиа запросы JSПодсветка синтаксисаJS анимацииПолучить элементы Iframe
Forcing Scrollbars
Scrollbars can appear in the usual place such as the browser window or on a tag. But you can also force scrollboxes onto other elements whenever their contents become too large to fit inside the box.
You can use CSS to create your own «inline scrollbars» by creating a box smaller than its contents. You can do this using the property. Specifically, you can use to force scrollbars to appear when the content overflows. This has an effect similar to inline frames (but using CSS is much simpler).
The above WebKit example on this page uses this technique. Here it is again but this time using inline styles and without all the scrollbar customization.
The property tells the browser what to do if the box’s contents is larger than the box itself. You can also specify , which will hide the scrollbars if the content doesn’t overflow, but display them if the content does overflow. You can also use to hide contents that don’t fit into the box and to automatically expand the box to fit the contents (this is the default setting)
Настройка направления и строгости привязки
Свойство scroll-snap-type задаётся контейнеру и позволяет указать направление, в котором происходит привязка прокрутки (x или y), а также строгость привязки (none, mandatory или proximity).
С направлением всё просто:
- горизонтальная прокрутка — x или ключевое слово inline:
- вертикальная прокрутка — y или ключевое слово block;
- привязка в обоих направлениях — both.
Чуть сложнее увидеть разницу между значениями mandatory и proximity, которые определяют строгость привязки:
- none — нет привязки к точке;
- mandatory — обязательное смещение прокрутки к указанной точке;
- proximity — смещение происходит только в тех ситуациях, когда область видимости находится близко к точке привязки. Степень близости браузер определяет самостоятельно.
Главный плюс mandatory — предсказуемость. Вы знаете, что браузер точно сместит область видимости к заданной точке. Главный минус — негибкость. Например, если содержимое при вертикальной прокрутке слишком большое по высоте, то пользователи окажутся в неприятной ситуации — они просто не смогут переместиться к определённому месту, браузер будет сразу перекидывать их к точке привязки.
See the Pen
Scroll Snap mandatory by Pochemuta (@pochemuta)
on CodePen.
Текст не помещается в области видимости по высоте, последние строчки невозможно прочитать, потому что срабатывает строгая привязка к прокрутке. Чтобы такого эффекта не было, можно заменить mandatory на proximity. Но и здесь остаётся опасность пролистывания — всё зависит от браузера. Проблему можно решить с помощью свойства scroll-padding, о котором мы поговорим ниже.
2
Scroll Bar Colors and Metrics
The system-defined color value, COLOR_SCROLLBAR, controls the color within a scroll bar shaft. Use the GetSysColor function to determine the color of the scroll bar shaft and the SetSysColors function to set the color of the scroll bar shaft. Note, however, that this change of color affects all scroll bars in the system.
You can get the dimensions of the bitmaps that the system uses in standard scroll bars by calling the GetSystemMetrics function. Following are the system metric values associated with scroll bars.
| System metric | Description |
|---|---|
| SM_CXHSCROLL | Width of arrow bitmap on horizontal scroll bar |
| SM_CXHTHUMB | Width of scroll box on horizontal scroll bar. This value retrieves the width a scroll bar that has a page size of zero. |
| SM_CXVSCROLL | Width of arrow bitmap on vertical scroll bar |
| SM_CYHSCROLL | Height of arrow bitmap on horizontal scroll bar |
| SM_CYVSCROLL | Height of arrow bitmap on vertical scroll bar |
| SM_CYVTHUMB | Height of scroll box on vertical scroll bar. This value retrieves the height of a scroll bar that has a page size of zero. |
Плавная прокрутка
Примечание: Этот пример не работает в Internet Explorer, Edge или Safari (для» кроссбраузерного » решения см. пример ниже).
Раздел 1
Нажмите на ссылку, чтобы увидеть эффект «плавной» прокрутки.
Примечание: Удалите свойство scroll-behavior, чтобы удалить плавную прокрутку.
Создать плавную прокрутку
Добавить к элементу <html>, чтобы включить плавную прокрутку для всей страницы (Примечание: также можно добавить его в определенный элемент/контейнер прокрутки):
Пример
html { scroll-behavior: smooth;}
Поддержка браузеров
Цифры в таблице указывают первую версию браузера, которая полностью поддерживает свойство scroll-behavior.
| Свойство | |||||
|---|---|---|---|---|---|
| scroll-behavior | 61.0 | Не поддерживаемый | 36.0 | Не поддерживаемый | Да |
Кросс-браузерное решение
Для браузеров, которые не поддерживают свойство , вы можете использовать JavaScript или библиотеку JavaScript, например jQuery, чтобы создать решение, которое будет работать для всех браузерах:
Пример
<script src=»https://ajax.googleapis.com/ajax/libs/jquery/3.3.1/jquery.min.js»></script> <script>$(document).ready(function(){ // Добавить плавную прокрутку до всех ссылок $(«a»).on(‘click’, function(event) { // Убедись в этом что .hash имеет значение перед переопределением поведения по умолчанию if (this.hash !== «») { // Запретить поведение щелчка якоря по умолчанию event.preventDefault(); // Хранить хэш var hash = this.hash; // Использование метода animate() jQuery для добавления плавной прокрутки страницы // Необязательное число (800) указывает количество миллисекунд, необходимых для прокрутки до указанной области $(‘html, body’).animate({ scrollTop: $(hash).offset().top }, 800, function(){ // Добавить хэш (#) для URL-адреса после завершения прокрутки (поведение щелчка по умолчанию) window.location.hash = hash; }); } // Конец, если });});</script>
Совет: Подробнее о свойстве scroll-behavior читайте в нашем справочнике по CSS: CSS Свойство scroll-behavior.
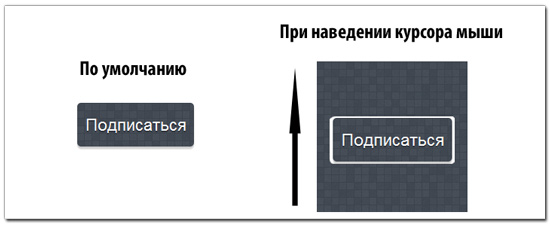
Customize the Scrollbar
Over the years, browser manufacturers have implemented their own means for customizing the appearance of scrollbars.
WebKit Browsers
If you’re using a WebKit browser, you will see that the following scrollbars have been styled using WebKit extensions. See HTML scrollbars for more examples.
WebKit based browsers such as Chrome, Safari, and Opera can take advantage of the various scrollbar pseudo-elements and pseudo-classes.
These allow you to customize all aspects of a scrollbar — from its color, to its size, shadows, and more.
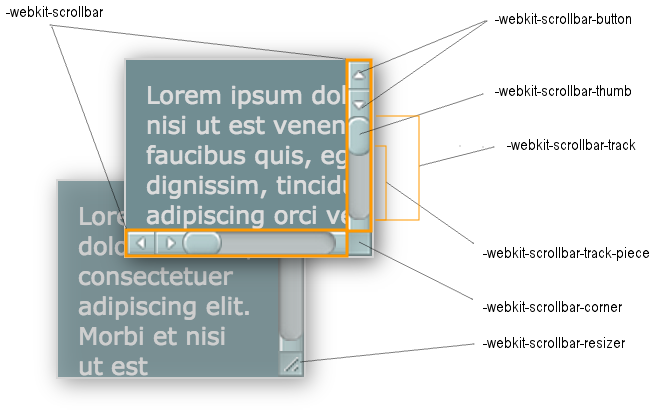
Here are the WebKit pseudo-elements for styling scrollbars:
And here’s where they fit within a scrollbar:
Pseudo-Classes
Here are the WebKit scrollbar pseudo-classes as outlined on the WebKit blog:
- Applies to any scrollbar piece that has a horizontal orientation.
- Applies to any scrollbar piece that has a vertical orientation.
- Applies to buttons and track pieces. It indicates whether or not the button or track piece will decrement the view’s position when used (e.g., up on a vertical scrollbar, left on a horizontal scrollbar).
- Applies to buttons and track pieces. It indicates whether or not the button or track piece will decrement the view’s position when used (e.g., up on a vertical scrollbar, left on a horizontal scrollbar).
- Applies to buttons and track pieces. It indicates whether the object is placed before the thumb.
- Applies to buttons and track pieces. It indicates whether the object is placed after the thumb.
- Applies to buttons and track pieces. It is used to detect whether a button is part of a pair of buttons that are together at the same end of a scrollbar. For track pieces it indicates whether the track piece abuts a pair of buttons.
- Applies to buttons and track pieces. It is used to detect whether a button is by itself at the end of a scrollbar. For track pieces it indicates whether the track piece abuts a singleton button.
- Applies to track pieces and indicates whether or not the track piece runs to the edge of the scrollbar, i.e., there is no button at that end of the track.
- Applies to all scrollbar pieces and indicates whether or not a scrollbar corner is present.
- Applies to all scrollbar pieces and indicates whether or not the window containing the scrollbar is currently active.
You can also use the CSS , , and pseudo-classes with the various scrollbar pieces.
Microsoft also added prefixed versions of these properties that can be used as a synonym for the other properties (eg, can be used as a synonym for in IE8 Standards mode).
Angular
Если вы читали другие мои статьи про Angular, то знаете, что я большой любитель декларативного подхода. Этот случай не станет исключением. Постараемся написать код максимально аккуратно. В качестве примера возьмем вертикальную прокрутку, для горизонтальной все будет идентично. Добавим в шаблон ползунок:
Для задания его внешнего вида используются геттеры:
Теперь нам нужно просто слушать скролл, чтобы запускать проверку изменений, — и наш компонент начнет работать с колесиком или трекпадом. Осталось научиться двигать ползунки мышкой. Эту логику стоит вынести в отдельную директиву, но для прозрачности сейчас мы это делать не будем.
Добавим обработчики на ползунок:
А в коде компонента будем обрабатывать эти события и слушать :
Теперь ползунки тоже работают.
Примечания
Если значение свойства KeepScrollBarsVisible равно True, любая полоса прокрутки всегда видна на форме или странице, независимо от того, попадает ли содержание объекта в границы объекта.
Если полоса прокрутки видна, ее поле прокрутки ограничивается видимой областью полосы прокрутки. При необходимости также изменяется положение прокрутки, чтобы вся полоса прокрутки оставалась видимой. Диапазон полосы прокрутки меняется при изменении значения свойства ScrollBars, меняется размер прокручиваемой или видимой области.
Если не видна планка прокрутки, можно установить ее положение прокрутки до любого значения. Допустимы как отрицательные значения, так и значения, превышающие размер прокрутки.
Для однострочного элемента управления можно отобразить горизонтальную полосу прокрутки, используя свойства ScrollBars и AutoSize. Полосы прокрутки скрываются или отображаются в соответствии со следующими правилами:
-
Если для свойства ScrollBars задано значение fmScrollBarsNone, полоса прокрутки не отображается.
-
Если для свойства ScrollBars задано значение fmScrollBarsHorizontal или fmScrollBarsBoth, для элемента управления отображается горизонтальная полоса прокрутки, если текст длиннее области редактирования и если элемент управления содержит достаточно места, чтобы разместить полосу прокрутки под его областью редактирования.
-
Если для свойства AutoSize задано значение True, элемент управления увеличивается, чтобы вместить добавленную полосу прокрутки, если размер элемента управления максимален или близок к максимальному.
Для многолинейной textBox можно отобразить панели прокрутки с помощью свойств ScrollBars, WordWrap и AutoSize. Полосы прокрутки скрываются или отображаются в соответствии со следующими правилами:
-
Если для свойства ScrollBars задано значение fmScrollBarsNone, полоса прокрутки не отображается.
-
Если для свойства ScrollBars задано значение fmScrollBarsVertical или fmScrollBarsBoth, для элемента управления отображается вертикальная полоса прокрутки, если текст длиннее области редактирования и если элемент управления содержит достаточно места, чтобы разместить полосу прокрутки вдоль правого края его области редактирования.
-
Если для свойства WordWrap задано значение True, горизонтальная полоса прокрутки для многострочного элемента управления не показывается. В большинстве многострочных элементов управления горизонтальная полоса прокрутки не используется.
-
Горизонтальная полоса прокрутки может отображаться в многострочном элементе управления в случае одновременного выполнения следующих условий:
- Область редактирования содержит слово, оказывающееся длиннее ширины области редактирования.
- Для элемента управление включено использование горизонтальных полос прокрутки.
- В элементе управления достаточно места для размещения полосы прокрутки под областью редактирования.
- Для свойства WordWrap задано значение False.
Events
customScroll
Triggered whenever content is scrolled. Separate events are fired when vertical and horizontal scrollbar is moved.
Handler function takes two arguments. is standard jquery event object. is an object with 3 fields holding scroll specific information:
- – floating point number in range 0.0 to 100.0 indicating percentage position of the scrollbar
- – string that can take following 4 values: , , , – indicates what direction the scrollbar was moved in
- – string indicating which scrollbar was moved: for horizontal scrollbar and for vertical scrollbar
You can also bind handler to that event when initializing scrollbar:
Ограничения и проблемы
Компьютерные грамотные пользователи часто знакомы с полосами прокрутки, но люди с ограниченными знаниями могут не понимать их интуитивно, особенно с учетом более поздних вариантов, без посторонней помощи. Независимо от грамотности, можно найти множество проблем с различными типами полос прокрутки и их взаимодействием. С точки зрения дизайна, если размер окна уже мал, видимая область содержимого будет еще больше уменьшена за счет наличия полосы прокрутки. В то время как некоторые недавно исчезнувшие полосы прокрутки помогают смягчить эту проблему, более традиционные не позволяют избежать ее, особенно когда присутствуют как горизонтальные, так и вертикальные полосы.
С точки зрения использования, многие общие проблемы связаны с точностью. Сопоставление полосы прокрутки и дисплея является линейным, поэтому точность использования зависит от размера содержимого. Тогда навигация по меньшему документу будет проще, чем по большому документу
Это также означает, что все части документа подчеркнуты одинаково, и важность каждой части не распознается с помощью полосы прокрутки.
Нечасто указывается, где в содержимом была достигнута прокрутка, если только действие прокрутки не остановлено для просмотра содержимого. Это затрудняет независимо от того, знает ли пользователь, что он ищет, или общую организацию контента. Те, у которых есть индикатор, ограничены предопределенными настройками видимости, количества и стиля. При попытке прокрутки при выполнении такого действия, как выделение, величина прокрутки может не соответствовать желаемой величине, выходить за рамки или предлагать пользователю изменить положение несколько раз. Перерегулирование также может произойти при попытке разместить рядом с верхом или низом отдельной страницы в большом наборе. Попытка регулировки небольшой прокрутки пользователем может привести к увеличению прокрутки, поскольку прокрутка активирует автоматическое действие, переходящее на следующую страницу.
Разные состояние скроллбара
Это селекторы псевдоклассов. Их можно применять к различным элементам скроллбара для изменения внешнего вида, когда скроллбар находится в разных состояниях.
- horizontal — псевдокласс применяется к любым частям скроллбара, имеющим горизонтальную ориентацию.
- vertical — псевдокласс применяется к любым частям скроллбара, которые имеют вертикальную ориентацию.
- decrement — Псевдокласс декремента применяется к кнопкам и элементами трека скроллбара. Он указывает, будет ли кнопка или элемент трека уменьшать положение вида при использовании (например, вверх по вертикальной полосе прокрутки, влево по горизонтальной полосе прокрутки).
- increment — Псевдокласс инкремента применяется к кнопкам и элементами трека скроллбара. Он указывает, будет ли кнопка или элемент трека увеличивать позицию вида при использовании (например, вниз на вертикальной полосе прокрутки, прямо на горизонтальной полосе прокрутки).
- start — Этот псевдокласс применяется к кнопкам и фрагментам трека. Он сообщает, что объект находится перед ползунком.
- end — Этот псевдокласс применяется к кнопкам и фрагментам трека. Он сообщает, что объект находится после ползунка.
- double-button — Псевдокласс применяется к кнопкам и трекам. Он используется для определения является ли кнопка частью пары кнопок, которые находятся на одном конце скроллбара. Для элементов трека он указывает, примыкает ли элемент трека к паре кнопок.
- single-button — Псевдокласс применяется к кнопкам и элементам трека. Он используется для определения того, находится ли кнопка в конце скроллбара. Для элементов дорожек указывает, примыкает ли элемент трека к одной кнопке.
- no-button — Применяется к элементам трека, сообщает, что видимая часть трека приближается к краю скроллбара, другими словами, кнопки в конце трека нет.
- corner-present — Применяется ко всем элементам скроллбара и указывает на наличие угла полосы прокрутки.
- window-inactive — Применяется ко всем элементам скроллбара и сообщает, что окно со скроллбаром в данный момент активно. В последних версиях этот псевдокласс хорошо сочетается с . Мы планируем расширить его работу для любого контента и предложить в качестве нового стандартного псевдокласса.
#
Scroll Bar Requests
The user makes scrolling requests by clicking various parts of a scroll bar. The system sends the request to the specified window in the form of a WM_HSCROLL or WM_VSCROLL message. A horizontal scroll bar sends the WM_HSCROLL message; a vertical scroll bar sends the WM_VSCROLL message. Each message includes a request code that corresponds to the user’s action, to the handle to the scroll bar (scroll bar controls only), and, in some cases, to the position of the scroll box.
The following diagram shows the request code that the user generates when clicking various parts of a scroll bar.
The SB_ values specify the action the user takes. An application examines the codes that accompany the WM_HSCROLL and WM_VSCROLL messages and then performs the appropriate scrolling operation. In the following table, the user’s action is specified for each value, followed by the application’s response. In each case, a unit is defined by the application as appropriate for the data. For example, the typical unit for scrolling text vertically is a line of text.
| Request | Action | Response |
|---|---|---|
| SB_LINEUP | The user clicks the top scroll arrow. | Decrements the scroll box position; scrolls toward the top of the data by one unit. |
| SB_LINEDOWN | The user clicks the bottom scroll arrow. | Increments the scroll box position; scrolls toward the bottom of the data by one unit. |
| SB_LINELEFT | The user clicks the left scroll arrow. | Decrements the scroll box position; scrolls toward the left end of the data by one unit. |
| SB_LINERIGHT | The user clicks the right scroll arrow. | Increments the scroll box position; scrolls toward the right end of the data by one unit. |
| SB_PAGEUP | The user clicks the scroll bar shaft above the scroll box. | Decrements the scroll box position by the number of data units in the window; scrolls toward the top of the data by the same number of units. |
| SB_PAGEDOWN | The user clicks the scroll bar shaft below the scroll box. | Increments the scroll box position by the number of data units in the window; scrolls toward the bottom of the data by the same number of units. |
| SB_PAGELEFT | The user clicks the scroll bar shaft to the left of the scroll box. | Decrements the scroll box position by the number of data units in the window; scrolls toward the left end of the data by the same number of units. |
| SB_PAGERIGHT | The user clicks the scroll bar shaft to the right of the scroll box. | Increments the scroll box position by the number of data units in the window; scrolls toward the right end of the data by the same number of units. |
| SB_THUMBPOSITION | The user releases the scroll box after dragging it. | Sets the scroll box to the position specified in the message; scrolls the data by the same number of units the scroll box has moved. |
| SB_THUMBTRACK | The user drags the scroll box. | Sets the scroll box to the position specified in the message and scrolls the data by the same number of units the scroll box has moved for applications that draw data quickly. Applications that cannot draw data quickly must wait for the SB_THUMBPOSITION request code before moving the scroll box and scrolling the data. |
| SB_ENDSCROLL | The user releases the mouse after holding it on an arrow or in the scroll bar shaft. | No response is needed. |
A scroll bar generates SB_THUMBPOSITION and SB_THUMBTRACK request code when the user clicks and drags the scroll box. An application should be programmed to process either the SB_THUMBTRACK or SB_THUMBPOSITION request code.
The SB_THUMBPOSITION request code occurs when the user releases the mouse button after clicking the scroll box. An application that processes this message performs the scrolling operation after the user has dragged the scroll box to the desired position and released the mouse button.
The SB_THUMBTRACK request code occurs as the user drags the scroll box. If an application processes SB_THUMBTRACK request codes, it can scroll the content of a window as the user drags the scroll box. However, a scroll bar can generate many SB_THUMBTRACK request code in a short period, so an application should process these request codes only if it can quickly repaint the content of the window.
Parts of a Scroll Bar
A scroll bar consists of a shaded shaft with an arrow button at each end and a scroll box (sometimes called a thumb) between the arrow buttons. A scroll bar represents the overall length or width of a data object in a window’s client area; the scroll box represents the portion of the object that is visible in the client area. The position of the scroll box changes whenever the user scrolls a data object to display a different portion of it. The system also adjusts the size of a scroll bar’s scroll box so that it indicates what portion of the entire data object is currently visible in the window. If most of the object is visible, the scroll box occupies most of the scroll bar shaft. Similarly, if only a small portion of the object is visible, the scroll box occupies a small part of the scroll bar shaft.
The user scrolls the content of a window by clicking one of the arrow buttons, by clicking the area in the shaded scroll bar shaft, or by dragging the scroll box. When the user clicks an arrow button, the application scrolls the content by one unit (typically a single line or column). When the user clicks the shaded areas, the application scrolls the content by one window. The amount of scrolling that occurs when the user drags the scroll box depends on the distance the user drags the scroll box and on the scrolling range of the scroll bar. For more information about the scrolling range, see .
The following screen shot shows a rich edit control with vertical and horizontal scroll bars, as they might appear in Windows Vista. The vertical scroll bar is currently «hot» because the mouse pointer was hovering over it when the screen shot was taken.
Images
SlideshowSlideshow GalleryModal ImagesLightboxResponsive Image GridImage GridTab GalleryImage Overlay FadeImage Overlay SlideImage Overlay ZoomImage Overlay TitleImage Overlay IconImage EffectsBlack and White ImageImage TextImage Text BlocksTransparent Image TextFull Page ImageForm on ImageHero ImageBlur Background ImageChange Bg on ScrollSide-by-Side ImagesRounded ImagesAvatar ImagesResponsive ImagesCenter ImagesThumbnailsBorder Around ImageMeet the TeamSticky ImageFlip an ImageShake an ImagePortfolio GalleryPortfolio with FilteringImage ZoomImage Magnifier GlassImage Comparison Slider
Свойства, унаследованные от класса Control
| Имя свойства | Краткое описание | |
| Anchors | Свойство Anchors определяет позицию компонента, размещенного внутри контейнера. |
|
| Animation | Свойство Animation устанавливает параметры анимации для компонента. |
|
| Bottom | Свойство Bottom устанавливает отступ снизу при размещении компонента внутри LayoutPanel. |
|
| Content | Свойство Content устанавливает содержимое компонента. |
|
| ContextMenu | Свойство ContextMenu устанавливает контекстное меню для компонента. |
|
| Data | Свойство Data предназначено для хранения любых пользовательских данных. |
|
| DataContext | Свойство DataContext содержит объект с данными. |
|
| Enabled | Свойство Enabled устанавливает, является ли компонент доступным для использования. |
|
| Height | Свойство Height устанавливает высоту компонента. |
|
| IsResizable | Свойство IsResizable определяет, можно ли изменять размеры компонента. |
|
| IsRTL | Свойство IsRTL устанавливает направление текста справа налево. |
|
| IsVisible | Свойство IsVisible определяет, отображается ли компонент. |
|
| Left | Свойство Left устанавливает отступ слева при размещении компонента внутри GridPanel. |
|
| Offset | Свойство Offset определяет координаты корневой DOM-вершины элемента управления. |
|
| Opacity | Свойство Opacity определяет прозрачность компонента. |
|
| Parent | Свойство Parent определяет родительский компонент элемента управления. |
|
| ParentNode | Свойство ParentNode устанавливает родительскую DOM-вершину. |
|
| ResourceKey | Свойство ResourceKey устанавливает ресурсный ключ для компонента. |
|
| Right | Свойство Right устанавливает отступ справа при размещении компонента внутри LayoutPanel. |
|
| Rotate | Свойство Rotate устанавливает угол поворота компонента. |
|
| ShowToolTip | Свойство ShowToolTip определяет, включена ли возможность отображать всплывающую подсказку компонента. |
|
| Style | Свойство Style устанавливает стиль для компонента. |
|
| TabIndex | Свойство TabIndex задает последовательность перехода элемента управления внутри контейнера. |
|
| Tag | Свойство Tag устанавливает JSON-объект, ассоциированный с компонентом. |
|
| ToolTip | Свойство ToolTip определяет текст всплывающей подсказки компонента. |
|
| Top | Свойство Top устанавливает отступ сверху при размещении компонента внутри GridPanel. |
|
| Value | Свойство Value задает значение компоненту. |
|
| Width | Свойство Width устанавливает ширину компонента. |
Scroll Bar Visibility
The system hides and disables a standard scroll bar when equal minimum and maximum values are specified. The system also hides and disables a standard scroll bar if you specify a page size that includes the entire scroll range of the scroll bar. This is the way to temporarily hide a scroll bar when it is not needed for the content of the client area. There is no need to make scrolling requests through the scroll bar when it is hidden. The system enables the scroll bar and shows it again when you set the minimum and maximum values to unequal values and when the page size does not include the entire scroll range. The ShowScrollBar function can also be used to hide or show a scroll bar. It does not affect the scroll bar’s range, page size, or scroll box position.
The EnableScrollBar function can be used to disable one or both arrows of a scroll bar. An application displays disabled arrows in gray and does not respond to user input.
Goals & Features
- A simple, powerful and good documented API.
- High browser compatibility (IE8+, Safari6+, Firefox, Opera, Chrome and Edge).
- Usage of the most recent technologies to ensure maximum efficiency and performance on newer browsers.
- Can be used without any dependencies or with jQuery.
- Automatic update detection — after the initialization you don’t have to worry about updating.
- Extremely powerful scroll method with features like animations, relative coordinates, scrollIntoView and more.
- Mouse and touch support.
- Textarea and Body support.
- RTL Direction support. (with normalization)
- Simple and effective scrollbar-styling.
- Rich extension system.
- TypeScript support.